Documentation Series

Learn About VISP App Dashboard

Help Documentations / Reports / Reports in VISP

Reports in VISP

In the UBO, you can access the Reports Center by clicking on the Reports menu.

You can view the Reports Center and all available reports in the VISP Web App by going to the App launcher menu in the upper-right corner of the screen.

  1. Click on the General tab.
  2. Select Reports.
  3. Reports are organized into different categories.
    1. For Billing related reports, for example, click here.
  4. You will notice to the right of a specific report you have several options available.
  5. To open the report in a new tab, click on the external link icon.
  6. To export the report to a CSV file, click on the note icon right in the middle of the external link and the favorite icon.
  7. Lastly, to bookmark or save the report to your Favorites, click on the star icon.
    1. Your report should now appear in the Favorites section.

Reports in VISP - Visp web app documentation

Reports in VISP - Visp web app documentation

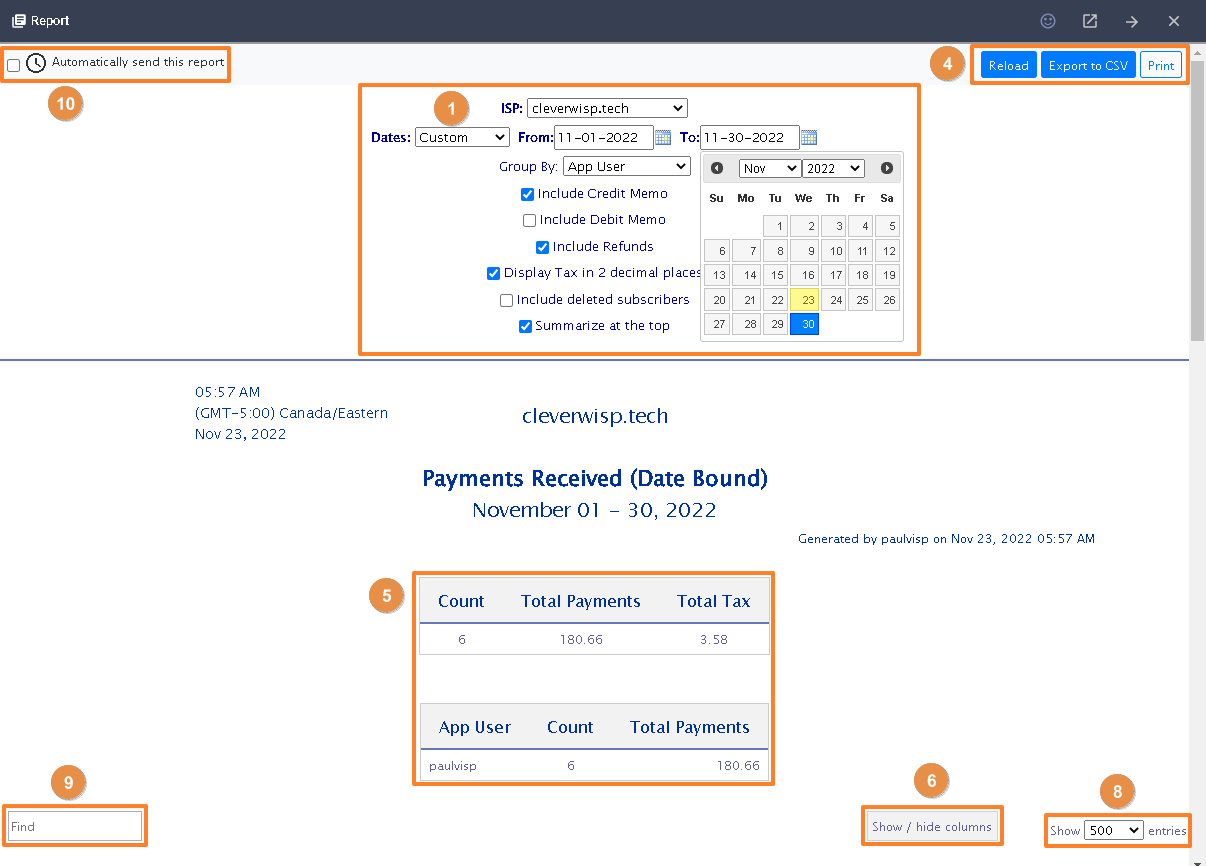
  1. A report may be date-bound, meaning you can sort the data according to a specific date range.
  2. If you’re using multiple brands, select an ISP or account from the dropdown.
  3. Whenever you make changes to the options or enable or disable additional criteria, reload the report to refresh the data.
  4. Here you can also Export the report to a CSV file or send it to your printer, or export a PDF copy of your current view.
  5. Some reports may contain a summary of the different sets or categories of data being displayed. Other reports will not have this information.
  6. You can display additional columns on the report by clicking on the Show/Hide columns option, if available.
  7. Check the box of the columns you want to see and uncheck the columns you want to be hidden from view.
  8. You may limit the number of entries displayed on the report. The more entries shown on a single page, the more time it will take for the data to load. Scroll to the bottom of the report to open different data pages.
  9. To filter reports based on available data from any of the categories, use the Find bar.
      1. In this example, let’s filter New Customers based on City.
      2. Type the city on the Find bar, and you will see the data filtered in real-time.
      3. You can export a copy of your current or filtered view by clicking on the Export to CSV button.
      4. After downloading your CSV file, you can make additional customizations via your spreadsheet application.
  10. You may receive snapshots of your report for a given period. Enable the option to “Automatically send this report” to a specific user.
      1. Select the Frequency of the report.
      2. And then add the email address of your recipient.
      3. You may select additional options of information to be included if available.
      4. Save your work when done.

For more information about this and all other features in VISP, reach out to your VISP Client Success Team today.

1. Generate your FCC 477 Subscription and Deployment Reports.

To generate your FCC 477 Subscription and Deployment Reports in VISP, go to your Reports > FCC 477. Select the report(s) you want to generate. Note: In order to generate your FCC Broadband Deployment Report, your site or tower information must be added in VISP,…

2. Checking a Subscriber’s Usage

Account Manager Each subscriber can monitor his/her usage via the online Account Manager. As the ISP Administrator, you can also do this and you also have access to an exclusive usage report about all of your involved subscribers. You and, to a certain extent, your…

3. How to display reports on the dashboard?

VISP dashboard is the first screen you will see when logging in to your account. It will provide you with useful information related to your billing account. It also allows you to display specific information to streamline your daily processes. This includes…

4. Report Builder

A report builder is a tool that allows users to provide entities and conditions to generate a custom report. How to Use the Report Builder? Go to the Main Menu > Reports. Click on the Report Builder tab Create a new report by clicking on the Add New button. Type…

5. Reports in VISP

You can view the Reports Center and all available reports in VISP by going to the menu. Click on the General tab. Select Reports. Reports are organized into different categories. For Billing related reports, for example, click here. You will notice to the right of a…

6. Report Reference

REPORT TYPE VISP Reports LEADS 1 Total Active Leads Reports > Subscriber > New User Report (Date Bound) 2 Newly Added Active Leads (weekly) New User Report (Date Bound) 3 Newly Lost Leads (weekly) Deleted Customers Report 4…

7. ISP Logs

The ISP log section serves as a historical audit trail within the system, allowing for the search and review of specific changes based on user actions. Features include: A search bar for pinpointing specific details within the log. A date range filter to narrow down…

8. Report Builder

Visp’s Report Builder lets you create custom reports where you can choose the fields and set specific conditions. Here are some tips when adding new reports: Define the Purpose of the Report : Determine what questions this report is meant to answer. For example, it…

9. Dashboard Widgets

Use the Dashboard in your App Launcher or Settings menu to create and manage custom Dashboard report widgets. Here are some tips when creating and using the dashboard widgets: Be Clear and Concise When Naming Your Widgets Clarity: Choose names that clearly describe…
?