

Profiles are the backbone of your equipment management system. They provide the structure and essential details the software needs to understand and effectively work with your equipment.
-
- Predefined Templates: Profiles act as templates that outline the expected information for each type of equipment. This ensures consistency in recording data for each item, making it easier to search, filter, and analyze your inventory later.
- Data Accuracy: Profiles help prevent errors and omissions during data entry by defining the required fields for each equipment type.
Creating profiles before adding equipment lays the foundation for an organized, efficient, and insightful equipment management system.
-
- Streamlined Workflows: With profiles in place, adding new equipment becomes quick and easy. You select the appropriate profile, and the software automatically populates the relevant fields, saving you time and effort.
- Improved Tracking: By associating equipment with specific profiles, you can easily track their location, status, warranty information, and other critical details. This makes managing maintenance schedules, troubleshooting issues, and planning upgrades easier.
Here are some key points to remember:
-
- Inventory Profile: Focuses on the physical item (model, manufacturer, SKU).
- Equipment Profile: Determines how the item will function in your network (CPE, AP, Antenna, etc.).
- Metadata: Adds extra details to help you manage and track your equipment effectively.
- Event Scripts (Advanced): This section allows for automation, but it’s a separate topic for later.
How to Add the Profile for Your Access Points (APs)??
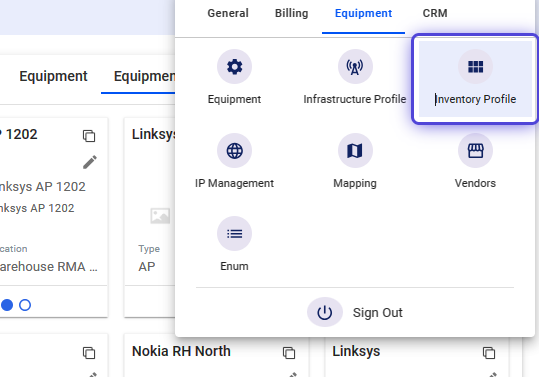
1. Click the nine-dot menu in the upper right corner to open the VISP Admin Page.
-
- Go to the Equipment tab.
- Click on Inventory Profile .
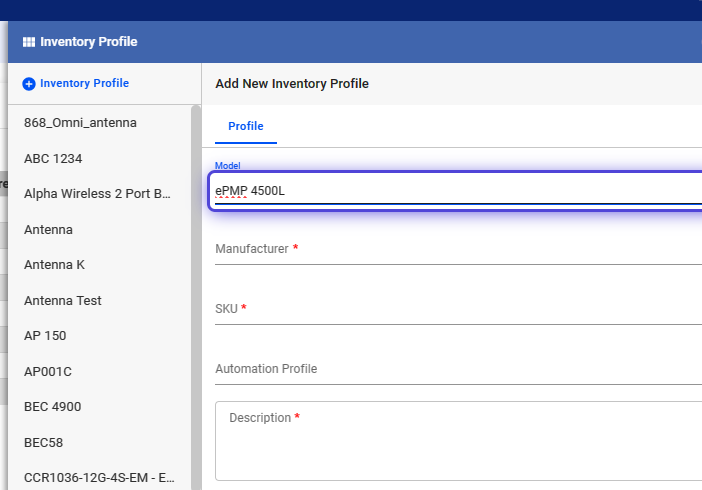
2. Click the blue “+” button next to the “Inventory Profile” label.
An Inventory Profile is only a framework or blueprint with pre-designed metadata fields for filling in custom and relevant information about specific devices.
Fill in Profile Details:
-
- Model: Enter the exact model name of your equipment (e.g., “Ubiquiti NanoStation M5”).
- Manufacturer: Select the manufacturer from the dropdown list (e.g., “Ubiquiti”).
- SKU (Stock Keeping Unit): If applicable, enter your internal SKU for this model. ISPSupplies.com has a database of devices and their SKU’s. You can refer to their website for additional details.
- Description: Provide a brief description of the equipment (optional).
- Metered: Leave this unchecked unless the equipment involves metered usage (e.g., cable length).
- The Automation Profile field is no longer available in recent app versions.
Click on Add to continue,
How to Add the AP Equipment Profile?
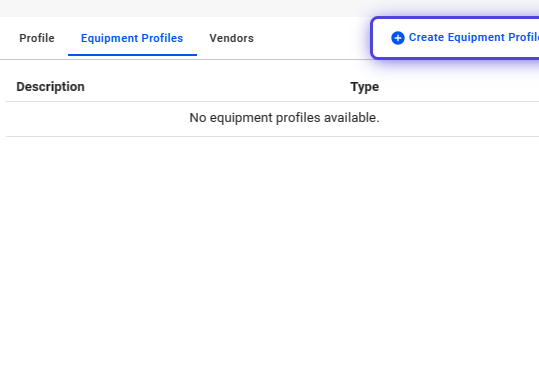
3. Click on Create Equipment Profile
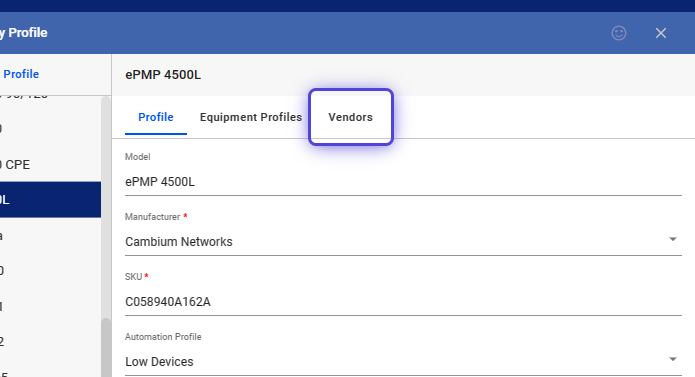
After saving the Inventory Profile, two new tabs will appear: Equipment Profiles and Vendors .
Click on the Equipment Profiles tab.
Click the blue “+” button, next to “Create Equipment Profile”
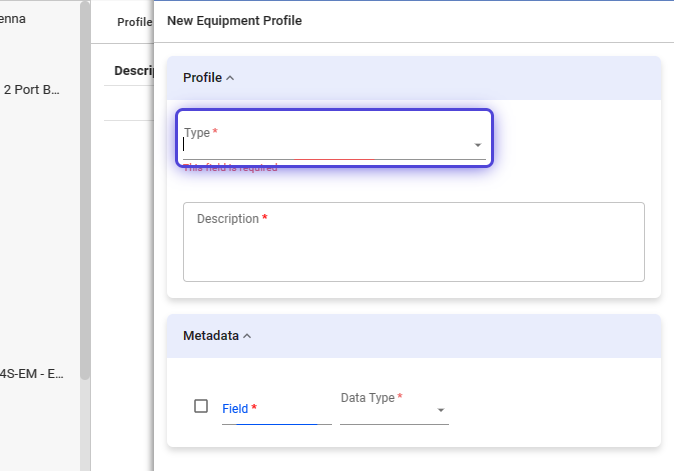
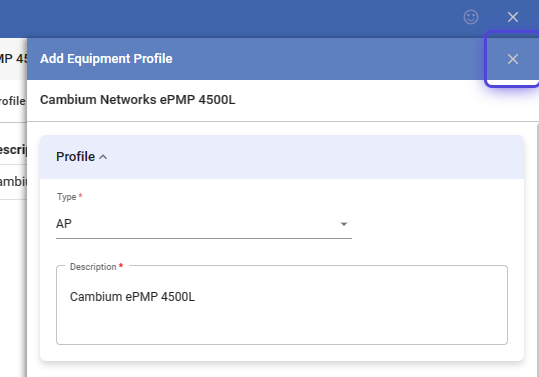
4. Define the Equipment Type
- Type: Use the dropdown to select the correct type for your equipment:
- Access Point (AP)
- Antenna
- CPE (Customer Premises Equipment)
- Subscriber Module (SM)
- Subscriber
- LTE SIM
- (Other relevant types)
- Description: Write a short description to help identify the equipment in your inventory.
- Add Metadata (Optional):
- In the Metadata section, you can define custom fields to store additional information about the equipment.
- Field: Enter the name of the metadata (e.g., “Frequency,” “Gain”).
- Data Type: Select the appropriate type from the dropdown (e.g., “Numeric,” “Text,” “Boolean”).
- Click “Add” to create the Equipment Profile.
5. Click on the X icon to close the panel.
How to Add Vendor Information?
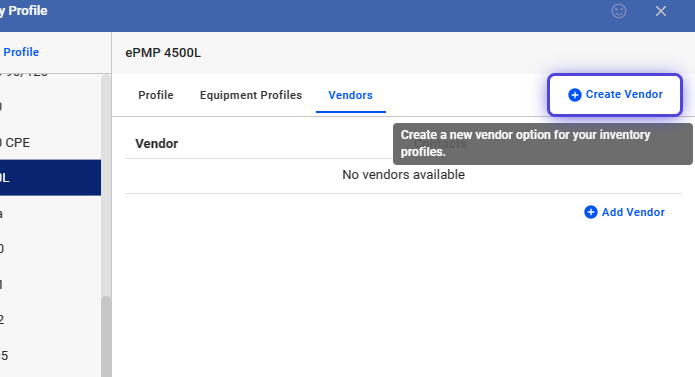
6. After saving the Equipment Profile, you’ll see the Vendors tab next to the Equipment Profiles tab. Click on it.
7. To Create a Vendor profile, click on “Create Vendor.”
Once you’ve created your Equipment Profile, it’s time to link the equipment to its vendor. This helps track where your equipment comes from and aids in future purchases (PoM or Purchase Order Management) or warranty claims.
On this page, you have two options:
- Option A: Add an Existing Vendor
- If you’ve already added this vendor to the system:
- Click on the (+) ” Add Vendor ” button.
- Use the dropdown and select the vendor’s name from the list.
- If you’ve already added this vendor to the system:
- Option B: Create a New Vendor
- If this is a new vendor:
- Click the blue “+” button labeled Create Vendor .
- If this is a new vendor:
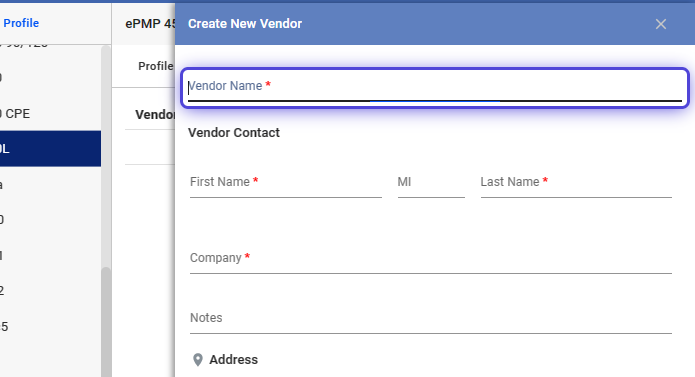
8. Enter Vendor Details
- Vendor Name: Type in the official name of the company.
- Contact Information:
- First Name: Enter the first name of the vendor’s main contact.
- Middle Initial (Optional): Add the middle initial, if applicable.
- Last Name: Enter the last name of the vendor’s main contact.
- Company: If the contact person is associated with a specific department within the vendor company, enter it here.
- Notes: Add any additional notes or relevant information about the vendor (e.g., preferred payment terms).
- Enter Vendor Address:
- Address 1: Start typing the vendor’s address. The system should auto-suggest addresses for accuracy. Select the correct one if it appears.
- City, State, Zip Code: These fields should automatically populate if you chose an address from the auto-suggest. If not, enter them manually.
- Enter Contact Details:
- Email: Type the contact person’s email address.
- Use the dropdown to select if it’s their Primary or Secondary email.
- Phone Number: Enter the contact person’s phone number.
- Use the dropdown to select if it’s their Home , Mobile , or Work phone.
- Email: Type the contact person’s email address.
- Save the Vendor Information:
- Review all the information you’ve entered to ensure accuracy.
- Click the “Add” button to save the new vendor information or link the existing vendor to the equipment.
- Fields with red asterisk are required.
Note
- After you create the vendor, add the vendor to the equipment profile.
- You can add multiple vendors to your equipment.
Why Certain Equipment Profile Have Unique Meta Data?
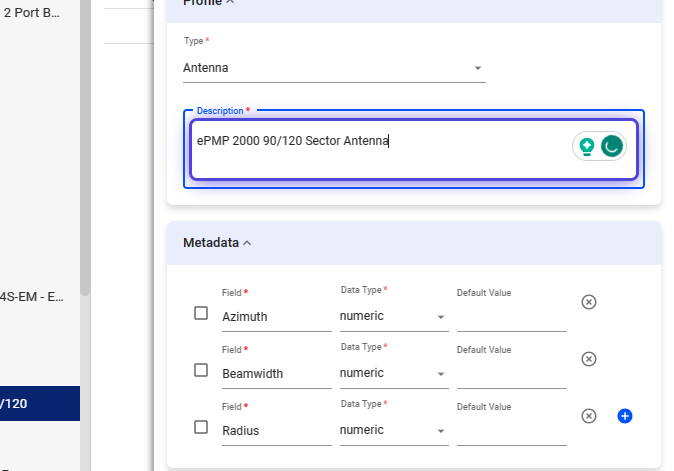
9. Reminders When Adding Antenna Equipment Profile
-
Note: Some equipment types, like antennas, have unique metadata requirements. For example, antenna profiles often include fields for “Azimuth,” “Beamwidth,” and “Radius.” This data is essential for generating accurate coverage maps within the software.
-
Field: Enter the name of the metadata (e.g., “Frequency,” “Gain,” “Azimuth,” “Beamwidth,” “Radius”).
-
Data Type: Select the appropriate type from the dropdown (e.g., “Numeric,”).
-
Click “ Add ” to create the Equipment Profile.
-
10. Required Equipment for Displaying Coverage Maps
Coverage Maps: To display coverage maps accurately, you’ll need to create separate Equipment Profiles for both the Access Point and the Antenna. These components work together to determine the coverage area.
Metadata for Antennas: When adding an antenna profile, include the required metadata fields (Azimuth, Beamwidth, Radius) with the correct data type (integer). This will enable the software to calculate and visualize the coverage area accurately.
- Wireless Infrastructure Location (Sub-Location / Sector)
- Create Profile and Add Equipment for AP + Antenna Assembly
- Configure Metadata for Azimuth, Beamwidth, and Range in your Antenna Profi
💡 For more information about this and all other features in Visp, reach out to your Visp Client Success Team today.
Phone: 541-955-6900Email: success@visp.net
Open a ticket via www.visp.net/ticket