Documentation Series

Learn About VISP App Dashboard

Help Documentations / Networks / Assigning a Static IP Address

Assigning a Static IP Address

When assigning static IP addresses through Visp.net, we recommend setting the IP into static if it is not included in the DHCP server’s address pool. Visp can’t tell Mikrotik which IP is not available for leases. When the static option is enabled, the RADIUS will provide it to the Mikrotik router as a Framed-IP-Address attribute. After authentication, Mikrotik configures it to the user, causing IP conflicts if DHCP assigns the same IP to another device.
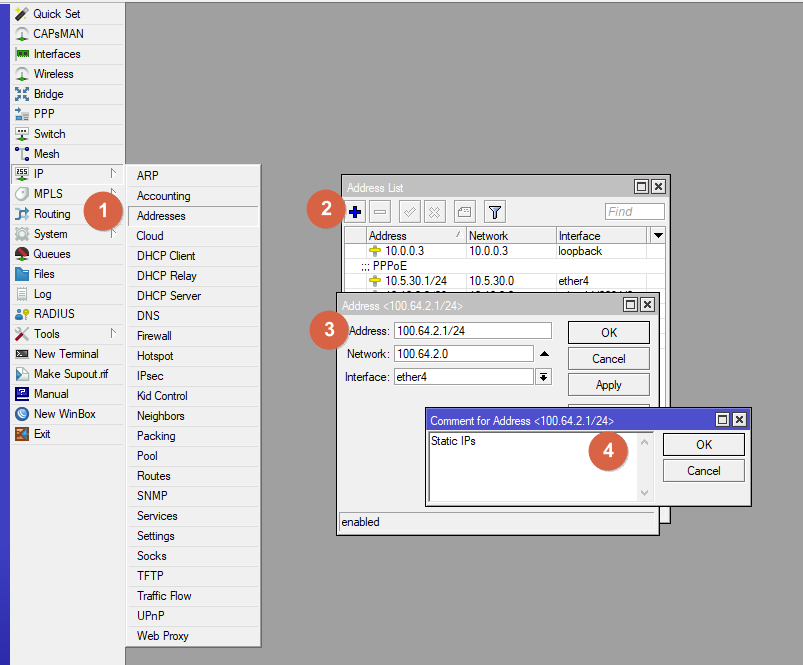
Mikrotik Settings

  1. Go to IP > Addresses
  2. On the IP address window, click on the + button to add the new IP address.
  3. Specify the network address for the static IPs, and add it to the customer-facing interface. In this example, ether4.
  4. Add a comment and save that new setting.
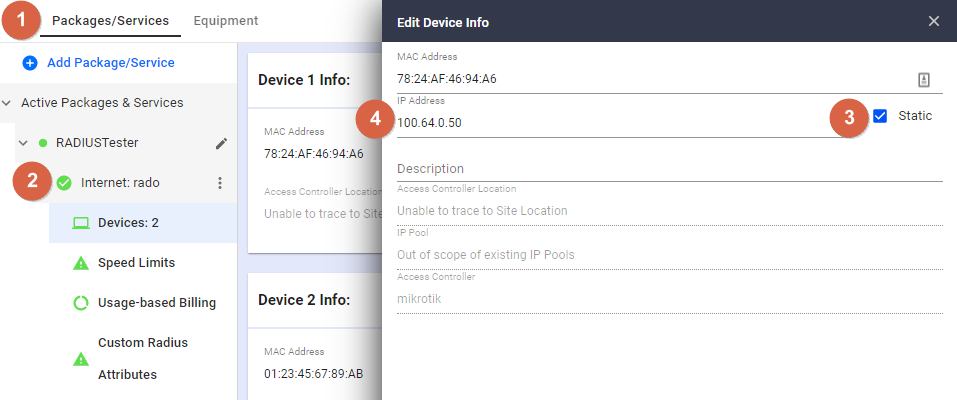
Assigning a Static IP Address - Miktotik settings

VISP Settings

  1. Go to the subscriber’s account, and click on the package and services.
  2. Click on Internet > Devices, then click on the vertical ellipsis and select Edit.
  3. Enable the static option by clicking the checkbox.
  4. Provide the static IP address.

Assigning a Static IP Address - Visp App

1. Allow Pre-signup Authentication

Let’s say you have a building that buys internet access from you that it supplies free and anonymously for all tenants. You earn revenue from the main connection but also when tenants upgrade to faster packages. Before, each of those tenants could not connect their…

2. Set-up SmartSession Authentication

VISP’s HyperRadius has many unique powerful features, one of which is SmartSession. SmartSession will allow you to make changes to your subscribers that are authenticated on Mikrotik devices, on the fly, including disconnects and package speed changes, right from…

3. Assigning a Static IP Address

When assigning static IP addresses through Visp.net, we recommend setting the IP into static if it is not included in the DHCP server’s address pool. Visp can’t tell Mikrotik which IP is not available for leases. When the static option is enabled, the RADIUS will…

4. Location ID

Setting up a location ID for your internet package allows you to: Restrict the location where the package is displayed on the signup page. Apply location-based authentications. Use the location ID of the customer’s subscribed package to filter the upgrade package list…

5. RADIUS Configuration

This section configures your Mikrotik router to communicate with the Visp.net HyperRADIUS servers. Critical Note: For the Multi-ISP setup, you must use these proxy servers: 52.37.68.81 and 52.11.17.135. Primary Click Radius (left) and click (+) symbol to add a radius…

6. Mikrotik DHCP Configuration

Client Isolation Recommendations AP’s should use Client-Isolation. This reduces load and improves reliability. Repeating broadcast messages between subscribers increases network load and can allow for rogue DHCP servers or other broadcast services to exist on the…

7. PPPoE Configuration

These instructions assume that you have a new Mikrotik with little to no existing configuration. It specifies certain IP ranges which are commonly used; however, you can replace the IP ranges referenced below with your own custom ranges if you wish. Likewise, if you…

8. Mikrotik Hotspot Configuration

Initial Setup If you’re using a new Mikrotik router, we recommend resetting the device to remove the preinstalled configuration as it contains settings you will probably not need. You may also need to upgrade your RouterOS to the latest stable version, from…

?