Documentation Series

Learn About VISP App Dashboard

Help Documentations / Subscriber / Send Text Messages (SMS)

Send Text Messages (SMS)

Create a Twilio Account

The Short-Messaging-Service (SMS) feature in VISP allows you to send text messages to your customers, technicians or vendors.

To set this up, you must first create a Twilio account. Go to https://www.twilio.com/try-twilio and register, or login via https://www.twilio.com/login to use an existing Twilio account.Send Text Messages (SMS) - Visp App

After signing in to your Twilio account, go to your dashboard.

Send Text Messages (SMS) - Visp App

Get Your Phone Number, Account SID and Auth Token

On your dashboard, do the following:

  1. Get a new phone number from Twilio, or use the limited trial number if you’re simply testing the service. If you have an old number you want to use, you can port it over to Twilio.
  2. Get a copy of your Account SID and Auth Token.

Note: Porting a phone number can take up to four weeks to finish.

To buy a new phone number, go to Phone Numbers > Manage > Buy a number

Enable Self-Service Links

To set up the ability for your customers to receive notifications on their ticket numbers and account balance, enable the messaging webhook on Twilio. Follow the instructions below:

After buying a phone number from Twilio or after setting up your limited trial number, go to your Active Numbers list, by clicking on Phone Numbers > Manage > Active Numbers, on the left sidebar.

Send Text Messages (SMS) - Visp App

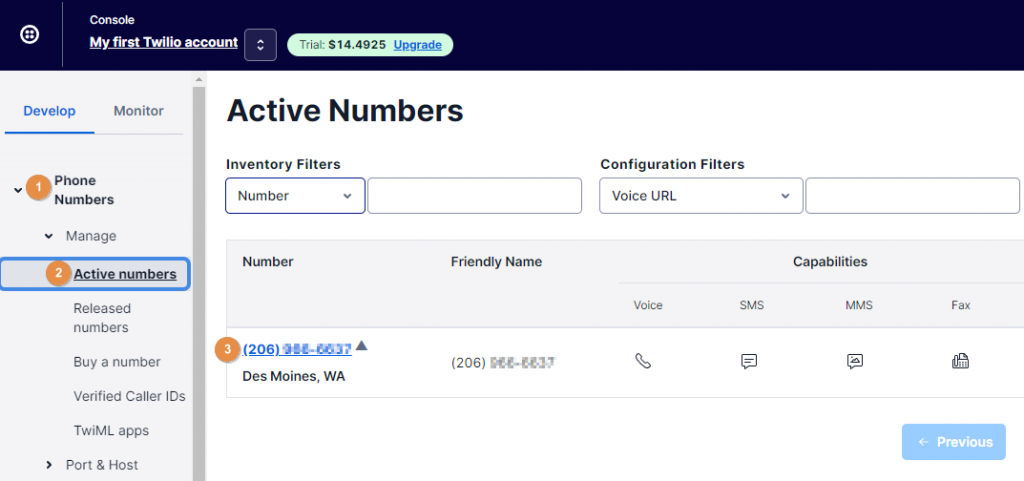
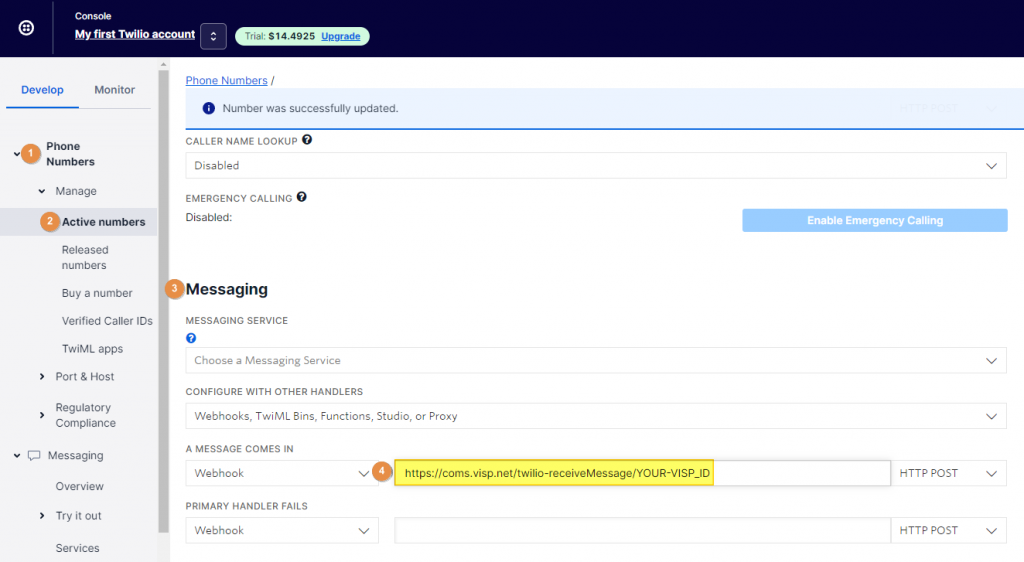
Next, click on your phone number to open the configuration page. Scroll down to get to the Messaging section.

In the section that says, “A message comes in,” make sure the dropdown option says Webhook and then add a link to the next field that points to https://coms.visp.net/twilio-receiveMessage/

IMPORTANT: The complete link should contain your VISP ID. To get your VISP ID, contact your VISP success team via chat or through email at success@visp.net.

Your final URL should display something similar to this example: https://coms.visp.net/twilio-receiveMessage/123456

Send Text Messages (SMS) - Visp App

Setup VISP Integration

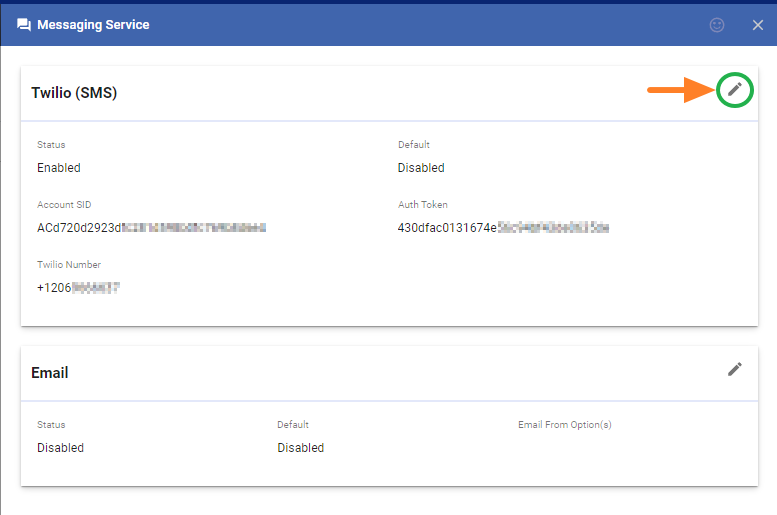
Go to your Menu and select the Messaging Service feature.

Send Text Messages (SMS) - Visp App

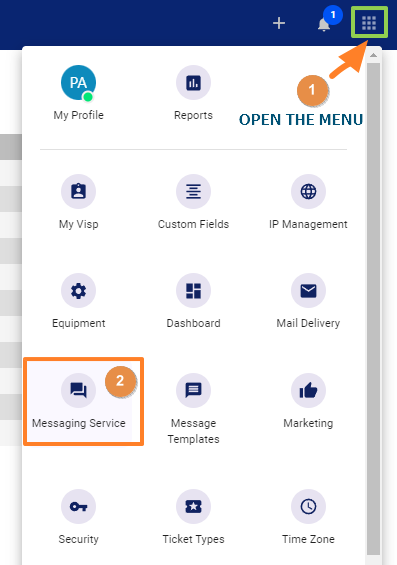
In the Messaging Service window, click on the pencil icon to edit the Twilio option in VISP.

Send Text Messages (SMS)

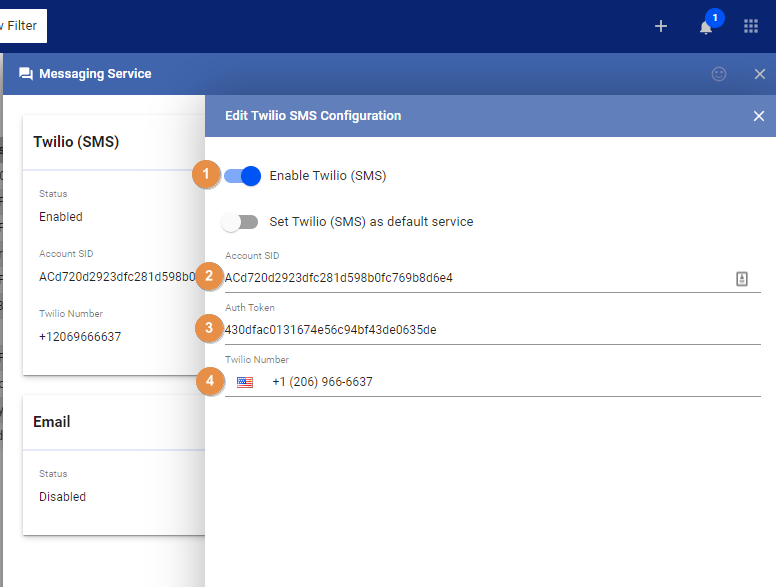
In the Twilio Configuration page, do the following:

  1. Enable Twilio (SMS)
  2. Enter your Account SID
  3. Enter your Auth Token
  4. Add your Twilio Number
  5. Save your work when done.

Send Text Messages (SMS) - Visp App

A separate window will open that completes the setup.

Send Text Messages (SMS) - Visp App

Sending SMS

To test if the setup is successful, do the following:

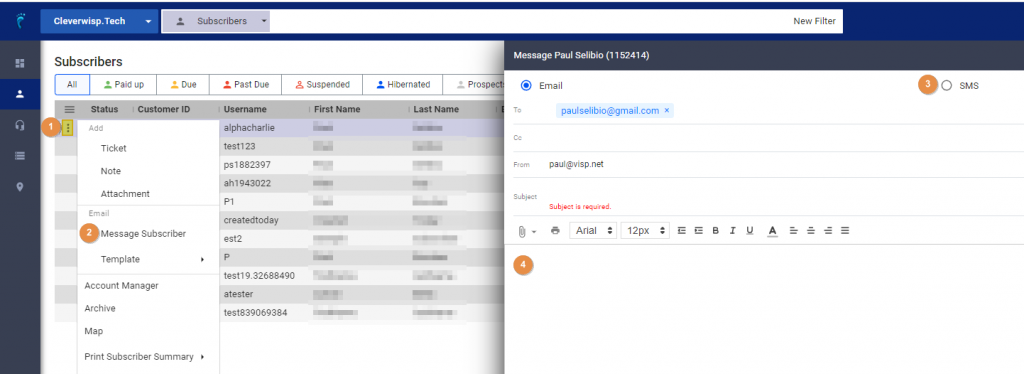
  1. Go to your Subscriber’s list, hover and click on the vertical ellipsis on the subscriber you want to send a message to.
  2. Click on Message Subscriber in the selection.
  3. A window will open. Click on the SMS radio button.
  4. Write your message.
  5. Save or Send your work.

Send Text Messages (SMS) - Visp App

Receiving Replies on Tickets via SMS

Here are some of the commands accepted by your Twilio phone number, to allow customers to check ticket status or reply to existing tickets.

The command below allows your customers to reply to existing tickets in VISP

TICKET REPLY , e.g. TICKET 12345 REPLY Thanks for the update!

The command below allows your customers to check on the status or updates from a ticket.

TICKET e.g. TICKET 12345

The command below allows your customers to view their current balance.

BALANCE

The command below allows your customers to process and pay for their bills through the VISP portal.

PAYNOW

Your customers can get their ticket numbers and details from their account management portal, or you can do a notification blast to your customers containing their ticket numbers.

Send Text Messages (SMS) - Visp App

At the moment, creating tickets can be done via email only, or by having your staff internally creating the ticket from customers that text or send their questions or requests via SMS.

1. Enable Email Notification for New Signups

You can get notifications emailed to you or your team when a new subscriber signs up for service. This is an internal message only, and cannot be edited. To access the feature, Main Menu > My Visp. In the My Visp panel, click on the pencil icon in the Primary…

2. Send Text Messages (SMS)

Create a Twilio Account The Short-Messaging-Service (SMS) feature in VISP allows you to send text messages to your customers, technicians or vendors. To set this up, you must first create a Twilio account. Go to https://www.twilio.com/try-twilio and register, or login…

3. Send to VISP Print House Automatically

You can now schedule invoices to be sent to the VISP Print house for printing. The VISP print house handles sending paper invoices to your subscribers. To enable the setting, go to the Main Menu > Invoicing. Click on Paper Invoice. Under Print House Schedule, put a…

4. Deleting a Subscriber

For UBO or desktop (Java) version, refer to this link. Note that deleting a subscriber means cutting his or her entire account from VISP, so he or she will not be able to access any of your services at all. We advise that you consider a ‘grace period’ before deleting…

5. Send a Mass Email

For UBO or desktop (Java) version, refer to this link. The Mass Email feature allows you to select a list of subscribers and send an email to them all at once. Here is how you schedule a mass email: Open the subscriber’s list. Click on the hamburger menu and select…

6. Scheduled and Triggered Emails

A scheduled email is a message that goes out to your subscribers on a specified date and time. A trigger, on the other hand, is sent when a specific event or action happens, (e.g., when a subscriber’s credit card is expired.). To open the feature where you can select…

7. Attach Files to Emails

If you need to send an email to a particular subscriber and attach files to it, you can do it directly within VISP. If you’re sending a mass email, click on the hamburger menu in the subscriber’s list and select Email this list. Once the email editor is open, you’ll…

8. Filters

For UBO or desktop (Java) version, refer to this link. If you are keeping track of or performing the same set of operations to a specific list of subscribers, the saved filters will be a convenient way to handle them. To add or edit your subscriber’s filters in VISP,…

9. Add Prospects or Subscribers

To add a new subscriber, simply click on the plus sign on the upper-right corner of the page and select Prospect or Subscriber once and you’ll be redirected to the mapping category or interface. Do the following: First, fill out all the information on the page….

10. Allow Customers to Create Their Passwords

For PCI compliance customers are given the ability to create a password for their account when they are first added to the system. When a new user is added to VISP, a password reset link is sent to the customer’s email address so that the customer can create a…

11. SMS Auto–Responder

The auto-responder feature allows you to create and present a user-friendly self-service menu for your customers who communicate via text or SMS. This feature allows your customers to get more information, list tickets, do essential account management, and access…

12. Portal Alerts or Notifications

You can now display alerts or messages on your subscribers’ portal. To enable the feature, and post an alert or message, follow these steps: Go to the Menu Click on the CRM tab Go to Message Templates Select the Customer Portal Message option. Select a template from…

13. Add Customers to VISP

There are two common ways to enter customer information in VISP By manually entering the customer information or Using the signup form. Let’s first discuss manually adding customer information to the VISP software. Click on the plus sign + in the upper-right corner of…

14. Process NACHA Payments

Does your bank support NACHA? It’s a quick, secure, and reliable payment gateway through the National Automated Clearing House Association (NACHA) network. Why process your customers’ eCheck payments via NACHA? low transaction fees (contact your bank), quick…

15. Add a New Filter

Add a New Filter – Visp Documentation To add a new filter in VISP, do the following: Go to your Subscriber’s list. Click on the search bar, and hit New Filter. In the first field, identify the source of the data. In the second field, identify the operator….

16. Create and Customize a Filter

To add a new filter in VISP, do the following: Go to your Subscriber’s list. Click on the search bar, and hit New Filter. In the first field, identify the source of the data. In the second field, identify the operator. Lastly, enter the value or criteria you want to…

17. Mass Email Editor

How to Open Mass Email Editor To send a mass email with the use of Filters, first launch your Mass Email Tool. Go to the Menu Click on the CRM tab Go to Message Templates Email Delivery and Automation There are two types of email delivery in VISP, and you can…

18. Add a Prospect or Subscriber

1. Click the nine-dot menu in the upper right corner to open the VISP Admin Page. 2. Click on “Add Prospect or Subscriber” 3. Fill out the form. Fields with a red asterisk (*) are required. 4. Type the customer’s address. The Address field offers suggestions, making…

19. Source and Source Details

1. When adding a prospect or subscriber, either manually or via online form, you can enter the Source and Source Details. The terms “source” and “source detail” in Visp refer to the origin or channel through which a person was referred to a particular service or…

20. Subscriber Payment Workflow

How to Process a One-Time Payment? 1. Click on Subscribers 2. Search for the subscriber or select from the list. 3. Click on Payments 4. Click and add a memo or note. 5. Input the amount. 6. Or select invoices to distribute the payment to. 7. Click on the Payment…

21. Subscriber Tickets

How to Open or Create a New Ticket? 1. Click and open the Subscribers list. Search for the subscriber or select from the list. 2. In the Tickets section, click on the blue plus icon. 3. Alternatively, in the upper-right corner of the app, click on the plus icon. This…

22. Add a Package to a Prospect or Subscriber

1. Click on Subscribers 2. Search for the subscriber or select from the list. 3. Click on the plus icon in the Packages/Services section. 4. Using the pop-up list of Packages/Services, select a package. 5. Click on Add and Configure How to Set the Bill Start Date and…
?