

Does your bank support NACHA?
It’s a quick, secure, and reliable payment gateway through the National Automated Clearing House Association (NACHA) network. Why process your customers’ eCheck payments via NACHA?
- low transaction fees (contact your bank),
- quick processing times,
- streamline your disbursement process.
Contact your bank today and find out if you can submit and process eCheck payments via NACHA.
VISP now supports the processing of eCheck payments via NACHA. This is a quick, secure, and reliable payment gateway that is processed through the National Automated Clearing House Association (NACHA) network. A few of the advantages of processing your customers’ eCheck payments via NACHA are the low transaction fees, quick processing times, and zero chargebacks.
Activate the NACHA Payment Gateway

To activate and set NACHA as a default option for processing eCheck payments, do the following
- Open the
Menu - Click on the
Billingtab - Select
Payments - Next, select the
Payment Gatewaystab - Click on NACHA.
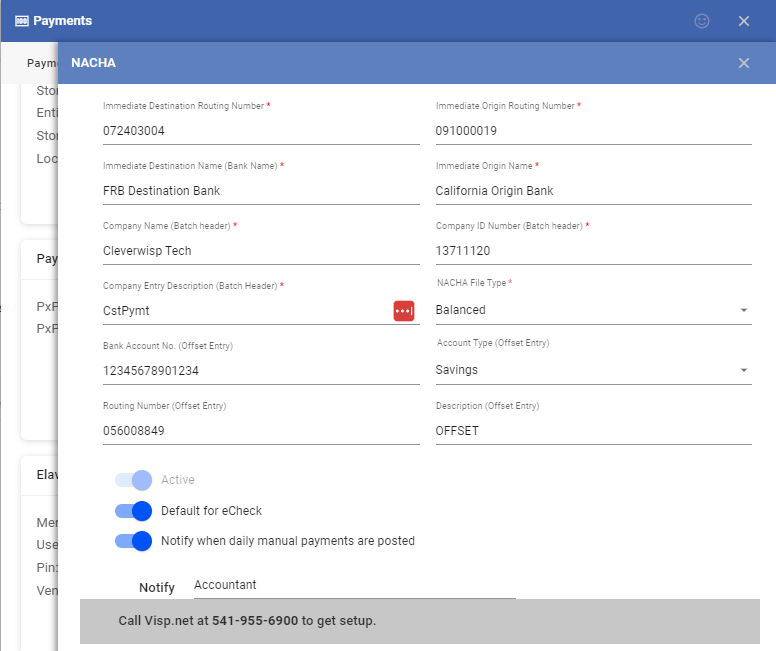
- To activate NACHA, provide the necessary information on the available fields. Consult with your bank for the details:
- Immediate Destination Routing Number
- Immediate Destination Name (Bank Name)
- Immediate Origin Routing Number
- Immediate Origin Name
- Company Name
- Company Entry Description (Batch header)
- Company ID Number (Batch header)
- NACHA File Type
- Bank Account Number (Offset Entry)
- Account Type (Offset Entry)
- Routing Number (Offset Entry)
- Description (Offset Entry)
- Toggle “Active” if you want to enable and use the NACHA payment gateway.
- Toggle the Default for eCheck option if you want NACHA to be the primary gateway when processing echeck payments.
- Toggle “Notify when daily manual payments are posted” and click on the Notify field. Add the name and email of the user or group you want to notify when any eCheck payments are posted.
- Save your work when done.
Setup NACHA for eCheck Customers
After you enable and configure NACHA, go back to your subscriber list. Select a subscriber who currently pays or plans to pay via echeck, and make the following changes:
-
-
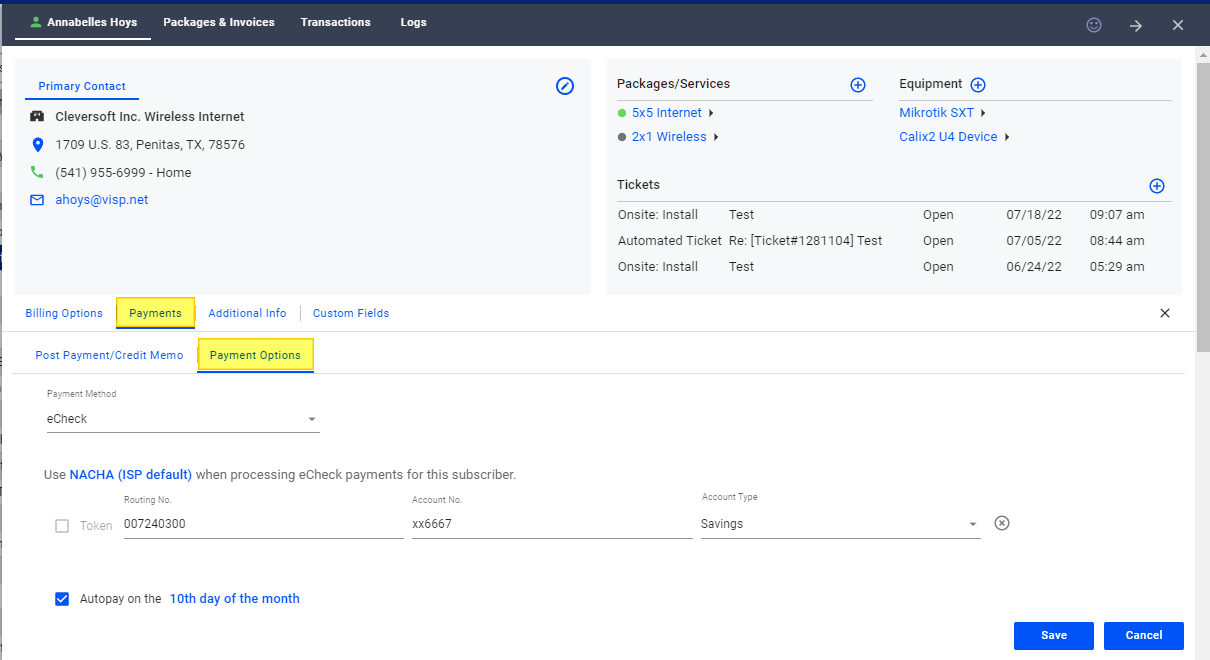
- Click and open the subscriber’s profile.
- Go to the Payments tab
- Select the Payment Options tab
- Under Payment Method, select eCheck
- Next, right below the payment method, click on the blue highlighted text and select NACHA (ISP Default) from the dropdown. The full text should now read, “Use NACHA (ISP Default) when processing eCheck payments for this subscriber.”
- After selecting NACHA, a pop-up may appear, containing this message: “The subscriber will be notified that they have to re-enter their account information because the selected payment gateway does not have the needed account information.”
- If you click on I understand, any saved payment information will be removed, and you will have to re-enter the payment details for the new gateway.
- If you select Cancel, any current payment information will be retained.

- If it is the customer’s first time to pay via echeck and process their payments via NACHA, you have to enter the following:
- Routing Number
- Account Number
- Account Type
- Savings
- Checking
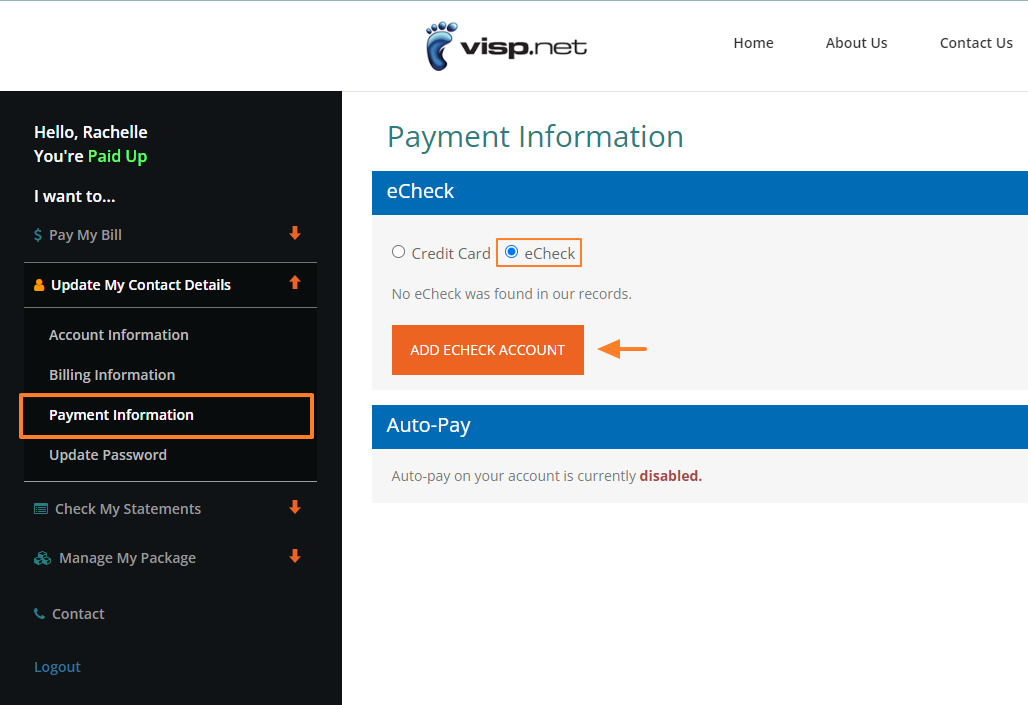
- You may also inform the customer to log in via their account manager to update their Payment Information to echeck and provide their routing and account numbers.
- However, if the customer has an existing echeck account that was previously processed from a different payment gateway, then switching to NACHA will require the re-entry of the echeck information.
- Send a notification to the customer via email or SMS, informing them that their payment gateway has changed and that they can log in via their account manager to update their payment information, by selecting echeck and providing their routing and account numbers.
-

Process echeck payments via NACHA
| NACHA Gateway | In VISP | Via Account Manager |
| Process Manual Payments | ✅ | ✅ |
| Activate and Use Autopay | ✅ | ✅ |
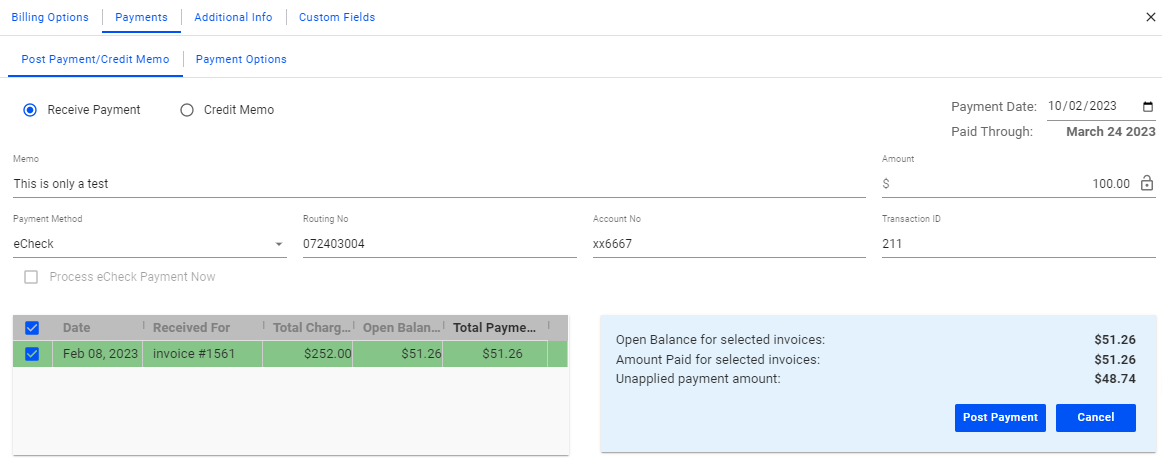
You can manually process one-time payments from within VISP or use autopay with NACHA. Your customers can also log in via their account manager to process one-time payments or enable autopay processing for their accounts.
Via VISP App
Via Account Portal
After you process a one-time or automated payment for a customer, the eCheck subscribers via NACHA (Date Bound) report found in Reports > Billing should populate with the customers’ profile, account information, and payment amount.
Generate the NACHA report
To generate the NACHA report, do the following steps:
Go to the Menu > Reports > Billing > eCheck subscribers via NACHA (Date Bound)
Set the date or date range of the customer payments you want to collect. Next, reload the report to update the data.
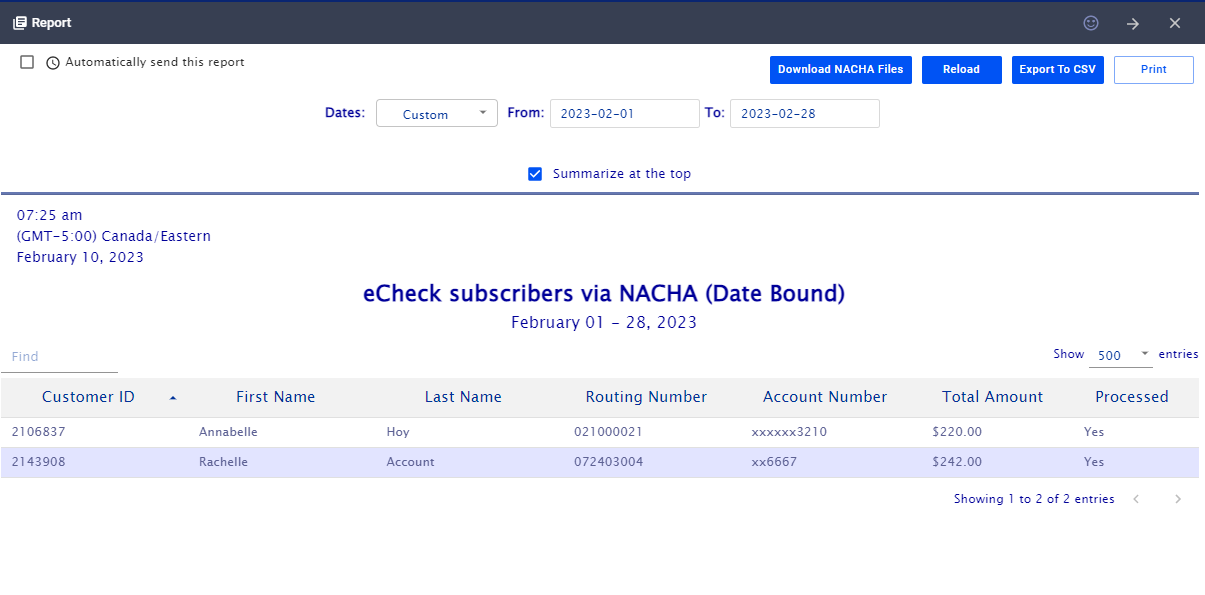
You will see your list of customers with NACHA as their payment method. Click on the Generate NACHA Files button beside Reload, on the upper-right side of the screen. The generated zip file contains a txt file that you can send to the bank for processing the e-check payments.
If a customer account were included in a previous NACHA report that was sent to the bank, the Processed column would display Yes.
Successful Processing, Failures, and Errors.
When you receive feedback from the bank on the successful and failed transactions, you can update the subscriber accounts accordingly. See the refund and reversal steps below:
Refund Process
– For scenarios where a double payment or excess payment has occured due to clerical or user error.
Steps:
- Inform the customer that if the amount is not yet in the transaction list, a credit will be added to reflect the double charge. The credit balance will be applied to future charges or invoices generated by the system.
- If the customer wants a refund, the following steps can be done:
- If the excess payment has not been added to the transaction list yet, then do so.
- Create a new invoice and add a custom item for a refund. Specify in the description that the invoice reduces the excess amount or payment in the customer’s account.
- Ensure that the newly created invoice is associated with the payment item in the transaction list containing the excess amount or payment.
Reversal Process
– For scenarios where the payment was not processed by the bank due to insufficient funds, an invalid account number, or a bank error.
Steps:
- Inform the customer via email or SMS that their transaction is declined due to insufficient funds or other errors. If the ISP policy does not include an option to retry the echeck account, the customer will be notified to use a different payment method. Otherwise, the outstanding bill will be carried over to the next billing cycle, or the account will be automatically suspended.
- If the customer is unable to pay the outstanding bill using an alternative payment method, the following steps can be done:
- Create a new invoice, and add a reversal item to specify that the full amount was declined.
- Associate or distribute the Payment to that invoice.
- The effect of this action restores the original balance due on the account.
- If the customer does not pay the bill, their account may get suspended.