

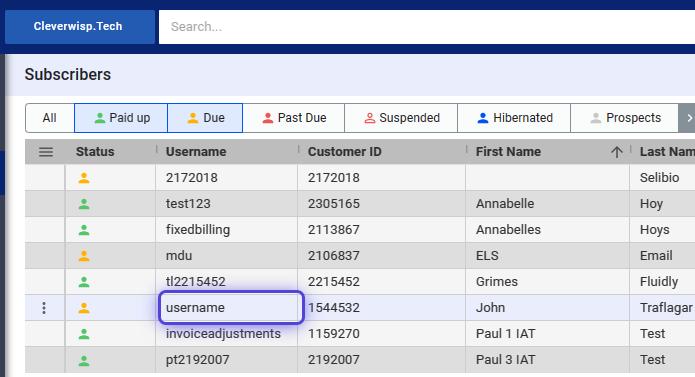
1. Click on Subscribers
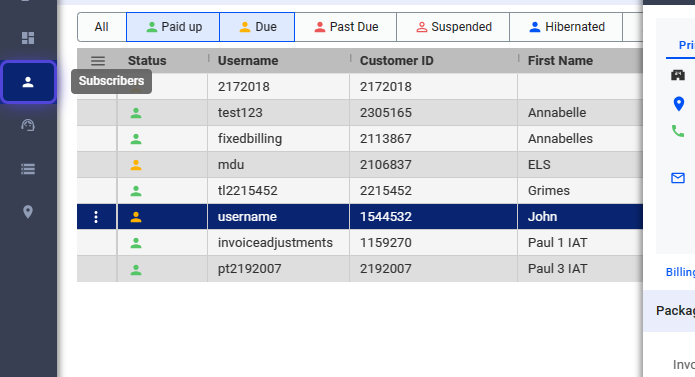
2. Search for the subscriber or select from the list.
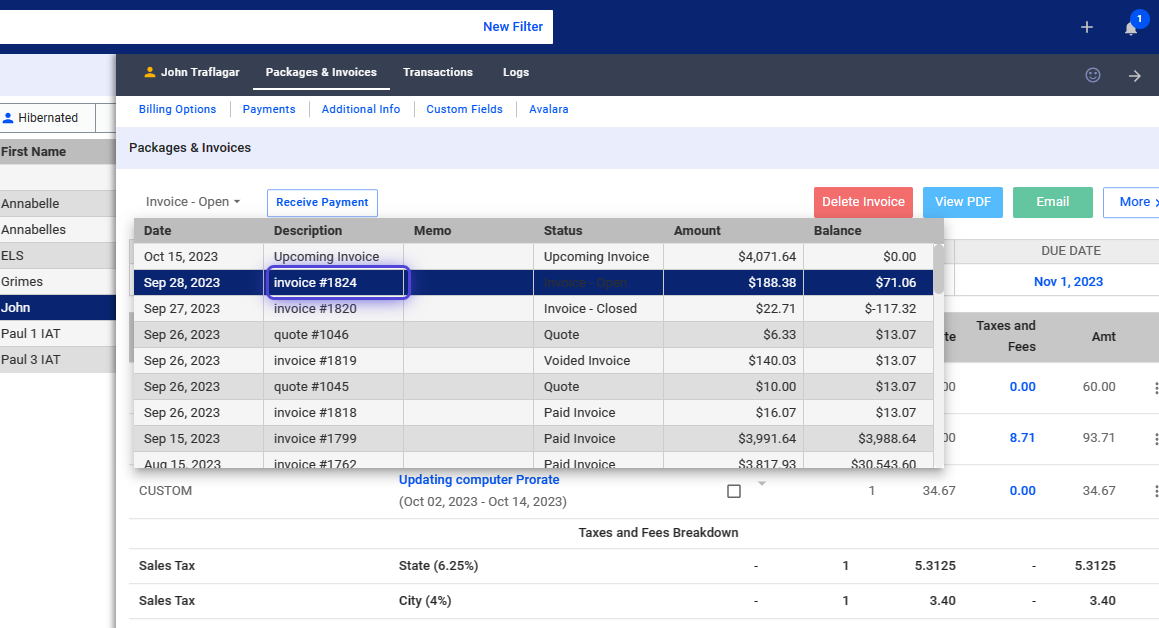
3. Click on Open
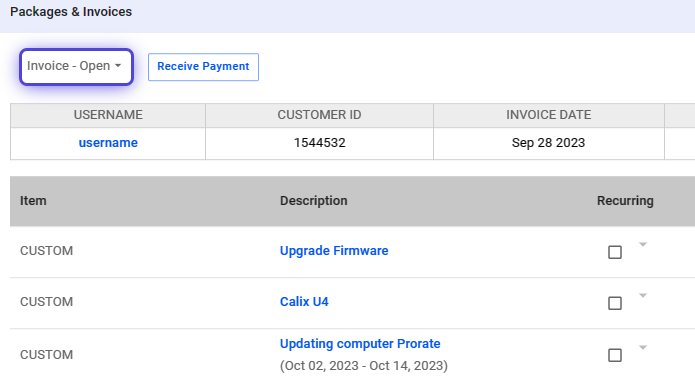
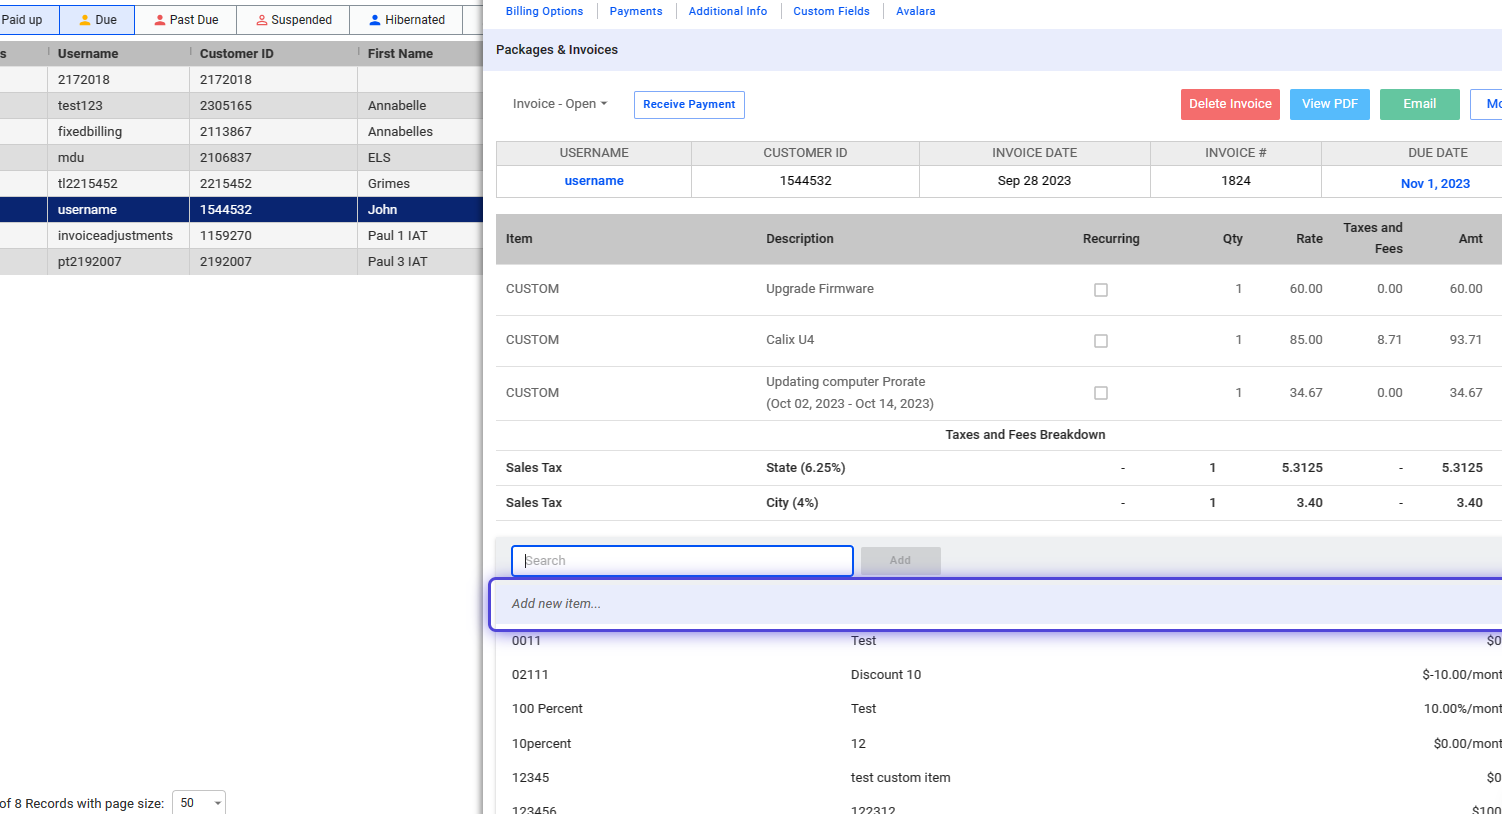
4. Select a current invoice.
5. Click on + Other Item
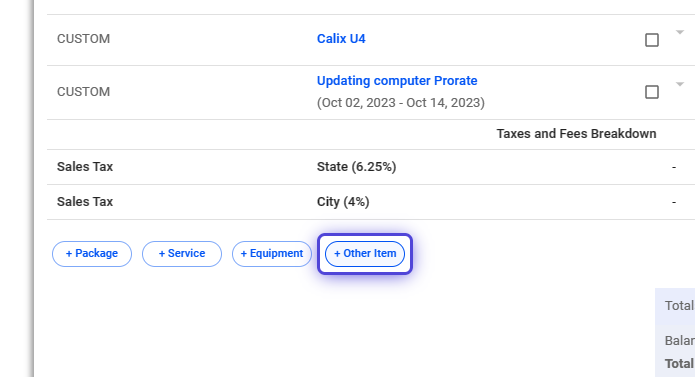
6. Search an item or select from the list.

7. Click on Add new item…
8. Input “Discount” for the Item Type.
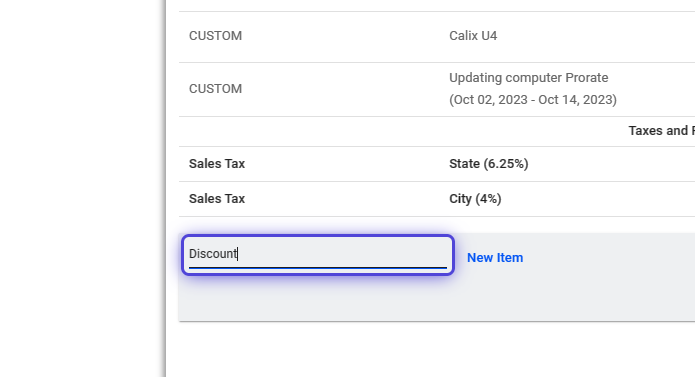
9. Input a Description.
10. Click and set the rate.
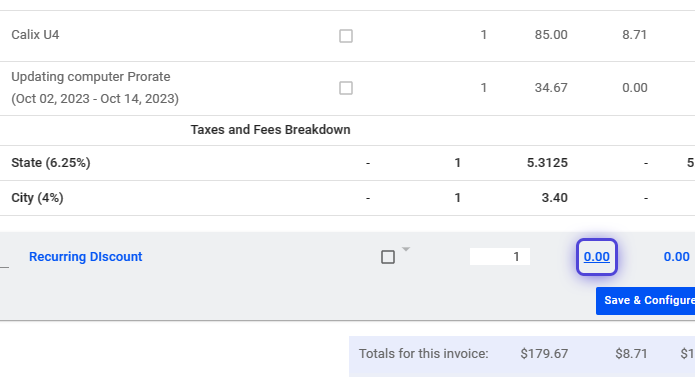
11. Add a negative amount, as long as the invoice does not go below zero.
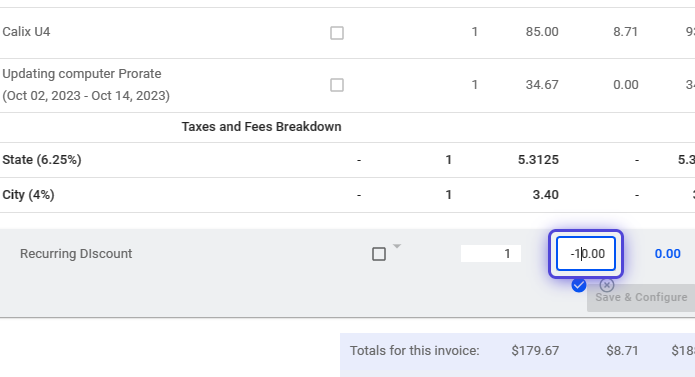
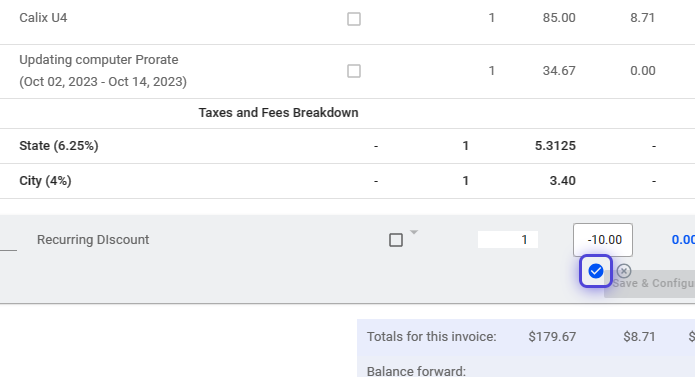
12. Click on Save & Configure. to save your work.
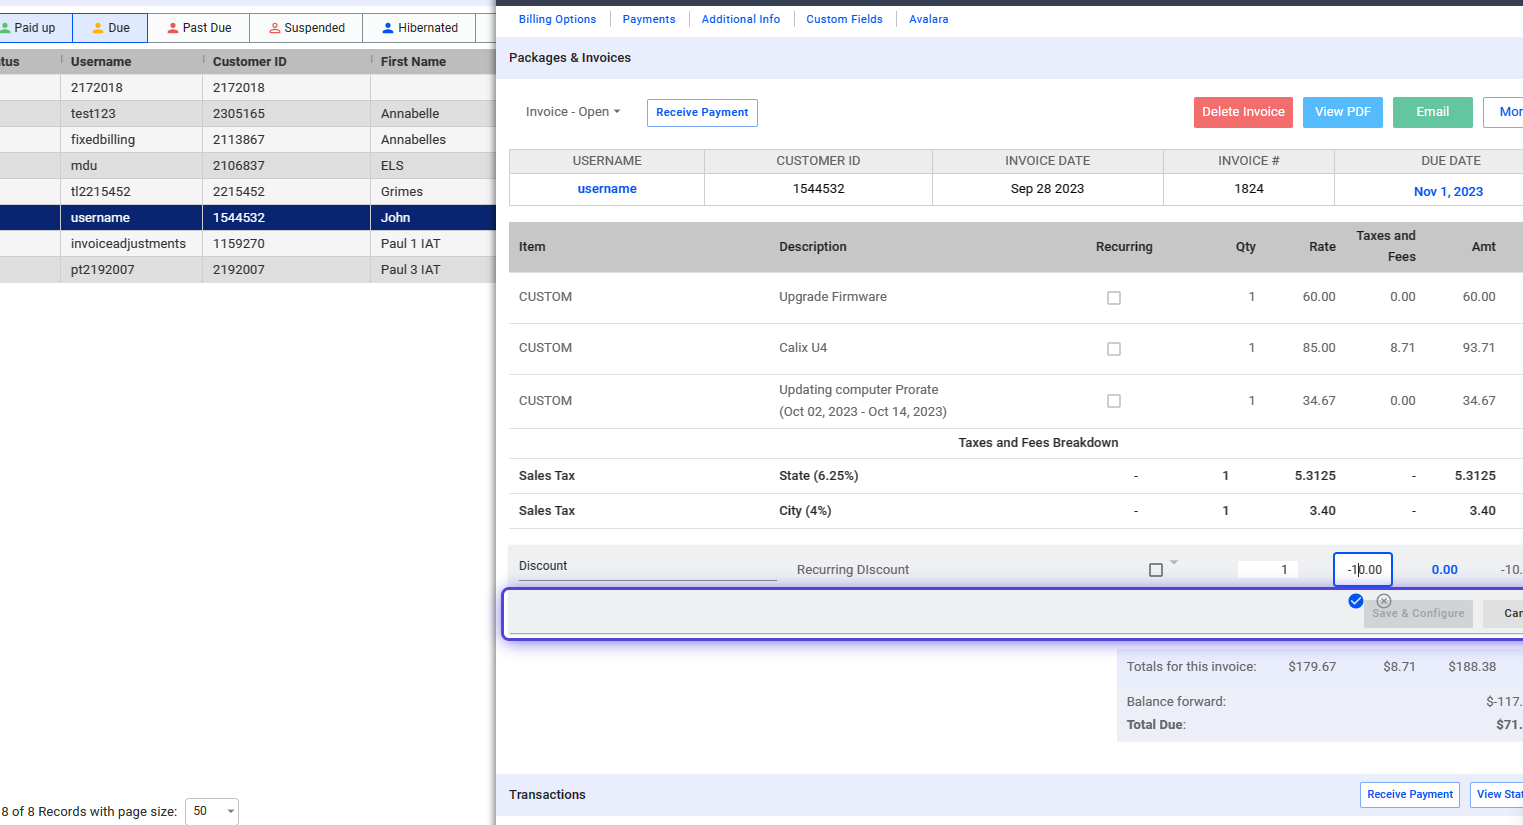
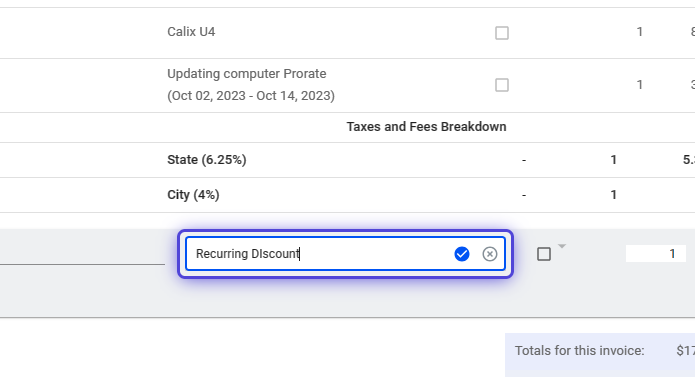
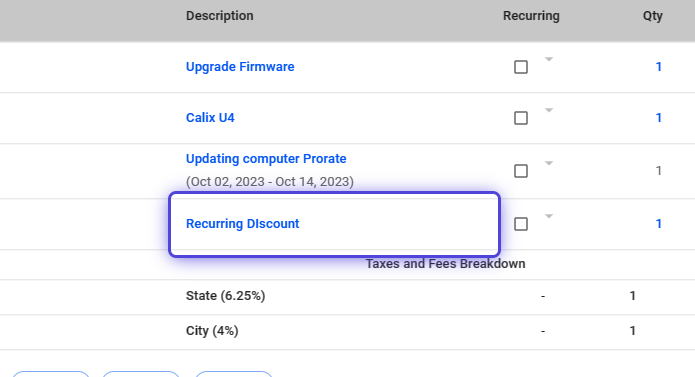
13. Click on the small blue check mark.
14. Click on Save & Configure
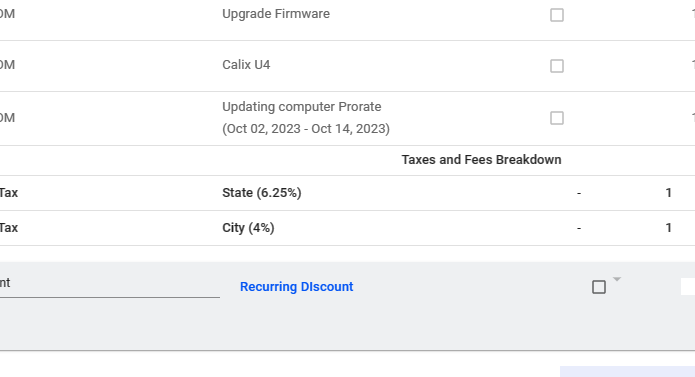
15. Click on Recurring DIscount
Add a One-Time Discount
1. Enable Automatic Payment of Invoices to VISP.net
To enable the automatic payment of your invoices to Visp.net, go to the menu in VISP and select My VISP. Scroll and expand Payments. Add the person’s email address who will receive your billing reminders or notifications from Visp.net. Add an amount to the Balance…
2. Taxes
VISP supports integration with Avalara for automated taxation. It’s also designed to manage tax settings that support multiple criterias for every transaction. To add a tax setting, go to Main Menu > Invoicing > Taxes and clicking on the plus sign or Add New…
3. Supported Merchant Processors
Choose the processor that works best with your billing operations; many of the top gateways integrate with VISP. Payment Solutions is a “white-glove concierge” service that ensures you get the best rates and features for your ISP. You’ll work with professionals that…
4. Late Fee or Re-billing Fee
Late fees and re-billing fees are charges that may be added to your subscribers when they have been past due for a specified number of days. They encourage your subscribers to pay on time to avoid paying late or re-billing fees. Go to Main Menu > Invoicing >…
5. Update Billing Cycle
For UBO or desktop (Java) version, refer to this link. To change or update the billing cycle of a subscriber, first click and open your subscriber’s list. Click on a subscriber’s account. Click on the Billing Options tab. In the section labeled Cycle, you can click…
6. Refund Payments
For UBO or desktop (Java) version, refer to this link. Whether it’s a mistake in receiving payments or a discount you forgot to enter, the Refund feature is your life-saver. To process a refund, you first need to have the Payment refunding function enabled in your…
7. Receive Payments
Let’s say your subscriber has seen the invoice you sent and has already paid. You need to acknowledge that payment and record it in that subscriber’s register: this is “posting a payment” in the software To receive payments from subscribers, first go to your…
8. Print Invoices
For UBO or desktop (Java) version, refer to this link. In VISP, you may print invoices individually or by batch. Here’s how to print it individually: Click on a subscriber’s account. In the Transactions section, click on the invoice you want to print. Once the…
9. Add Scheduled Actions (Reschedule Late Fee / Suspension)
To reschedule suspensions and late fees to another date, go to your subscribers’ list and pick a subscriber. In the subscriber’s profile, go to the Logs section. Click on the vertical ellipsis ⋮ or the three dots . on the account
10. Enable and Set Paper Invoices
For UBO or desktop (Java) version, refer to this link. Some of your subscribers may want to have printed invoices. The Paper Invoice Fee feature allows you to set a default value and setting when Paper Invoice is enabled for your subscribers. To set up or configure…
11. Enable and Set Grace Periods
For UBO or desktop (Java) version, refer to this link. A grace period is the amount of time you give your subscribers so they can pay their balance due without getting suspended. For example, if payment is due on the 10th of the month and the grace period was set for…
12. Edit an Invoice
For UBO or desktop (Java) version, refer to this link. To edit an invoice in an account, first go to your subscriber list. Click on a subscriber’s account and do the following: In the Transactions section, select the invoice you want to edit. Or under Packages and…
13. Delete an Invoice
For UBO or desktop (Java) version, refer to this link. To delete an invoice, first go to your subscriber list. Click on a subscriber’s account, and do the following: In the Transactions section, click on the invoice you want to delete. If you want to delete the…
14. Add Equipment Charge to an Invoice
For UBO or desktop (Java) version, refer to this link. A Credit Memo reduces the Accounts Receivable (AR) from a subscriber. Use a credit memo when adding a one-time credit (discount) to an account, or reversing a charge. To add a credit or debit memo to an account,…
15. Add a Custom invoice
For UBO or desktop (Java) version, refer to this link. Each of your subscribers already has an automatically generated invoice based on the package services he/she is availing from you. However, if a subscriber has additional items to pay for (like rented or purchased…
16. Adding a Credit or Debit Memo
For UBO or desktop (Java) version, refer to this link. A Credit Memo reduces the Accounts Receivable (AR) from a subscriber. Use a credit memo when adding a one-time credit (discount) to an account, or reversing a charge. To add a credit or debit memo to an account,…
17. Bill-to-Another Feature
Use the Bill-to-Another feature to pay for an item on another customer’s bill. Customer A (Parent Account) is paying for an item on Customer B’s (Child Account) invoice. First, go to Customer B (Child Account), and hover over the item. Click on the vertical ellipsis…
18. Add Scheduled Actions
To reschedule suspensions and late fees to another date, go to your subscribers’ list and pick a subscriber. In the subscriber’s profile, go to the Logs section Click on the vertical ellipsis ⋮ or the three dots . on the account Click on Add Scheduled Action On the…
19. Credit Memo Redesigned
In VISP, a credit memo or a credit note is a commercial document issued by an ISP to a subscriber account that reduces the amount of money the subscriber owes. It is used when services are canceled, when products (devices) are returned or not delivered, or when a…
20. Chart of Accounts
1.Click the nine-dot menu in the upper right corner to open the VISP Admin Page. 2. Click on Billing. 3. Select Chart of Accounts 4. Click on “Add New Account” 5. Enter a Chart of Accounts code. 5. Enter a Chart of Accounts code. 6. Use the dropdown to select a Chart…
21. Add and Configure Taxes
1. Click the nine-dot menu in the upper right corner to open the VISP Admin Page. 2. Click on Billing. 3. Select Invoicing 4. Select Invoicing 5. Enter a new label for taxes. 6. Toggle “Require selection upon adding new subscriber.” to require the selection of a tax…
22. Add and Configure Taxes
1. Click the nine-dot menu in the upper right corner to open the VISP Admin Page. 2. Click on Billing. 3. Select Invoicing 4. Select Invoicing 5. Enter a new label for taxes. 6. Toggle “Require selection upon adding new subscriber.” to require the selection of a tax…
23. Bundled Charges – Packages and Items
1. Click the nine-dot menu in the upper right corner to open the Visp Admin Page 2. Click on Billing. 3. Select Items 4. To create a new custom item that will be bundled or included in a package, follow these steps: Click on Add New Item Enter a unique item code From…
24. Lock Transactions: Activate and Configure
1. Click the nine-dot menu in the upper right corner to open the Visp admin page. 2. Click Billing. 3. Select Invoicing. 4. Click on Accounting Controls. 5. In “Warn Users on Closed Books,” toggle, “Automatically warn users on closed books.” 6. Set a “Closing Date” 7….
25. Enable and Configure the Auto-Bad Debt Write-Off Feature
1. Click the nine-dot menu in the upper right corner to open the VISP Admin Page. 2. Click on Billing 3. Select Auto Actions 4. Scroll to the Write-Off Settings 5. Toggle to enable the, “Auto bad debt write-off for archived subscribers.” 6. Click on “Balance…
26. Set Manual Invoice Dates
1. Click on Subscribers 2. Search for the subscriber or select from the list. 3. Click on Packages & Invoices 4. Click on the three dots (vertical ellipsis) 5. Select New Invoice 6. Click to set a new date. ⚠️ Invoice dates must be set ON or PRIOR to the bill…
27. Setup Your Merchant, Autopay, and Payment Retry Settings
Configure Your Payment Gateway 1. Click the nine-dot menu in the upper right corner to open the VISP Admin Page. 2. Click on Billing 3. Select Payments 4. Click on Payment Gateways 5. Select a Payment Gateway 6. Enter the API or credentials for your Merchant Account…
28. Setup Your Merchant, Autopay, and Payment Retry Settings
Configure Your Payment Gateway 1. Click the nine-dot menu in the upper right corner to open the VISP Admin Page. 2. Click on Billing 3. Select Payments 4. Click on Payment Gateways 5. Select a Payment Gateway 6. Enter the API or credentials for your Merchant Account…
29. How to Create a New Invoice and Add Invoice Items
1. Click on Subscribers 2. Search for the subscriber or select from the list. 3. Click on Packages & Invoices 4. Click on the three dots. 5. Select New Invoice Add Custom Invoice Items 💡 Add a new invoice or edit an open invoice in order to add new items. 6….
30. How to Void an Invoice?
1. Click on Subscribers 2. Search for the subscriber or select from the list. 3. Click on Transactions 4. Select an Invoice. 5. Click on the three dots. 6. Select, “Void this Invoice.” 7. Read and acknowledge the pop-up message. Click, “Yes,” to continue. 8. Invoice…
31. How to Add a Credit Memo?
1. Click on Subscribers 2. Search for the subscriber or select from the list. 3. Click on Packages & Invoices 4. Click on the three dots. 5. Click on “New Credit Memo.” 6. Input a Memo description. 7. Choose an invoice to apply this credit memo. 8. Or set the…
32. Add a One-Time Discount
1. Click on Subscribers 2. Search for the subscriber or select from the list. 3. Click on Open 4. Select a current invoice. 5. Click on + Other Item 6. Search an item or select from the list. 7. Click on Add new item… 8. Input “Discount” for the Item Type. 9. Input…
33. Configure Invoice Defaults
1. What are Invoice Defaults? Invoice Defaults lets you set the global invoicing schedule and triggers for customer statutes and automation in Visp. How to Access Invoice Defaults? 2. Click the nine-dot menu in the upper right corner to open the VISP Admin Page. 3….
34. Process Payments to Visp
This feature or section lets Application Users pay their Visp bill and save their cards or bank accounts for one-time or recurring payments. You can also view your items and balance due in the account information. 1. Click the nine-dot menu in the upper right corner…
35. Configure Primary, Billing, and Contact Us Information
There are three essential areas in Visp.net that must be initially configured: the primary contact, billing contact, and the Contact Us information in your CRM’s brandable portal settings. Primary Contact Contains the email address used when sending customer…
36. Credit Memo
Use Cases for Credit Memo: If you made an invoice error like overcharging or listing incorrect quantities, issue a credit memo to fix the mistake, keep accurate records, and avoid customer issues. Some customers prefer account credits over refunds. Apply a credit memo…
37. Grace Periods and Grace Amount Settings
This covers the activation of the Grace Period and Grace Amount. It also covers the sequence that triggers an account’s grace periods and grace amounts. Activate and Set the Global Grace Period and Grace Amount Settings. Grace Periods are fixed periods where you can…
38. Account History and Payments
The account history shows your financial transactions, such as invoices and payments to Visp. Additionally, the invoices in the Account History show your subscribers’ growth or decline over time. This guide covers making payments and setting up auto-payments to Visp….
39. Recurring Discount
To enable the automatic addition of a line item on future invoices, simply create a CUSTOM type and activate the “Recurring” option. How to Create an Invoice and Add a Custom Line Item 1. Click and open the Subscribers’ table. 2. Search for the subscriber or select…
40. Forms
Building Brand Recognition and Improved Customer Experience Adding logos can help create a professional look. Custom design makes invoices unique and memorable, increasing brand recall and recognition. Including marketing messages or promotions for other products and…
41. Refunds
To process a refund, you must wait at least 24 hours after the payment was made or ensure the payment has settled. If you need to refund immediately after a transaction, simply log into your merchant portal and choose to void the transaction there. Voiding the payment…
42. Taxes and Fees
The Taxes and Fees feature lets you apply taxes to invoices- items, and packages. Here, you can set up tax rates, a critical step in the billing process. Configure Tax Labels 1. Click the nine-dot menu in the upper right corner to open the Visp Admin Page. 2. Click on…
43. Setup Multiple Payment Gateways for Different Billing Methods
Customers may choose from various payment methods including credit cards, cash, or checks. To accommodate this, enabling several payment gateways in your system might be necessary. Ideally, your primary gateway should handle both credit card and eCheck transactions….
44. Bill All to Another
The “bill all to another” feature streamlines the billing process by allowing all invoices and item charges to be transferred from one account to another, such as from a child to a parent account. 1. Click and open the Subscribers list. 2. Search for the subscriber or…