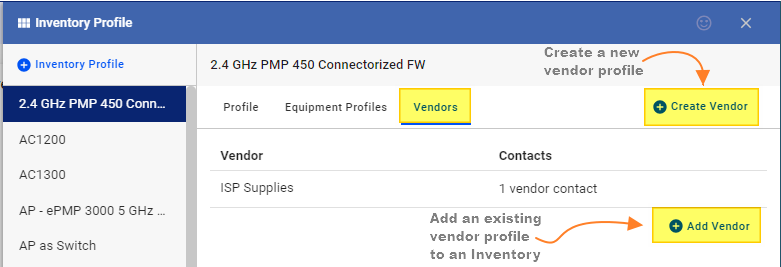
1-541-955-6900

success@visp.net

Login

Documentation Series

Learn About VISP App Dashboard

Help Documentations / Equipment / Add a Purchase Order

Add a Purchase Order

Before you begin, ensure that the Vendor’s information is added to the profile of the equipment you’re planning to purchase.

  1. You can verify by going to the Inventory profile of that equipment.
  2. To get there, go to the menu, click on Equipment tab, and select Inventory profile.
  3. Click on a piece of equipment, and then go to the Vendors tab.
  4. For this example, we can verify that the equipment is sourced from two vendors. Now let’s close these panels and create a purchase order.


Add a Purchase Order - Visp Documentation

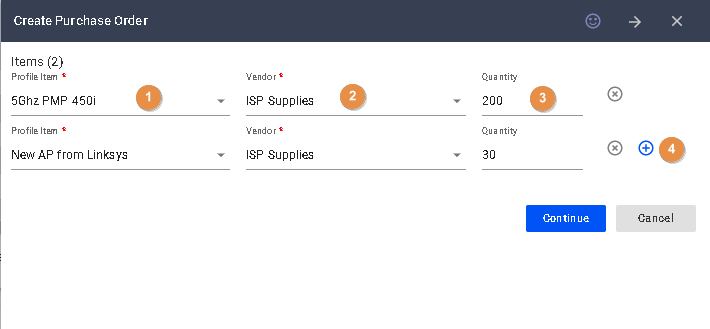
To create a Purchase Order, go to the IRM or Infrastructure Resource Management. Scroll to the Purchase Orders panel and click on the (+) plus sign or the Add button in the far right corner.

  1. Select the item you want to purchase
  2. Pick a vendor
  3. Add quantity.
  4. To add more items, click here.
  5. Click on Continue when you’re done.
  6. Enter the unit price and taxes for these items
  7. Click on Create PO when you’re done.
  8. Click on the new PO you’ve created.
  9. You may add notes in the Notes section on the progress of your order.

Add a Purchase Order - Visp Documentation

Once your Vendor verifies that the item has been ordered, you can select a new status from the dropdown here.

If the serial number information is given, you can enter them here and then update the profile and location you want to assign the device.

Click on Receive when you’re done.

Now your order is complete, and the new equipment is added in your inventory.

For more information about this and all other features in VISP, reach out to your VISP Client Success team today.

1. Assigning and Unassigning Equipment

Assigning Equipment 1. Using the Equipment Manager Open the Equipment Manager and go to the Inventory tab. Select the equipment profile you’d like to assign. On the equipment profile, search and select the equipment, then click on the “Assign to Subscriber” button….

2. Receive Inventory

Receiving inventory or a new device in VISPrequires an equipment profile. If Equipment profile is already configured, follow the steps below to receive or add new equipment into VISP: Navigate to the Equipment > Hamburger menu > Click Add Inventory In the Add…

3. Add ISP Tower or Site Location

The ISP Tower or Site Location gives you an overview of the Towers/Site that you installed with their corresponding address. Additional features include automatic calculation of revenue per site and accounting for expenses that were set. To add a Site Location or ISP…

4. IRM: Profiles and Metadata

To add a brand new site, tower, or equipment in the Infrastructure Resource Management or the IRM, you must first add a profile or template. These profiles simplify the process of adding new infrastructures and equipment, as well as collecting the metadata that…

5. Equipment Accounting Controls

Manage and control how your equipment is being handled by the software with accounting controls. To enable this feature, go to the Main Menu > Equipment > Equipment Accounting Controls and check the “Enable Equipment Management Features” checkbox. This will…

6. Inventory Locations

The Inventory Location determines where devices are stored or the type of storage that houses your equipment. This can include the warehouse or the storage unit of your suppliers. To add an inventory location, for your equipment inventory, click on the menu. Go to…

7. IRM: Add Infrastructure and Equipment

To add an infrastructure, like a site or tower, a warehouse, or even your technician’s vehicle, go to the infrastructure locations panel and click on the plus sign. Add a name to this infrastructure. Select an Infrastructure profile from the dropdown. Input the…

8. Add a Purchase Order

Before you begin, ensure that the Vendor’s information is added to the profile of the equipment you’re planning to purchase. You can verify by going to the Inventory profile of that equipment. To get there, go to the menu, click on Equipment, and select Inventory…

9. Add a Purchase Order

Before you begin, ensure that the Vendor’s information is added to the profile of the equipment you’re planning to purchase. You can verify by going to the Inventory profile of that equipment. To get there, go to the menu, click on Equipment, and select Inventory…
?