1-541-955-6900

success@visp.net

Login

Documentation Series

Learn About VISP App Dashboard

Taxes

VISP supports integration with Avalara for automated taxation. It’s also designed to manage tax settings that support multiple criterias for every transaction.

To add a tax setting, go to Main Menu > Billings Tab > Invoicing > Taxes Tab > and clicking on the plus sign or Add New button.

Taxes - Visp App

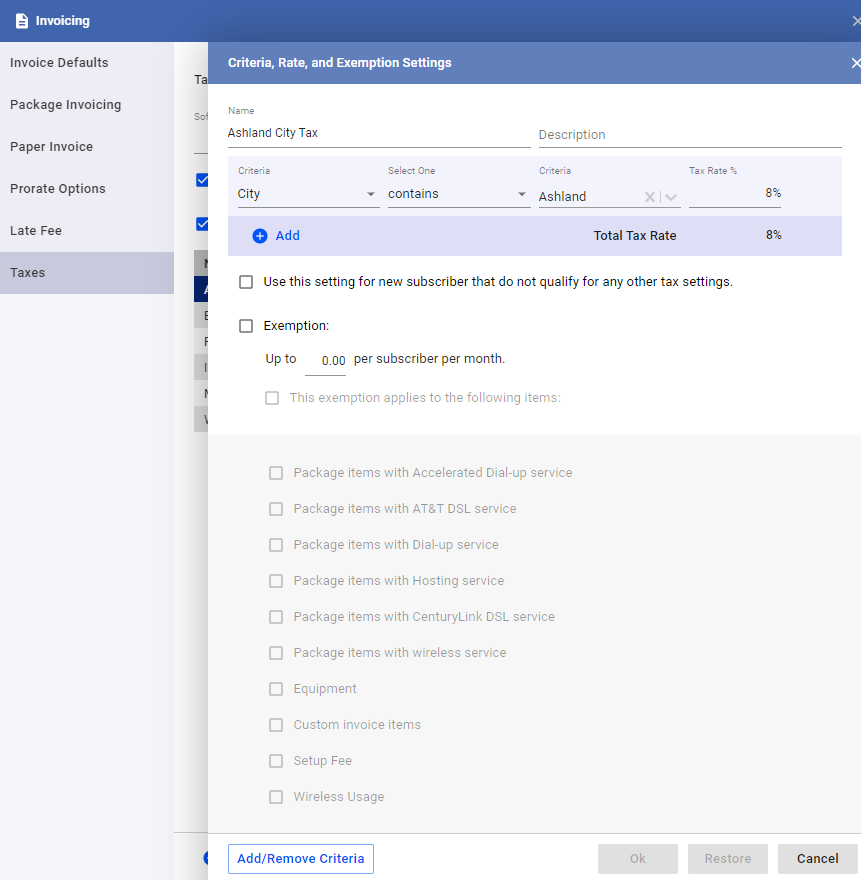
  • Enter the Tax Name and Description
  • Add Criteria
    • Select either City or State as the basis of your criteria
    • Select the condition for the criteria.
    • Select/Type the desired value of your Tax Criteria.
  • Set exemption if necessary.
  • Click on Ok to save the settings.


Applying Tax Settings

If the subscriber has packages, the order of precedence will be as follows:

  1. Package’s tax setting
  2. Subscriber’s tax setting


Applying by Package

Go to Main Menu Billings Tab > Packages > [name of package] > three dots icon  edit > Tax Tab.

Taxes - Visp App

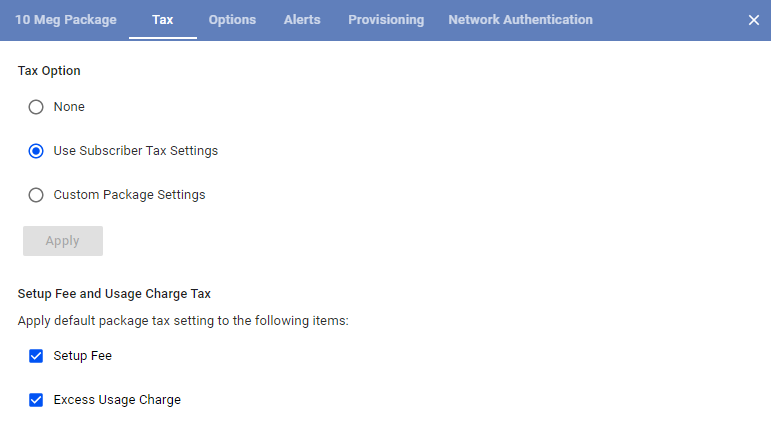
None – no tax will be applied (regardless of the subscriber’s tax setting).
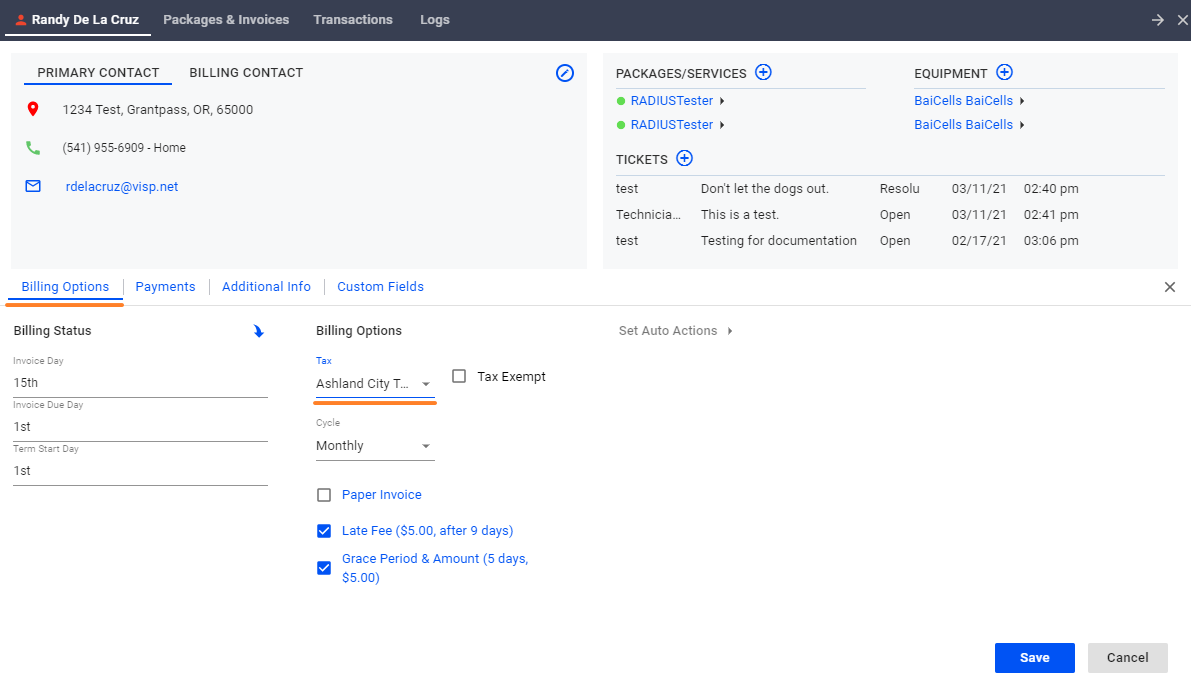
Use Subscriber Tax Settings – billing settings that was set to Main Menu > Billing Tab > Invoicing > Taxes Tab
Custom Package Settings – apply the tax settings configured here

  • Percentage Total – charge the specified percentage of the total package price.
  • Flat Rate – a fixed tax is charged depending on the subscriber’s billing cycle (prorated for prorated terms)

Include Tax on Setup Fee
If this is unchecked, no tax will be applied on the Setup Fee, regardless of the package’s tax setting


Applying by Subscriber

Taxes - Visp App

1. Enable Automatic Payment of Invoices to VISP.net

To enable the automatic payment of your invoices to Visp.net, go to the menu in VISP and select My VISP. Scroll and expand Payments. Add the person’s email address who will receive your billing reminders or notifications from Visp.net. Add an amount to the Balance…

2. Taxes

VISP supports integration with Avalara for automated taxation. It’s also designed to manage tax settings that support multiple criterias for every transaction. To add a tax setting, go to Main Menu > Invoicing > Taxes and clicking on the plus sign or Add New…

3. Supported Merchant Processors

Choose the processor that works best with your billing operations; many of the top gateways integrate with VISP. Payment Solutions is a “white-glove concierge” service that ensures you get the best rates and features for your ISP. You’ll work with professionals that…

4. Late Fee or Re-billing Fee

Late fees and re-billing fees are charges that may be added to your subscribers when they have been past due for a specified number of days. They encourage your subscribers to pay on time to avoid paying late or re-billing fees. Go to Main Menu > Invoicing >…

5. Update Billing Cycle

For UBO or desktop (Java) version, refer to this link. To change or update the billing cycle of a subscriber, first click and open your subscriber’s list. Click on a subscriber’s account. Click on the Billing Options tab. In the section labeled Cycle, you can click…

6. Refund Payments

For UBO or desktop (Java) version, refer to this link. Whether it’s a mistake in receiving payments or a discount you forgot to enter, the Refund feature is your life-saver. To process a refund, you first need to have the Payment refunding function enabled in your…

7. Receive Payments

Let’s say your subscriber has seen the invoice you sent and has already paid. You need to acknowledge that payment and record it in that subscriber’s register: this is “posting a payment” in the software To receive payments from subscribers, first go to your…

8. Print Invoices

For UBO or desktop (Java) version, refer to this link. In VISP, you may print invoices individually or by batch. Here’s how to print it individually: Click on a subscriber’s account. In the Transactions section, click on the invoice you want to print. Once the…

9. Add Scheduled Actions (Reschedule Late Fee / Suspension)

To reschedule suspensions and late fees to another date, go to your subscribers’ list and pick a subscriber. In the subscriber’s profile, go to the Logs section. Click on the vertical ellipsis ⋮ or the three dots . on the account

10. Enable and Set Paper Invoices

For UBO or desktop (Java) version, refer to this link. Some of your subscribers may want to have printed invoices. The Paper Invoice Fee feature allows you to set a default value and setting when Paper Invoice is enabled for your subscribers. To set up or configure…

11. Enable and Set Grace Periods

For UBO or desktop (Java) version, refer to this link. A grace period is the amount of time you give your subscribers so they can pay their balance due without getting suspended. For example, if payment is due on the 10th of the month and the grace period was set for…

12. Edit an Invoice

For UBO or desktop (Java) version, refer to this link. To edit an invoice in an account, first go to your subscriber list. Click on a subscriber’s account and do the following: In the Transactions section, select the invoice you want to edit. Or under Packages and…

13. Delete an Invoice

For UBO or desktop (Java) version, refer to this link. To delete an invoice, first go to your subscriber list. Click on a subscriber’s account, and do the following: In the Transactions section, click on the invoice you want to delete. If you want to delete the…

14. Add Equipment Charge to an Invoice

For UBO or desktop (Java) version, refer to this link. A Credit Memo reduces the Accounts Receivable (AR) from a subscriber. Use a credit memo when adding a one-time credit (discount) to an account, or reversing a charge. To add a credit or debit memo to an account,…

15. Add a Custom invoice

For UBO or desktop (Java) version, refer to this link. Each of your subscribers already has an automatically generated invoice based on the package services he/she is availing from you. However, if a subscriber has additional items to pay for (like rented or purchased…

16. Adding a Credit or Debit Memo

For UBO or desktop (Java) version, refer to this link. A Credit Memo reduces the Accounts Receivable (AR) from a subscriber. Use a credit memo when adding a one-time credit (discount) to an account, or reversing a charge. To add a credit or debit memo to an account,…

17. Bill-to-Another Feature

Use the Bill-to-Another feature to pay for an item on another customer’s bill. Customer A (Parent Account) is paying for an item on Customer B’s (Child Account) invoice. First, go to Customer B (Child Account), and hover over the item. Click on the vertical ellipsis…

18. Add Scheduled Actions

To reschedule suspensions and late fees to another date, go to your subscribers’ list and pick a subscriber. In the subscriber’s profile, go to the Logs section Click on the vertical ellipsis ⋮ or the three dots . on the account Click on Add Scheduled Action On the…
?