1-541-955-6900

success@visp.net

Login

Documentation Series

Learn About VISP App Dashboard

Service Desk

It’s no secret: subscribers love customer service that’s fast and efficient. But there’s always that big question of exactly how you can provide excellent customer service without getting frazzled or having to spend a ton.

With the Service Desk feature, it’s streamlined and built right into your billing and management software.

Swiftly issue Tickets
When a subscriber calls you to report an issue (need for installation, repair, etc), you can immediately create a ticket, and assign or schedule a technician to fix the problem.

Schedule
While adding a ticket, just click schedule, and it will be automatically assigned in the Service Desk for easy task management.

View your Tickets and Schedule
The Service Desk organizes them neatly. Simply click on the service desk icon on the left navigation bar to open the manager. Here, all your recorded tickets are organized in table form, and you can add, edit, or close them. 

Service Tickets

You can create a new ticket by opening a subscriber profile and clicking on the plus sign in the Tickets category.Service Desk - Visp App

You can also create a ticket and assign it to a subscriber by clicking on the plus sign in the upper right corner of the window. Select Open Ticket in the pop-up menu.

To access the Service Desk, click on the support icon in the left sidebar of the VISP. You will see a page with the following header: Kanban, Calendar, and List.
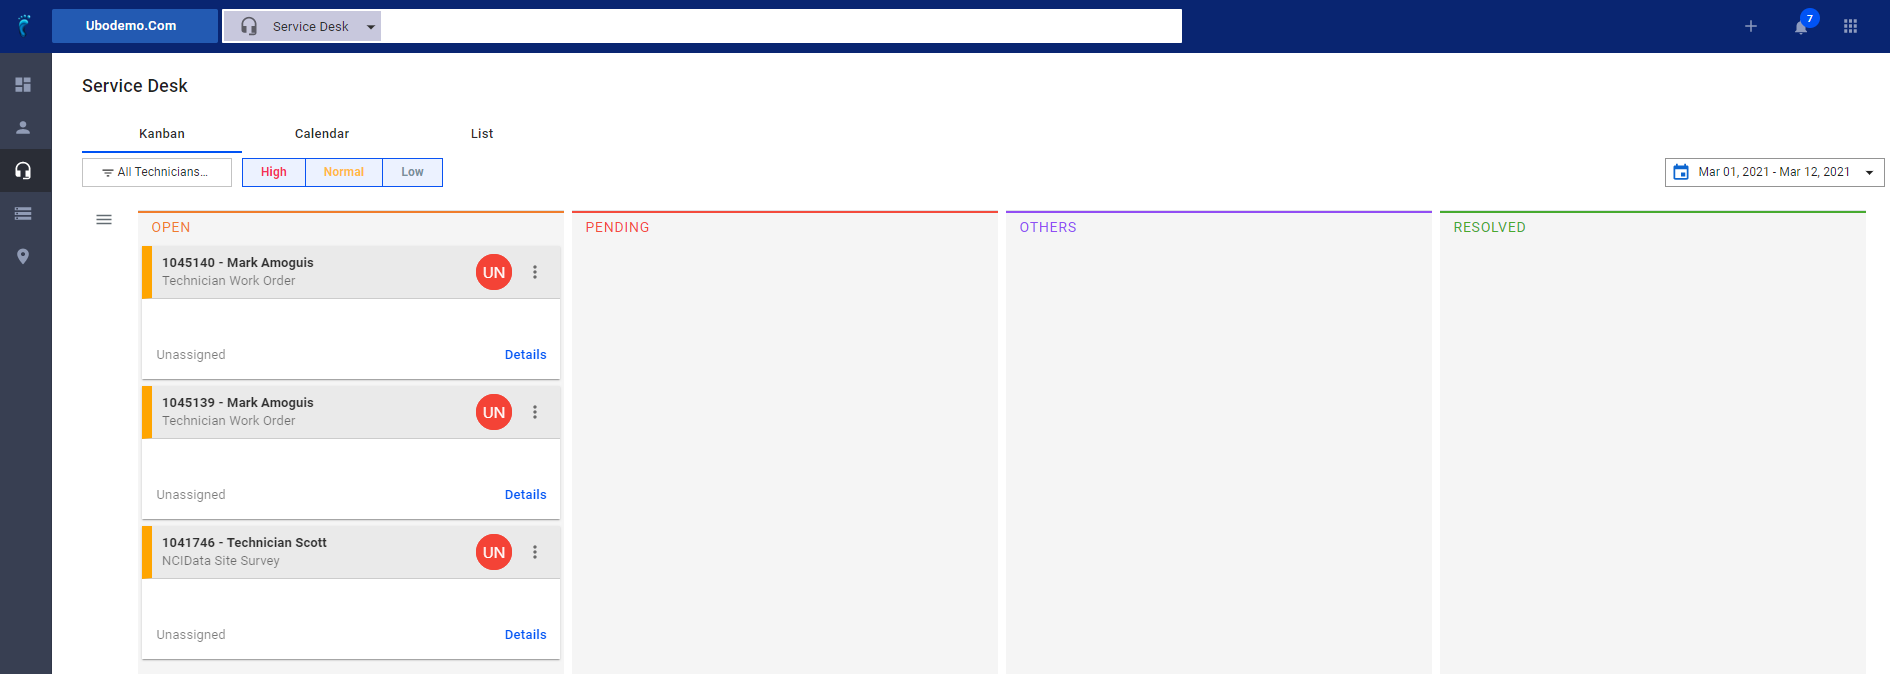
Service Desk - Visp App

The Kanban Board

This shows the different tasks and service tickets in different stages of progress or completion. You can sort the view according to priority, by the technician, or according to the status of the tickets.
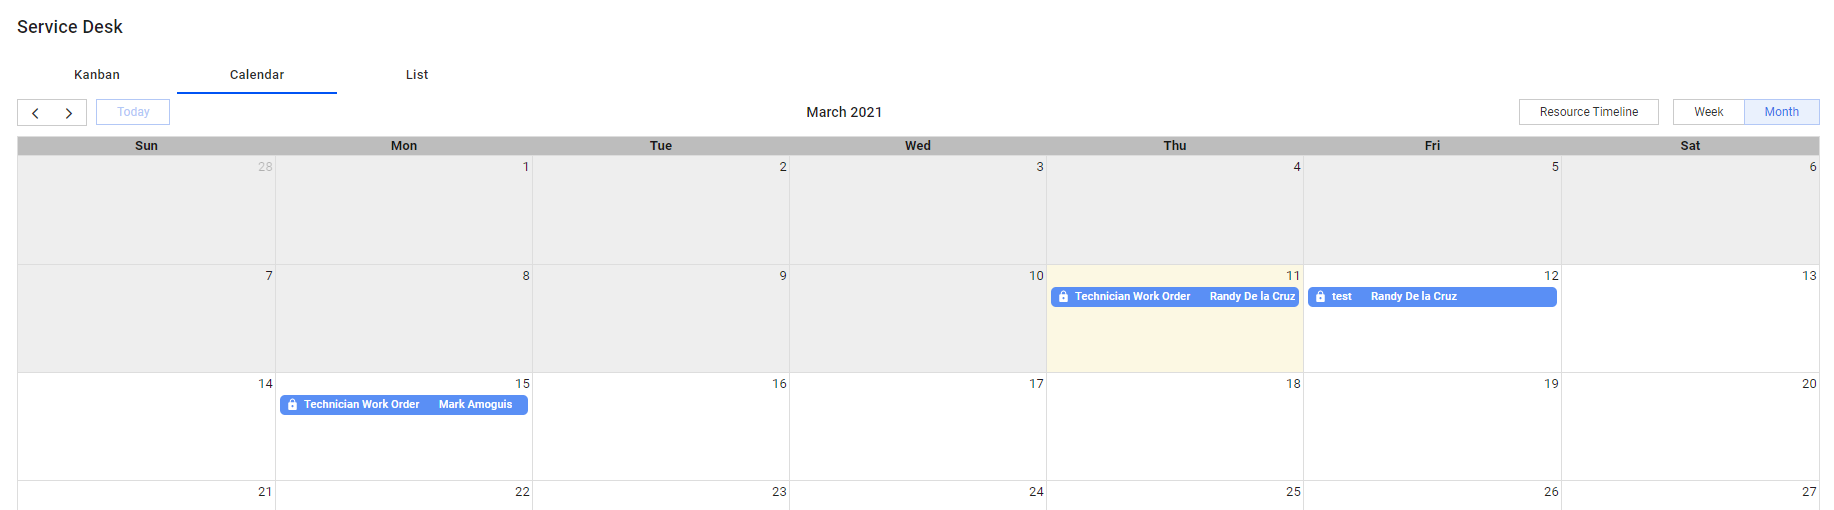
Service Desk - Visp App

The Calendar

ISP owners or Managers have the ability in the VISP to schedule a fixed or a flexible date and time on tickets. Scheduled tickets are displayed on the calendar with additional information about the task as well as the assigned technician.

Service Desk - Visp App

The List

The last category in the set is called List. Aptly so, it contains a list of all the service tickets created (opened), assigned, and resolved by managers and technicians.Service Desk - Visp App

You can sort tickets by priority and arrange them by columns. You can also attach files or images to the tickets.

1. Assigning and Unassigning Equipment

Assigning Equipment 1. Using the Equipment Manager Open the Equipment Manager and go to the Inventory tab. Select the equipment profile you’d like to assign. On the equipment profile, search and select the equipment, then click on the “Assign to Subscriber” button….

2. Receive Inventory

Receiving inventory or a new device in VISPrequires an equipment profile. If Equipment profile is already configured, follow the steps below to receive or add new equipment into VISP: Navigate to the Equipment > Hamburger menu > Click Add Inventory In the Add…

3. Add ISP Tower or Site Location

The ISP Tower or Site Location gives you an overview of the Towers/Site that you installed with their corresponding address. Additional features include automatic calculation of revenue per site and accounting for expenses that were set. To add a Site Location or ISP…

4. IRM: Profiles and Metadata

To add a brand new site, tower, or equipment in the Infrastructure Resource Management or the IRM, you must first add a profile or template. These profiles simplify the process of adding new infrastructures and equipment, as well as collecting the metadata that…

5. Equipment Accounting Controls

Manage and control how your equipment is being handled by the software with accounting controls. To enable this feature, go to the Main Menu > Equipment > Equipment Accounting Controls and check the “Enable Equipment Management Features” checkbox. This will…

6. Inventory Locations

The Inventory Location determines where devices are stored or the type of storage that houses your equipment. This can include the warehouse or the storage unit of your suppliers. To add an inventory location, for your equipment inventory, click on the menu. Go to…

7. IRM: Add Infrastructure and Equipment

To add an infrastructure, like a site or tower, a warehouse, or even your technician’s vehicle, go to the infrastructure locations panel and click on the plus sign. Add a name to this infrastructure. Select an Infrastructure profile from the dropdown. Input the…

8. Add a Purchase Order

Before you begin, ensure that the Vendor’s information is added to the profile of the equipment you’re planning to purchase. You can verify by going to the Inventory profile of that equipment. To get there, go to the menu, click on Equipment, and select Inventory…

9. Add a Purchase Order

Before you begin, ensure that the Vendor’s information is added to the profile of the equipment you’re planning to purchase. You can verify by going to the Inventory profile of that equipment. To get there, go to the menu, click on Equipment, and select Inventory…
?