1-541-955-6900

success@visp.net

Login

Documentation Series

Learn About VISP App Dashboard

Help Documentations / Subscriber / Scheduled and Triggered Emails

Scheduled and Triggered Emails

A scheduled email is a message that goes out to your subscribers on a specified date and time.  A trigger, on the other hand, is sent when a specific event or action happens, (e.g., when a subscriber’s credit card is expired.).

To open the feature where you can select to send or set up a scheduled or triggered email, first open your subscriber’s list.

1. Click on the hamburger menu, and select Email this list. When you’ve already opened the mass email editor, click on Templates.Scheduled and Triggered Emails - Visp App

2. Next, select Scheduled Emails. To schedule an email, click on the Templates tab and create or select a message you want to schedule for sending.

    • At the bottom of the email editor, you’ll find a checkbox with a small clock icon and the word Schedule beside it.
    • Putting a check on the box opens a popup bar that gives you the day and time when you want messages to go to your customers or subscribers.

Scheduled and Triggered Emails - Visp App

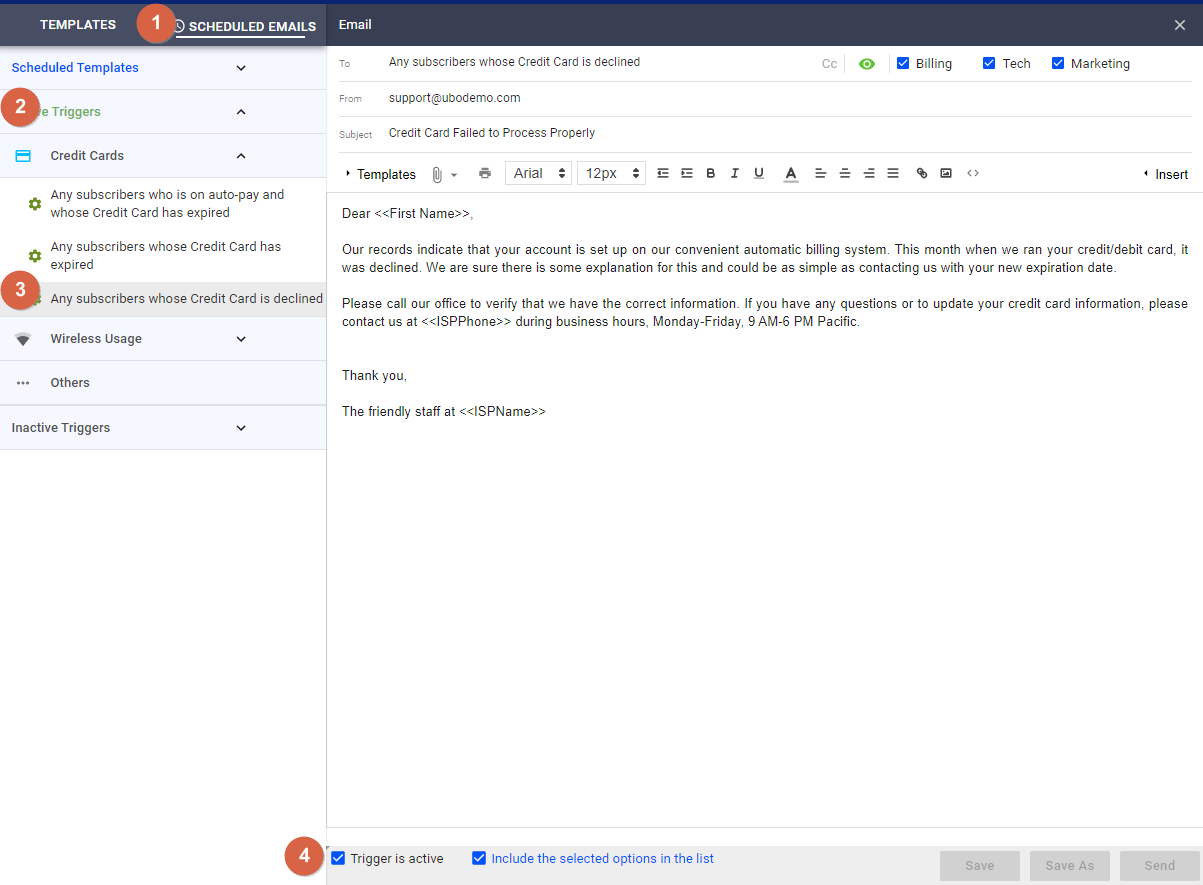
3. To activate a Trigger, first go back to the Scheduled emails tab.

    • Click on the Inactive triggers category
    • For this example, go to Credit Cards and select “Any subscribers whose credit card is declined.”
    • After writing your message in the body of this email, and attaching any file or statement to the message, put a check in the “Trigger is active” box at the bottom of the editor. 
    • A selection is available beside the “Trigger is active” option, which allows you to select whether to include Inactive, Suspended, Hibernated, and Auto-pay enabled subscribers in your email messages.

Scheduled and Triggered Emails - Visp App

1. Enable Email Notification for New Signups

You can get notifications emailed to you or your team when a new subscriber signs up for service. This is an internal message only, and cannot be edited. To access the feature, first click on the menu (9-dots menu). Then click on My Visp. In the My Visp panel, click…

2. Send Text Messages (SMS)

Create a Twilio Account The Short-Messaging-Service (SMS) feature in VISP allows you to send text messages to your customers, technicians or vendors. To set this up, you must first create a Twilio account. Go to https://www.twilio.com/try-twilio and register, or login…

3. Send to VISP Print House Automatically

You can now schedule invoices to be sent to the VISP Print house for printing. The VISP print house handles sending paper invoices to your subscribers. To enable the setting, go to the Menu. Click on Invoicing. Click on Paper Invoice. Under Print House Schedule, put a…

4. Deleting a Subscriber

For UBO or desktop (Java) version, refer to this link. Note that deleting a subscriber means cutting his or her entire account from VISP, so he or she will not be able to access any of your services at all. We advise that you consider a ‘grace period’ before deleting…

5. Private: Send to VISP Print House Automatically

You can now schedule invoices to be sent to the VISP Print house for printing. The VISP print house handles the sending of paper invoices to your subscribers. To enable the setting, go to the Menu. Click on Invoicing. Click on Paper Invoice. Under Print House…

6. Send a Mass Email

For UBO or desktop (Java) version, refer to this link. The Mass Email feature allows you to select a list of subscribers and send an email to them all at once. Here is how you schedule a mass email: Open the subscriber’s list. Click on the hamburger menu and select…

7. Scheduled and Triggered Emails

A scheduled email is a message that goes out to your subscribers on a specified date and time. A trigger, on the other hand, is sent when a specific event or action happens, (e.g., when a subscriber’s credit card is expired.). To open the feature where you can select…

8. Attach Files to Emails

If you need to send an email to a particular subscriber and attach files to it, you can do it directly within VISP. If you’re sending a mass email, click on the hamburger menu in the subscriber’s list and select Email this list. Once the email editor is open, you’ll…

9. Filters

For UBO or desktop (Java) version, refer to this link. If you are keeping track of or performing the same set of operations to a specific list of subscribers, the saved filters will be a convenient way to handle them. To add or edit your subscriber’s filters in VISP,…

10. Add Prospects or Subscribers

To add a new subscriber, simply click on the plus sign on the upper-right corner of the page and select Prospect or Subscriber once and you’ll be redirected to the mapping category or interface. Do the following: First, fill out all the information on the page….

11. Allow Customers to Create Their Passwords

For PCI compliance customers are given the ability to create a password for their account when they are first added to the system. When a new user is added to VISP, a password reset link is sent to the customer’s email address

12. SMS Auto–Responder

The auto-responder feature allows you to create and present a user-friendly self-service menu for your customers who communicate via text or SMS. This feature allows your customers to get more information, list tickets, do essential account management, and access…

13. Portal Alerts or Notifications

You can now display alerts or messages on your subscribers’ portal. Once you’re done, you can Activate your message. You can deactivate a message or alert from the same panel. For more information about this and all other features in VISP, reach out to your VISP Client Success team today.

14. Add Customers to VISP

There are two common ways to enter customer information in VISP By manually entering the customer information or Using the signup form. Let’s first discuss manually adding customer information to the VISP software. Click on the plus sign in the upper-right corner of…

15. Process NACHA Payments

You can use the National Automated Clearing House Association (NACHA) as an alternative option for processing subscriber e-check payments via your bank. Activating the NACHA Payment Method To use this method, you must activate NACHA by Going to the Menu Clicking on…

16. Create and Customize a Filter

You can now display alerts or messages on your subscribers’ portal. Once you’re done, you can Activate your message. You can deactivate a message or alert from the same panel. For more information about this and all other features in VISP, reach out to your VISP Client Success team today.

?