

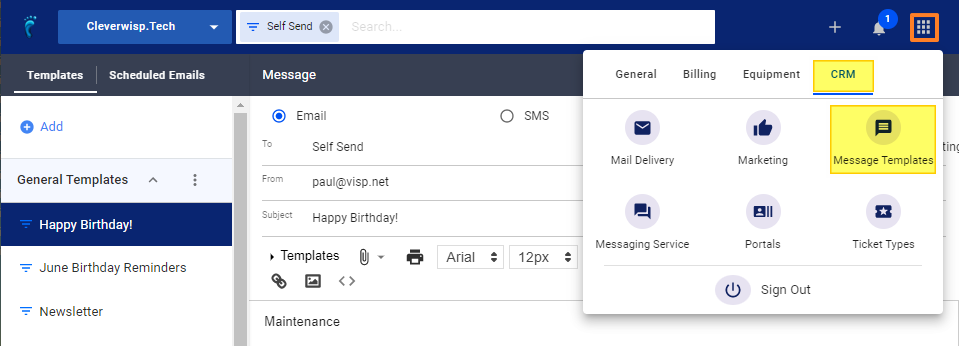
How to Open Mass Email Editor
- To send a mass email with the use of Filters, first launch your Mass Email Tool. Go to the
Menu - Click on the
CRM tab - Go to
Message Templates
Email Delivery and Automation
There are two types of email delivery in VISP, and you can customize your templates accordingly. There are automated emails and you have to either schedule a day and time for the message to go out, or set a specific action or trigger before the message gets sent. You also have the standard templates that can be manually sent.
To view the Scheduled or Triggered Templates, click on the Scheduled Templates tab.
You can schedule a standard template to automatically send on a specific day and time, by clicking on the Schedule toggle, as shown below. To disable it, go to the Scheduled Template tab, and look for your email template. Uncheck the Schedule box to turn off automatic sending.
To activate an inactive Triggered Template, go to the Scheduled emails tab, and exp[and the list of Inactive Triggers. Select a trigger, and then put a check in the ‘Trigger is active’ box. Once active, you can deactivate the said template by going to the Active Triggers list and unchecking the ‘Trigger is active’ box on the email template.
Take note that when you send an email, it will take at least 10 minutes for the message to be queued and then sent to your customers.
Parts of the Email Tool
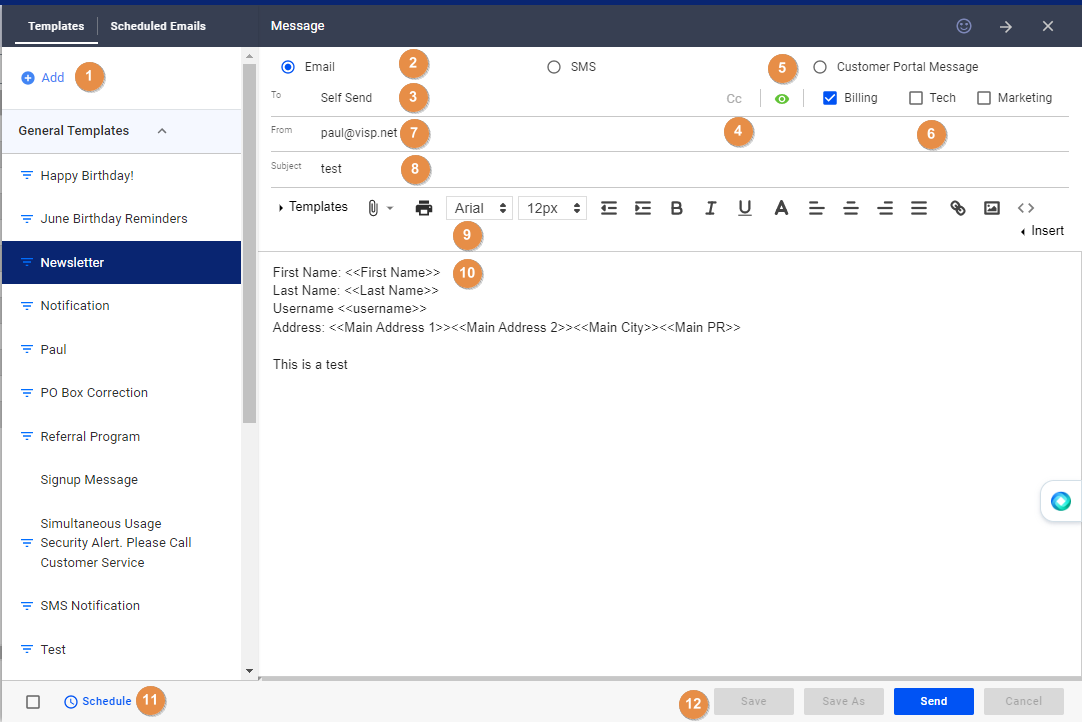
To send a mass email, open the Mass Email editor via the Menu > CRM > Message Templates. See the next instructions below:
- On the sidebar, you can Add new templates or click on existing ones to edit, preview, or send.
- On the topmost row, you can select whether to send an email, an SMS, or compose and display a portal message for your customers.
- The next row gives you the To field, where you can pull up filters you’ve previously created.
- A CC option is available here so you can type additional email addresses of team members or users, that you want to copy on your message. Take note, that the email addresses added here will be visible to customers.
- The eye icon is for enabling a preview of your message. If your subscriber’s list is on the left, you can click on the same eye icon to open the message preview for that specific customer.
- Next, if you are grouping or categorizing customer email addresses based on their role (i.e. billing, technical, or marketing), disabling any of the options here will skip the customers with those groups or roles selected.
- The next row contains the From field, which you can add valid company email addresses to, by going to the
Menu>General tab>My VISP. Click on the pencil icon in the Primary contact field, and then add another email address, separated by a comma. Save your work when done. - The next row is where you can write the Subject line for your message.
- The row below allows you to customize the formatting of your email. You can choose a new template, edit the font size and colors, attach files, or link images, or use the Insert option at the far right of the panel, to add merge codes that personalize (add First name, Last name, etc. ) to your message.
- Type your message in this section.
- The last row of the editor contains the Schedule option. This allows you to automate the sending of your email on a specific day and time.
- To the right, you’ll find options to Save, Save As, or Send and Cancel your message.
- After editing your email, save your work.