

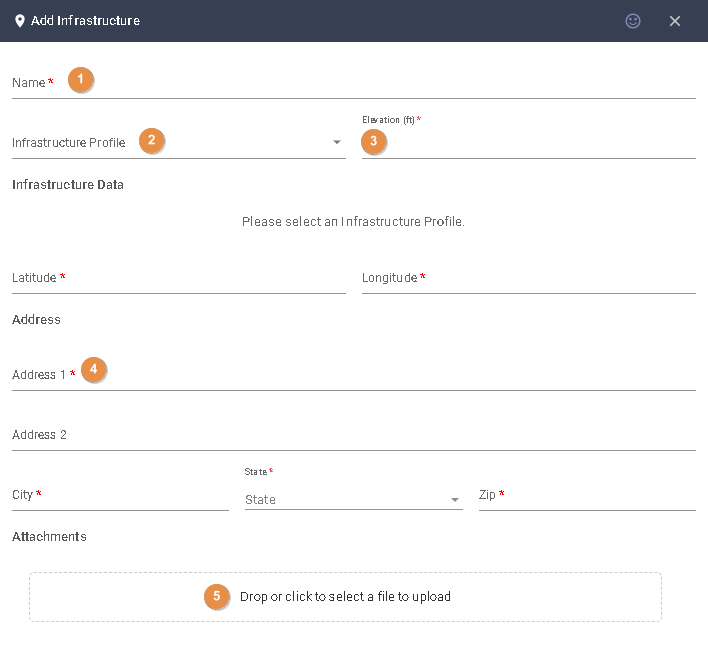
To add an infrastructure, like a site or tower, a warehouse, or even your technician’s vehicle, go to the infrastructure locations panel and click on the plus sign.
- Add a name to this infrastructure.
- Select an Infrastructure profile from the dropdown.
- Input the above-ground-level elevation.
- You can enter a fully qualified street address in the Address 1 field or provide the Latitude and Longitude for the location. A green refresh icon will appear beside the field for your address or coordinates if the system detects a validated address is entered in either of the fields.
- Add attachments or pictures of the infrastructure.
- Save your work when done.

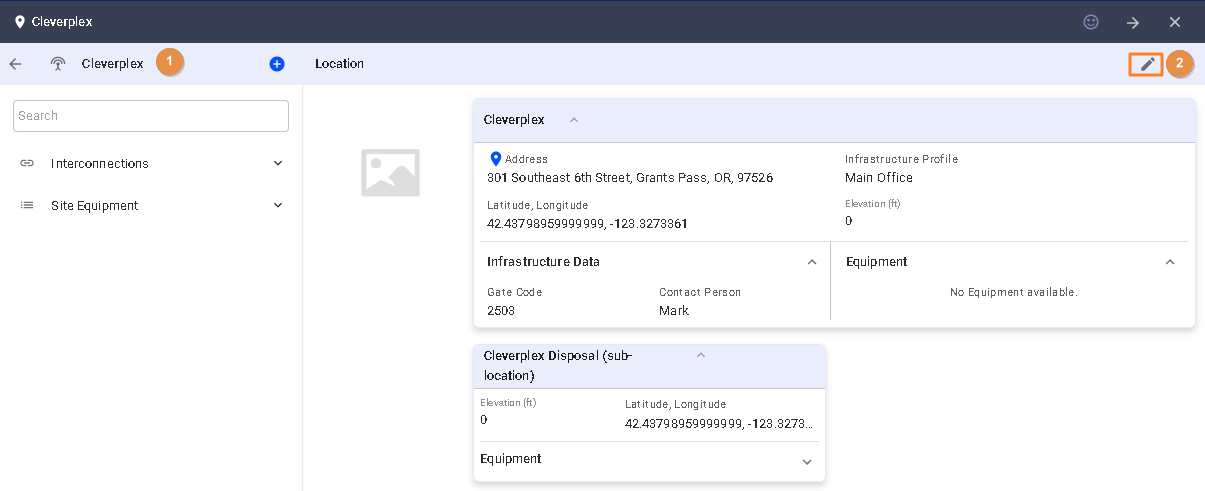
Your new tower or site should now be available in its specific category-tab in the Infrastructure locations list.
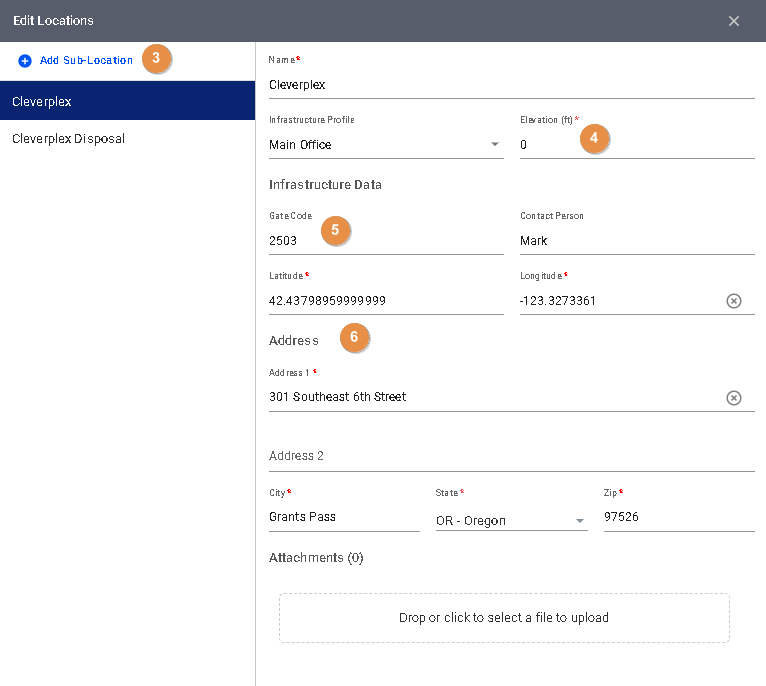
To add sub-locations, rooms, or sectors, in your infrastructure follow these instructions:
- Click on the tower or site name.
- Click on the pencil icon on the far right.
- Click on Add Sub-Location.
- Enter above-ground level elevations if you mount APs or radios on these infrastructure sub-locations.
- Fill out the metadata.
- You can enter a fully qualified street address in the Address 1 field or provide the Latitude and Longitude for the location. A green refresh icon will appear beside the field for your address or coordinates if the system detects a validated address is entered in either of the fields.
- Save your work when done.
To add equipment to the IRM:
-
-
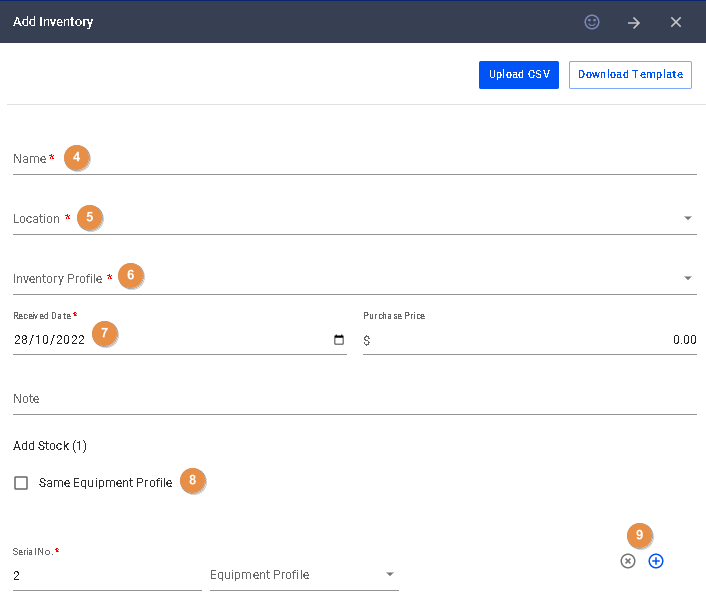
- First, go to the Inventory panel, and click on the plus sign.
- Before we continue, let me explain the two components of an equipment or device record in VISP.
- Before an equipment or device is added in VISP, you create an inventory profile, which contains the model, manufacturer, and SKU of the device. You also create an equipment profile that determines the equipment type and contains the metadata fields.
- Both are combined whenever you add new equipment or devices in the Infrastructure Resource Management or the IRM. You can add new equipment either from the inventory or the equipment tab.
- The only difference is that when adding equipment via the Inventory tab, you are required to enter their serial numbers.
- Let’s add equipment using the inventory tab. The mass import feature using the inventory tab will be covered in another video.
- Add a name for your device.
- Set the Location where this device is going to be stored or mounted. Access Points and Point-to-Point devices can be mounted or placed in a sub-location of an infrastructure. While CPE’s, range extenders, and other subscriber modules can be stored in the main infrastructure unit or in a sub-location of the infrastructure.
- Select the Inventory profile for this device.
- You may fill out the received date, purchase price, and notes.
- Before adding stocks, select the equipment profile that identifies the equipment type and its metadata. If adding multiple stocks with the same equipment profile, toggle the “Same Equipment Profile” box, and then select a profile from the dropdown.
- After adding a serial number, click Enter to open a new field and add more serial numbers, or you can click on the Plus or x button to add or remove lines for the serial number.
- Click on Save when you’re done.
-

The new equipment should now be added in the set Location, and should also display in both the Inventory and Equipment tabs for its model and manufacturer.
Now to add via the Equipment tab, follow these instructions:
-
-
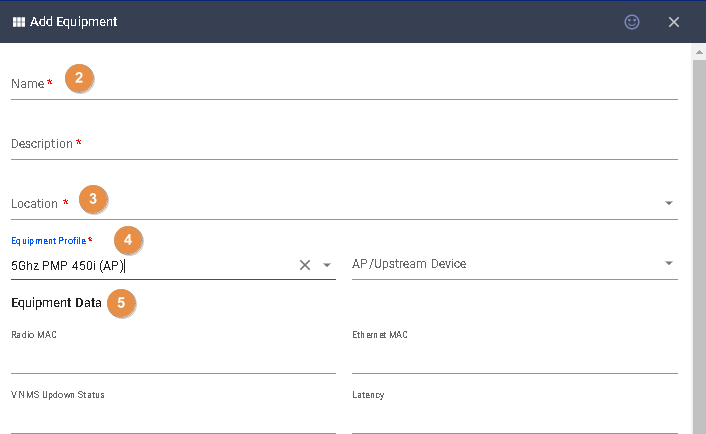
- Click on the Equipment tab, and then hit the plus sign.
- Enter the name and description of the device.
- Select the location where you want to store or mount the unit.
- Select the Equipment Profile for this device. This loads the metadata for the equipment.
- You may enter additional information in the metadata fields, or leave them blank for now.
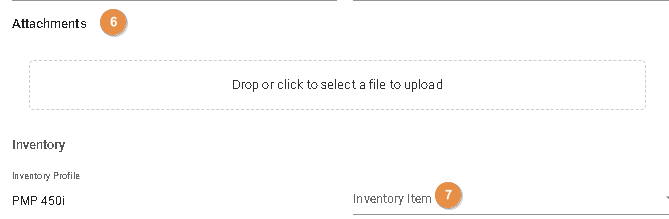
- Scroll to the bottom of the page to view the image attachments.
- You will also find the Inventory items. You will find the inventory profile associated with this equipment, as well as the option to select or add a new inventory item, by entering a serial number to match this new equipment. Otherwise, you can leave it blank.
- Hit save when you’re done.
-

Now, you can easily search the Equipment tab for your device. If you entered a MAC or IP address in the metadata fields, you can look for them using the search bar.
For more information about this and all other features in VISP, reach out to your VISP client success team today.