Documentation Series

Learn About VISP App Dashboard

Help Documentations / Equipment / IRM: Transfer Equipment

IRM: Transfer Equipment

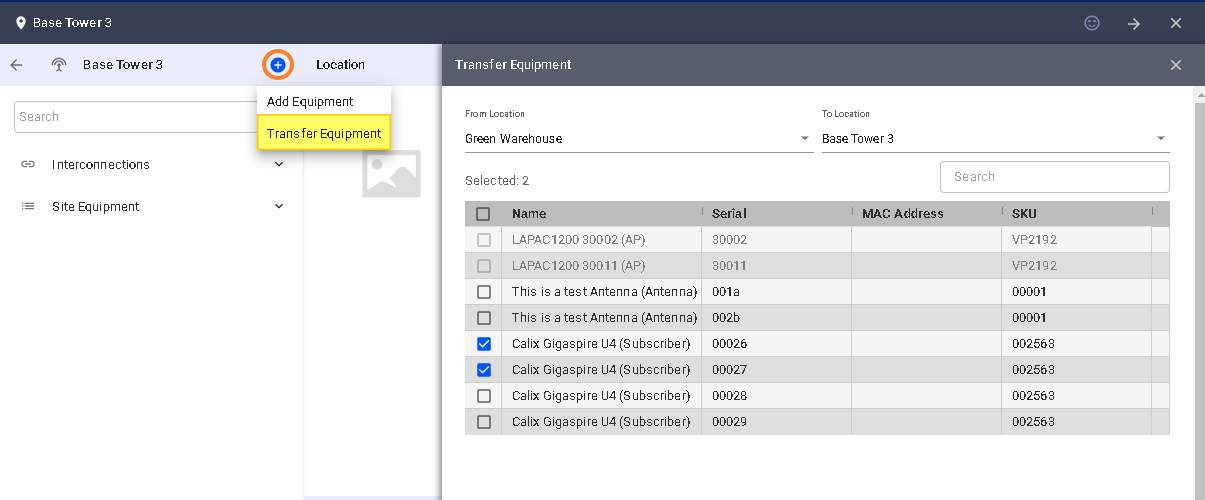
To transfer equipment from one location to another in the IRM, do the following steps:

  1. Go to the IRM.
  2. Select the infrastructure where you want to put the device.
  3. Click on the Plus sign and select transfer equipment.
  4. Choose the infrastructure you want to pull equipment from.
  5. A selection containing the list of available equipment is provided.
  6. Put a check on the equipment you want to transfer
  7. Click on Save when you’re done.

IRM: Transfer Equipment - Visp Documentation

1. Assigning and Unassigning Equipment

Assigning Equipment 1. Using the Equipment Manager Open the Equipment Manager and go to the Inventory tab. Select the equipment profile you’d like to assign. On the equipment profile, search and select the equipment, then click on the “Assign to Subscriber” button….

2. Receive Inventory

Receiving inventory or a new device in VISPrequires an equipment profile. If Equipment profile is already configured, follow the steps below to receive or add new equipment into VISP: Navigate to the Equipment > Hamburger menu > Click Add Inventory In the Add…

3. Add ISP Tower or Site Location

The ISP Tower or Site Location gives you an overview of the Towers/Site that you installed with their corresponding address. Additional features include automatic calculation of revenue per site and accounting for expenses that were set. To add a Site Location or ISP…

4. IRM: Profiles and Metadata

To add a brand new site, tower, or equipment in the Infrastructure Resource Management or the IRM, you must first add a profile or template. These profiles simplify the process of adding new infrastructures and equipment, as well as collecting the metadata that…

5. Equipment Accounting Controls

Manage and control how your equipment is being handled by the software with accounting controls. To enable this feature, go to the Main Menu > Equipment > Equipment Accounting Controls and check the “Enable Equipment Management Features” checkbox. This will…

6. Inventory Locations

The Inventory Location determines where devices are stored or the type of storage that houses your equipment. This can include the warehouse or the storage unit of your suppliers. To add an inventory location, for your equipment inventory, click on the menu. Go to…

7. IRM: Add Infrastructure and Equipment

To add an infrastructure, like a site or tower, a warehouse, or even your technician’s vehicle, go to the infrastructure locations panel and click on the plus sign. Add a name to this infrastructure. Select an Infrastructure profile from the dropdown. Input the…

8. Add a Purchase Order

Before you begin, ensure that the Vendor’s information is added to the profile of the equipment you’re planning to purchase. You can verify by going to the Inventory profile of that equipment. To get there, go to the menu, click on Equipment, and select Inventory…

9. Add a Purchase Order

Before you begin, ensure that the Vendor’s information is added to the profile of the equipment you’re planning to purchase. You can verify by going to the Inventory profile of that equipment. To get there, go to the menu, click on Equipment, and select Inventory…

10. IP Management (IPAM)

To setup IPAM: First, click on the menu Go to your Equipment tab Click on the IP Management panel. In the Subnets tab: Click on Add New Subnet Fill out the Network field, which contains your IP and slash notation. The Gateway field automatically populates after you…

11. IP Management (Subscriber Settings)

After adding your IP addresses via the IP Address Management (IPAM) tool, it’s time to populate them to your customers’ devices. Open your customer’s account and go to Packages Click on the service and open Devices Click on the vertical ellipsis for a specific device…

12. Avalara

Before you begin, ensure that the Vendor’s information is added to the profile of the equipment you’re planning to purchase. You can verify by going to the Inventory profile of that equipment. To get there, go to the menu, click on Equipment, and select Inventory…

13. Wireless Infrastructures

How to Create a Wireless Infrastructure Profile? 1. Open the Visp Web App 2. Click the nine-dot menu in the upper right corner to open the VISP Admin Page. 3. Click on Equipment 4. Select Infrastructure Profile 5. Click on Infrastructure Profile An Infrastructure…

14.How to Access the Infrastructure Resource Management (IRM)

The IRM or the Infrastructure Resource Management feature in Visp allows you to efficiently manage and optimize the infrastructures (sites, warehouses, etc.) and…

15. Add Access Point and Antenna

1. Required Equipment for Displaying Coverage Maps Wireless Infrastructure Location (Sub-Location / Sector) Create Profile and Add Equipment for AP + Antenna Assembly Configure Metadata for Azimuth, Beamwidth, and Range in your Antenna Profile How to Add the AP…

16. Assign Equipment to User Accounts and Connect to Access Points

Add Equipment to a Subscriber Account 1. Click on Subscribers 2. Search for the subscriber or select from the list. 3. Go to the Equipment Panel. 4. Click on the blue plus icon. 5. Choose a Subscriber or CPE-type device using the “Add Equipment” window. 6. Use the…

17. Infrastructure Resource Management (IRM)

The IRM or the Infrastructure Resource Management feature in Visp allows you to efficiently manage and optimize the infrastructures (sites, warehouses, etc.) and infrastructure resources (network devices, servers, etc) in a centralized platform. 1. Outline of Setup…
?