

The integration with Avalara allows you to access up-to-date information on changing tax laws for different states, cities, or counties. It then allows you to automate the tax calculations applied to invoice items in VISP, depending on the nature, the type, and the coverage of your business and services. This, in turn, allows you to easily collect and speed up your remittance process and manage exemption certificates. Overall, this allows you to streamline your process, which can save you more time and money and reduce the risk of errors when you prepare, file, and remit your tax returns.
Activation
To activate Avalara,
- Go to the
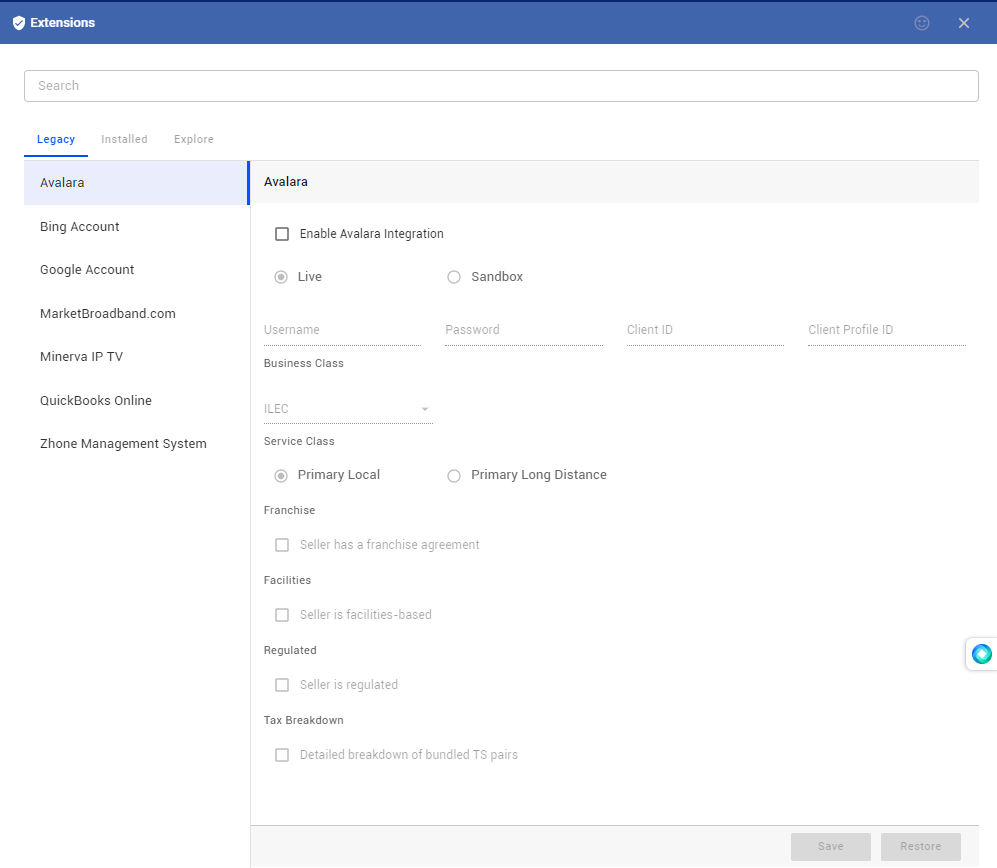
Menu>Extensions, and click on the Avalara menu item (sidebar) - Put a check on “Enable Avalara Integration” to activate the feature.
- You may initially set your instance to Sandbox while you’re setting up or testing Avalara. Coordinate with your Avalara Account Representative on your trial period and when you should set your instance to Live.
- Reach out to your Avalara representative as well for all the necessary information for the fields listed here. The details are customized depending on your business and services. You may schedule a time between Avalara and your VISP Onboarding team, for the configuration of the settings here.
- Save your work when you are done.
Setting up Avalara in Your Items and Packages
Once you have activated Avalara:
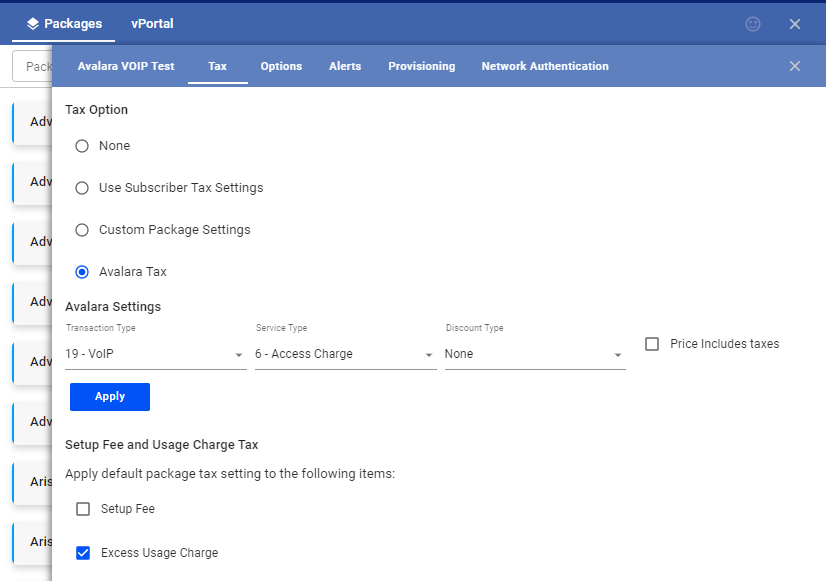
- Proceed to your Package List, by going to the
Menu> thenBilling> and then Packages. - Edit a package, and go to the Tax section.
- Toggle
Avalara Taxfrom the availableTax Options - In the Avalara settings, select the Transaction Type, Service Type, and Discount Type for the service.
- Hit Apply when you’re done and then click on Save.
- Take note that the
Transaction,Service, andDiscounttypes are provided in the catalog for your account, by your Avalara representative. Coordinate with the Avalara team if you want more information on the Transaction, Service, and Discount types for your different packages. - To configure Avalara for custom line items or charges in VISP, go to the
Menu. Select theBillingtab, and click on Items. - Choose an item from your list.
- Go to the
Taxtab, and toggleAvalara Tax. - Once again, coordinate with your Avalara team or account representative, in order to have the correct settings when you populate the
Transaction,Service, andDiscounttypes for the item. - Save your work when done.
Enable Avalara in the Subscriber’s Account

To enable Avalara on a subscriber account:
- Go to your Subscriber’s List.
- Select a subscriber.
- Below the Primary Contact panel, click on the Avalara sub-menu or tab.
- Again, depending on your profile and configuration with Avalara, populate the necessary fields on this page to enable the use of Avalara on the subscriber’s account.
- Here’s an example of a standard configuration for a residential subscriber with no specific exemptions on the account.
- Once you’re done editing the information, Save your work.
Avalara in Statements
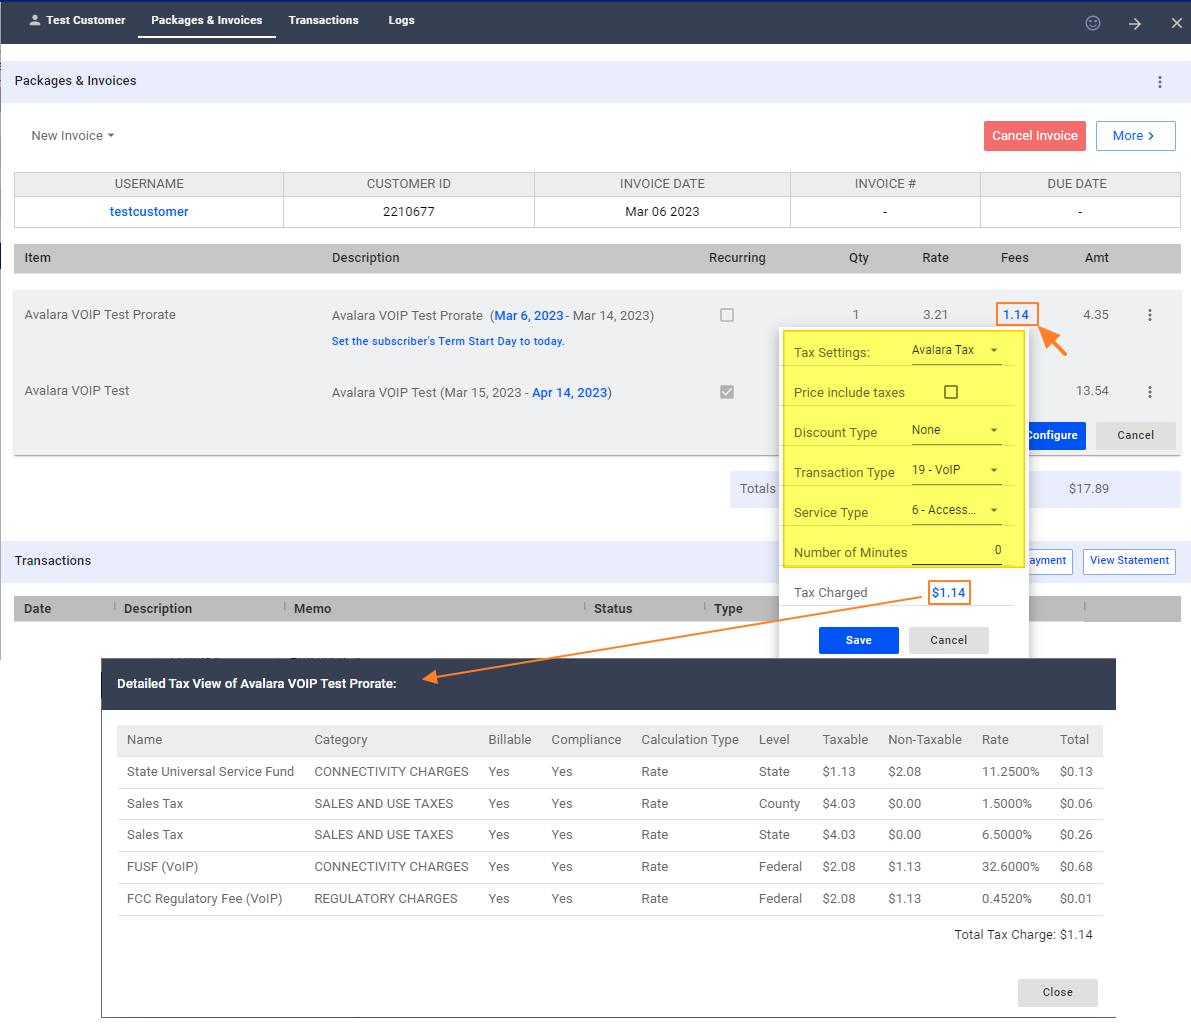
- To review or edit the Avalara tax applied on an invoice item, go to an existing invoice.
- Under the Fees column, click on the line item of the custom charge, service, or package you want to edit.
- Make sure that Avalara Tax is selected in the Tax Settings.
- Set the Transaction and Service types, and all other information for the fee, right on this pop-up.
- You may click on the
Tax Chargedlink to open a pop-up containing the breakdown of the taxes applied to the item. - Save your work when done.
Note
- The PDF copy of the invoices contains your taxes/fees, as well as the breakdown of the Avalara charges.
- Upcoming invoices also contain details on the Avalara tax applied to the item or charges.
For more information about this and all other features in VISP, reach out to your VISP Client Success Team today.