1-541-955-6900

success@visp.net

Login

Documentation Series

Learn About VISP App Dashboard

Help Documentations / Billing / Add a Custom invoice

Add a Custom invoice

For UBO or desktop (Java) version, refer to this link.

Each of your subscribers already has an automatically generated invoice based on the package services he/she is availing from you. However, if a subscriber has additional items to pay for (like rented or purchased equipment, for example), you can create an invoice yourself. Here’s how to add a custom invoice to an account:

  1. First, go to your subscriber’s list and click on a subscriber’s account.
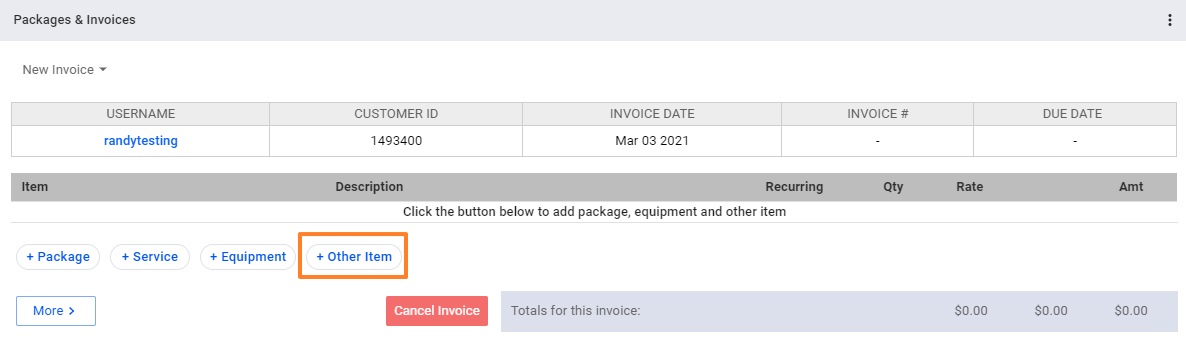
  2. In the Packages & Invoices section, click on the vertical ellipsis and choose New Invoice.Add a Custom invoice - Visp App
  3. On your new invoice, select whether to charge a package, a service, equipment or a custom line item (Other Item).
    • In this example, let’s say you’re adding an Other Item to the invoice.
    • Select other items. Select an item from the pre-defined list or add a new item.Add a Custom invoice - Visp App
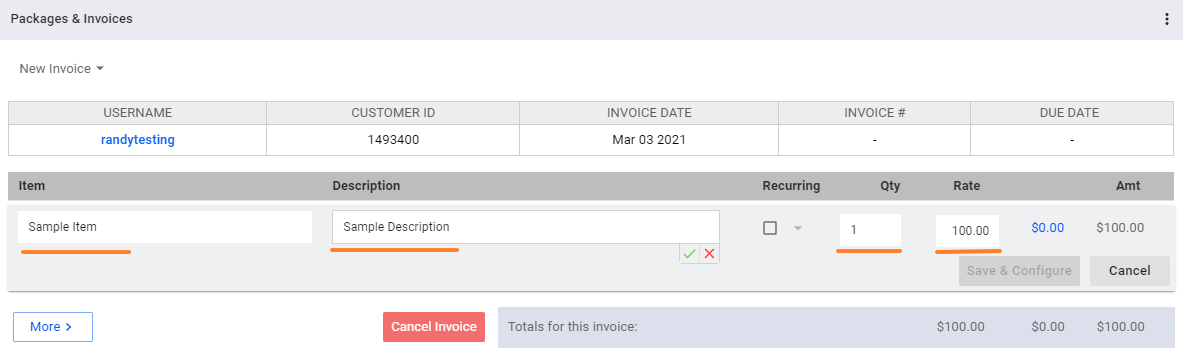
  4. When you’re adding a custom item, take note of the following fields:
    • Item field – Add a label for your item.
    • Description field – Add a brief description about the item or charge you are adding.
    • Recurring box – Put a check here if you want to charge this item based on a recurring term. If your subscriber pays quarterly, then the custom item gets added quarterly to the invoice.
    • Add a quantity – Set the number of units for the specific item.
    • Rate – Set the price of the item here.Add a Custom invoice - Visp App
  5. After filling out all the fields, hit Save & Configure.

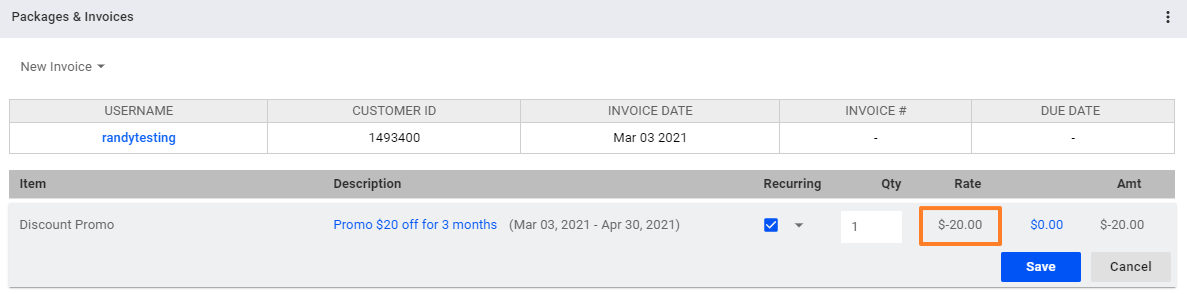
Note that if you’re adding a discount, add a negative rate to a custom item. However, make sure that the invoice does not result in a negative value, or shows a total amount that is less than zero.

Add a Custom invoice - Visp App


1. Enable Automatic Payment of Invoices to VISP.net

To enable the automatic payment of your invoices to Visp.net, go to the menu in VISP and select My VISP. Scroll and expand Payments. Add the person’s email address who will receive your billing reminders or notifications from Visp.net. Add an amount to the Balance…

2. Taxes

VISP supports integration with Avalara for automated taxation. It’s also designed to manage tax settings that support multiple criterias for every transaction. To add a tax setting, go to Main Menu > Invoicing > Taxes and clicking on the plus sign or Add New…

3. Supported Merchant Processors

Choose the processor that works best with your billing operations; many of the top gateways integrate with VISP. Payment Solutions is a “white-glove concierge” service that ensures you get the best rates and features for your ISP. You’ll work with professionals that…

4. Late Fee or Re-billing Fee

Late fees and re-billing fees are charges that may be added to your subscribers when they have been past due for a specified number of days. They encourage your subscribers to pay on time to avoid paying late or re-billing fees. Go to Main Menu > Invoicing >…

5. Update Billing Cycle

For UBO or desktop (Java) version, refer to this link. To change or update the billing cycle of a subscriber, first click and open your subscriber’s list. Click on a subscriber’s account. Click on the Billing Options tab. In the section labeled Cycle, you can click…

6. Refund Payments

For UBO or desktop (Java) version, refer to this link. Whether it’s a mistake in receiving payments or a discount you forgot to enter, the Refund feature is your life-saver. To process a refund, you first need to have the Payment refunding function enabled in your…

7. Receive Payments

Let’s say your subscriber has seen the invoice you sent and has already paid. You need to acknowledge that payment and record it in that subscriber’s register: this is “posting a payment” in the software To receive payments from subscribers, first go to your…

8. Print Invoices

For UBO or desktop (Java) version, refer to this link. In VISP, you may print invoices individually or by batch. Here’s how to print it individually: Click on a subscriber’s account. In the Transactions section, click on the invoice you want to print. Once the…

9. Add Scheduled Actions (Reschedule Late Fee / Suspension)

To reschedule suspensions and late fees to another date, go to your subscribers’ list and pick a subscriber. In the subscriber’s profile, go to the Logs section. Click on the vertical ellipsis ⋮ or the three dots . on the account

10. Enable and Set Paper Invoices

For UBO or desktop (Java) version, refer to this link. Some of your subscribers may want to have printed invoices. The Paper Invoice Fee feature allows you to set a default value and setting when Paper Invoice is enabled for your subscribers. To set up or configure…

11. Enable and Set Grace Periods

For UBO or desktop (Java) version, refer to this link. A grace period is the amount of time you give your subscribers so they can pay their balance due without getting suspended. For example, if payment is due on the 10th of the month and the grace period was set for…

12. Edit an Invoice

For UBO or desktop (Java) version, refer to this link. To edit an invoice in an account, first go to your subscriber list. Click on a subscriber’s account and do the following: In the Transactions section, select the invoice you want to edit. Or under Packages and…

13. Delete an Invoice

For UBO or desktop (Java) version, refer to this link. To delete an invoice, first go to your subscriber list. Click on a subscriber’s account, and do the following: In the Transactions section, click on the invoice you want to delete. If you want to delete the…

14. Add Equipment Charge to an Invoice

For UBO or desktop (Java) version, refer to this link. A Credit Memo reduces the Accounts Receivable (AR) from a subscriber. Use a credit memo when adding a one-time credit (discount) to an account, or reversing a charge. To add a credit or debit memo to an account,…

15. Add a Custom invoice

For UBO or desktop (Java) version, refer to this link. Each of your subscribers already has an automatically generated invoice based on the package services he/she is availing from you. However, if a subscriber has additional items to pay for (like rented or purchased…

16. Adding a Credit or Debit Memo

For UBO or desktop (Java) version, refer to this link. A Credit Memo reduces the Accounts Receivable (AR) from a subscriber. Use a credit memo when adding a one-time credit (discount) to an account, or reversing a charge. To add a credit or debit memo to an account,…

17. Bill-to-Another Feature

Use the Bill-to-Another feature to pay for an item on another customer’s bill. Customer A (Parent Account) is paying for an item on Customer B’s (Child Account) invoice. First, go to Customer B (Child Account), and hover over the item. Click on the vertical ellipsis…

18. Add Scheduled Actions

To reschedule suspensions and late fees to another date, go to your subscribers’ list and pick a subscriber. In the subscriber’s profile, go to the Logs section Click on the vertical ellipsis ⋮ or the three dots . on the account Click on Add Scheduled Action On the…

19. Credit Memo Redesigned

In VISP, a credit memo or a credit note is a commercial document issued by an ISP to a subscriber account that reduces the amount of money the subscriber owes. It is used when services are canceled, when products (devices) are returned or not delivered, or when a…

20. Chart of Accounts

1.Click the nine-dot menu in the upper right corner to open the VISP Admin Page. 2. Click on Billing. 3. Select Chart of Accounts 4. Click on “Add New Account” 5. Enter a Chart of Accounts code. 5. Enter a Chart of Accounts code. 6. Use the dropdown to select a Chart…

21. Add and Configure Taxes

1. Click the nine-dot menu in the upper right corner to open the VISP Admin Page. 2. Click on Billing. 3. Select Invoicing 4. Select Invoicing 5. Enter a new label for taxes. 6. Toggle “Require selection upon adding new subscriber.” to require the selection of a tax…
?