This guide outlines the process of adding a custom item to a customer invoice using the ‘Items Manager’ feature. This is particularly useful when you need to bill for one-time charges, recurring fees, or bundle specific charges with packages.
1. Accessing the Items Manager
-
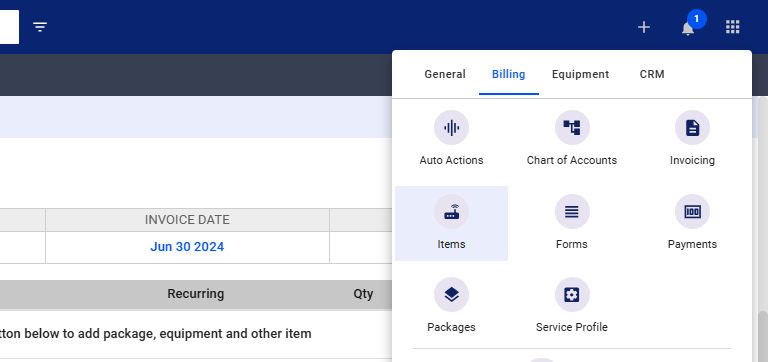
- Click on the nine-dot menu in the upper right corner of the screen.
- Select the “Billing” tab.
- Choose “Items”.
2. Understanding Item Types
Before creating an item, it’s important to understand the different types:
-
- Custom Item: This is the most versatile type and encompasses any charge or fee. It can be a one-time charge, a recurring fee, or bundled with packages.
- Fee: This refers to automated charges triggered by a specific event (e.g., hibernation fee, suspension fee, credit card fee).
- Equipment Charge: Use this for charges related to specific equipment or devices.
- Package: This allows for more configurable package settings, including bundling options.
- Service: This is for adding services to packages or invoices, but its use is limited at the moment.
3. Creating a Custom Item
- In the Items Manager, click the “+ Add New Item” button.
4. Setting Up Your Item
- Code: Enter a unique code for easy identification (e.g., “rental” for equipment rental).
- Type: Select “Custom”.
- Description: Provide a clear description (e.g., “Rental Charge or Fee”).
- Account: While optional initially, it’s recommended to set up a chart of accounts for better financial tracking. This allows you to categorize items as revenue, expense, etc.
- Status: Ensure the “Item is Active” toggle is enabled. The date will be set by default.
- Click “Add”.
5. Setting the Rate
- Go to the “Rates” tab.
- Rate Option: Choose how the charge will be applied:
- Non-recurring
- Recurring flat rate
- Percent-based
- Set the rate amount (e.g., $10 for a flat rate).
- Enable “Allow custom rates per subscriber” if you might need to adjust the rate for specific customers in the future.
Click “Save”.
6. Configuring Tax Settings
- Go to the “Tax” tab.
- Select the appropriate tax setting:
- Non-taxable
- Use subscriber’s tax settings
- Avalara tax (requires integration with Avalara)
- Click “Save”.
7. Managing Access Restrictions (Optional)
- Go to the “Access Restrictions” tab if you need to limit user access to this item.
8. Adding the Item to an Invoice
- Close the Items Manager by clicking the “X” button.
- Return to the subscriber’s profile and the “New Invoice” section.
- Click the “+ Other Item” button.
- In the search field, type the code you created (e.g., “rental”).
- Select the item from the list and click the blue “Add” button.
- If the charge is recurring, check the “Recurring” box and configure the settings:
- Proration options
- Auto-suspend
- Expiry date
- Set the quantity and verify the tax and final amount.
- Adjust the invoice date if necessary.
- Click “Save”.
💡 For more information about this and all other features in Visp, reach out to your Visp Client Success Team today.
Phone: 541-955-6900Email: success@visp.net
Open a ticket via www.visp.net/ticket


