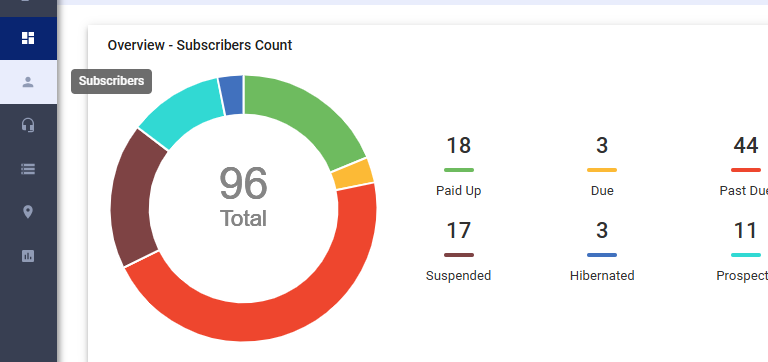
Documentation Series

Learn About VISP App Dashboard

Help Documentations / How to Set up a Parent Account with Linked Child or Sub-Accounts?

How to Set up a Parent Account with Linked Child or Sub-Accounts?

The parent-child relationship provides a clear hierarchical structure, making it easy to organize and manage multiple accounts. Payments can be made from the parent account to cover all sub-accounts, eliminating the need for multiple transactions and reducing administrative overhead.

Setup the Accounts

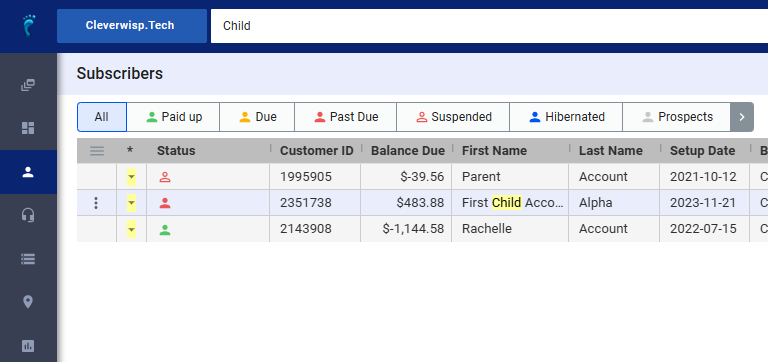
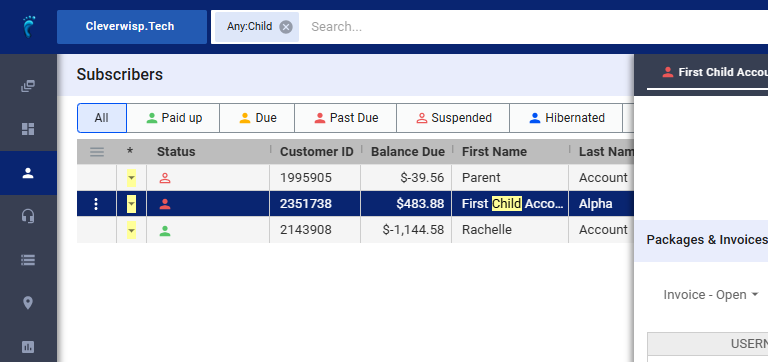
1. Click on Subscribers

2. Search for the subscriber or select from the list.
3. Display the Billing Contact tab.
If not displayed already, click on the pencil icon in the Primary Contact section.
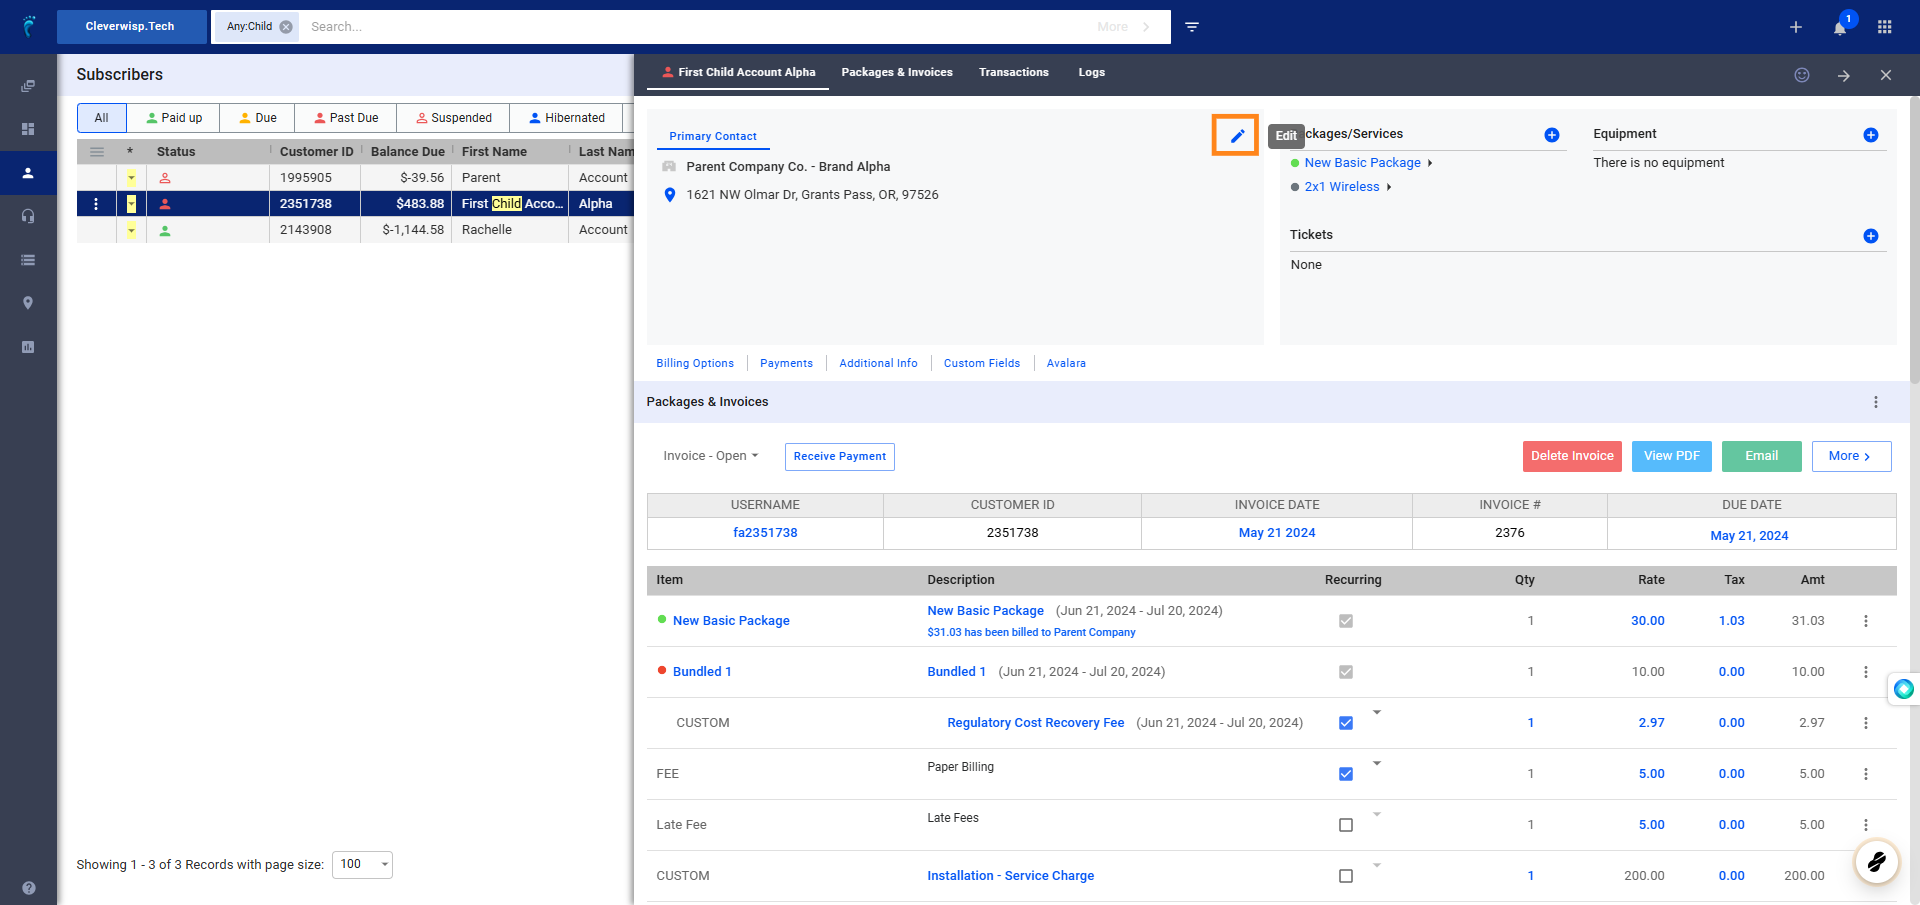
4. Disable or uncheck the option, “This is also the Billing Contact”
.

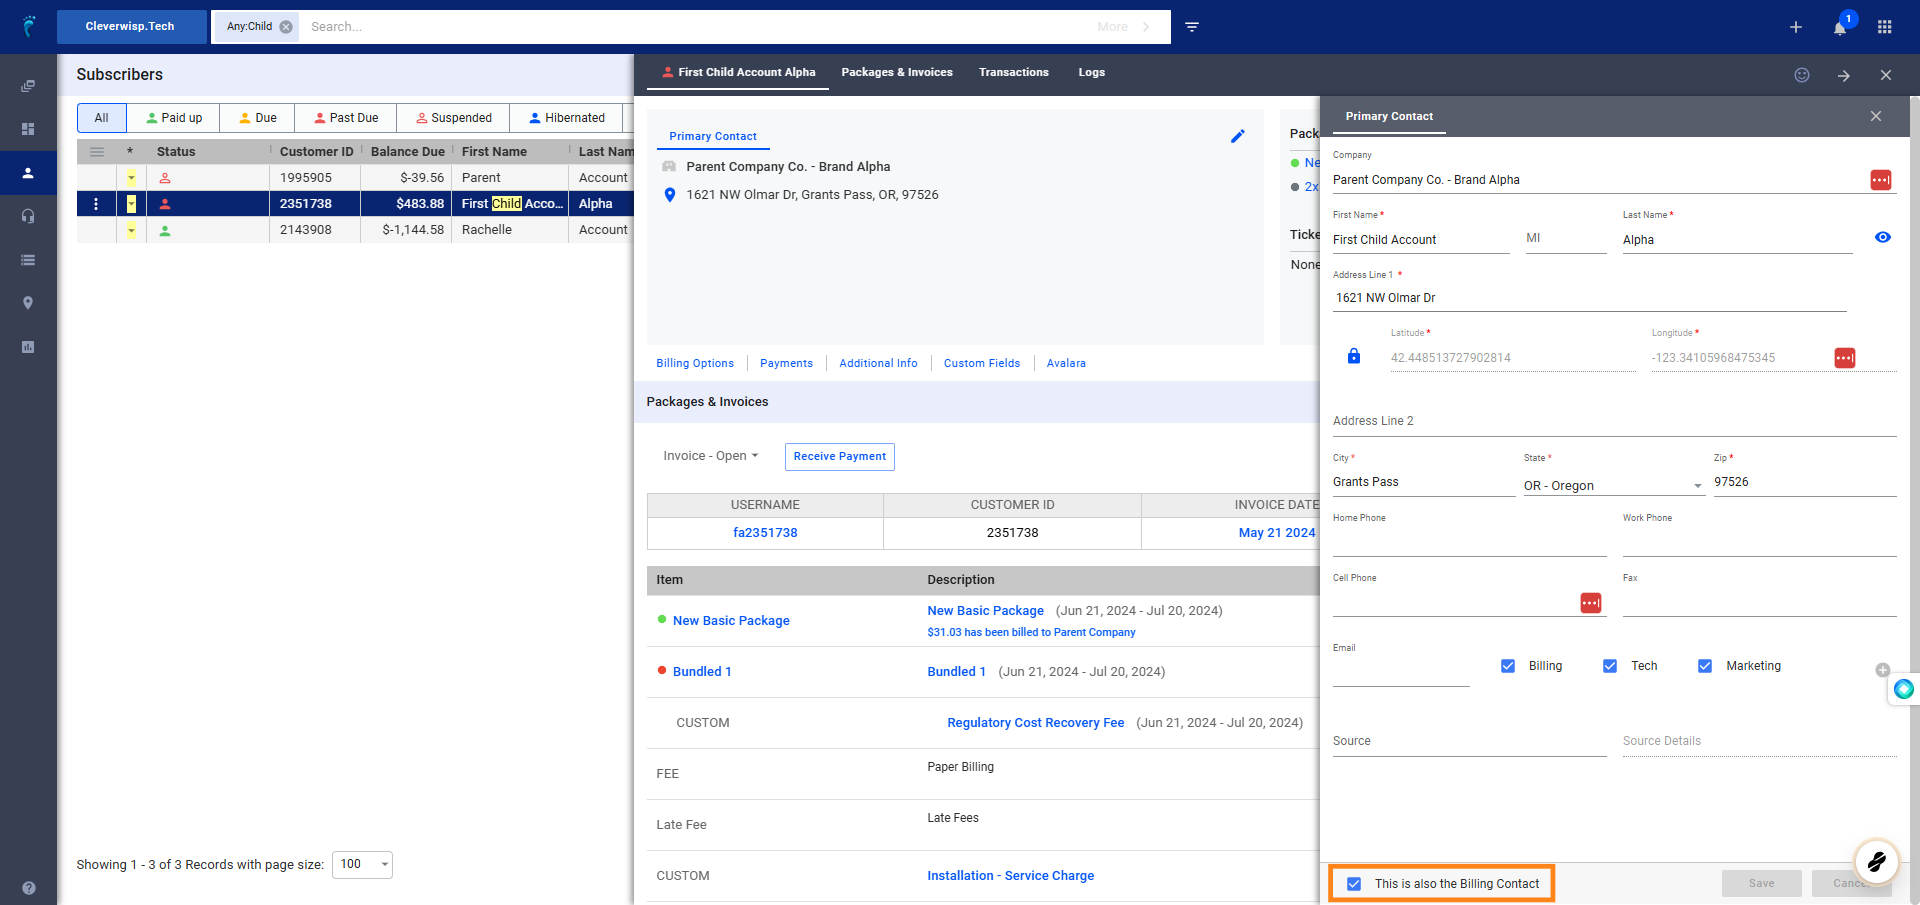
5. Fill out the fields for the Primary and Billing Contacts, to clearly distinguish between parent and child accounts.
Ensure the following fields are updated for the Primary and Billing Contact tabs are updated:

    • Company: Indicate if the account is a child or parent account. (e.g. Child Account – Brand Alpha, Parent – Brand Alpha)
    • Names: For the child account, use the subscriber’s name. Use the payer’s name for the billing contact.
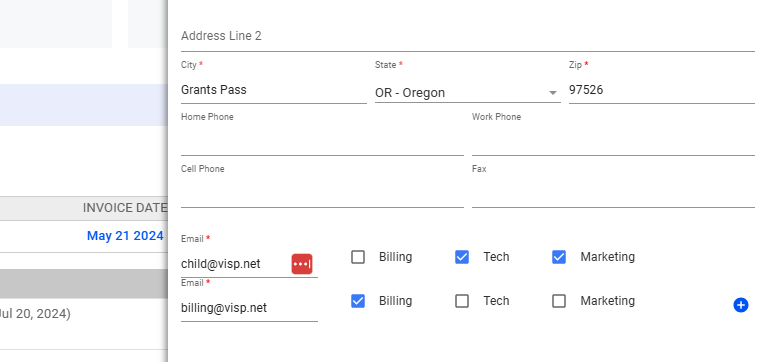
    • Service Address (Address 1 and 2): The Primary Contact address or the Service Address should contain the actual address of the subscriber. The Billing Contact tab contains the location where the bill is sent (paper invoice).
    • Phones: Add distinct phone numbers for the subscriber and the payer of the account.
    • Email: For the email address, ensure billing is only received by the payer of the account. Technical and marketing emails should go to the primary contact email address.
    • Source: Update any source or source details fields as well.

This process helps distinguish between parent and child accounts.

Save your work when done.

💡 Next, enable the Bill All to Another Feature
The “bill all to another” feature streamlines the billing process by allowing all invoices and item charges to be billed from one account to another, such as from a child to a parent account.

Steps to Enable Bill All to Another

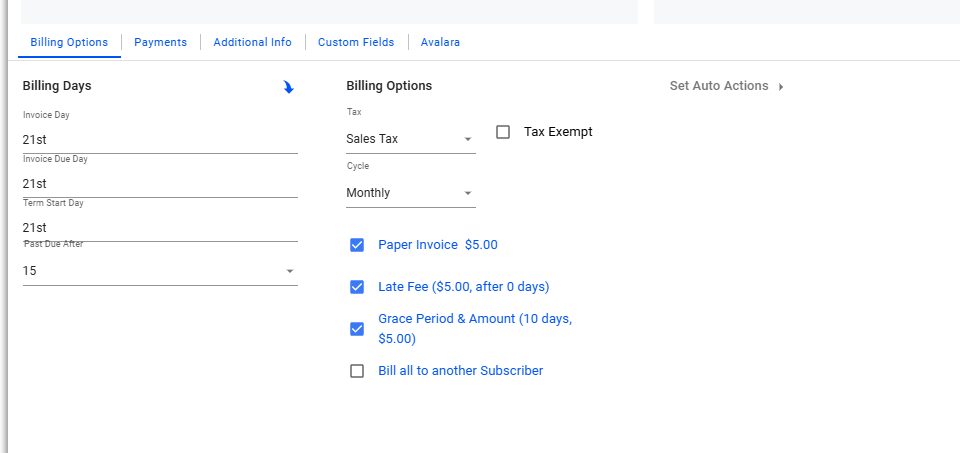
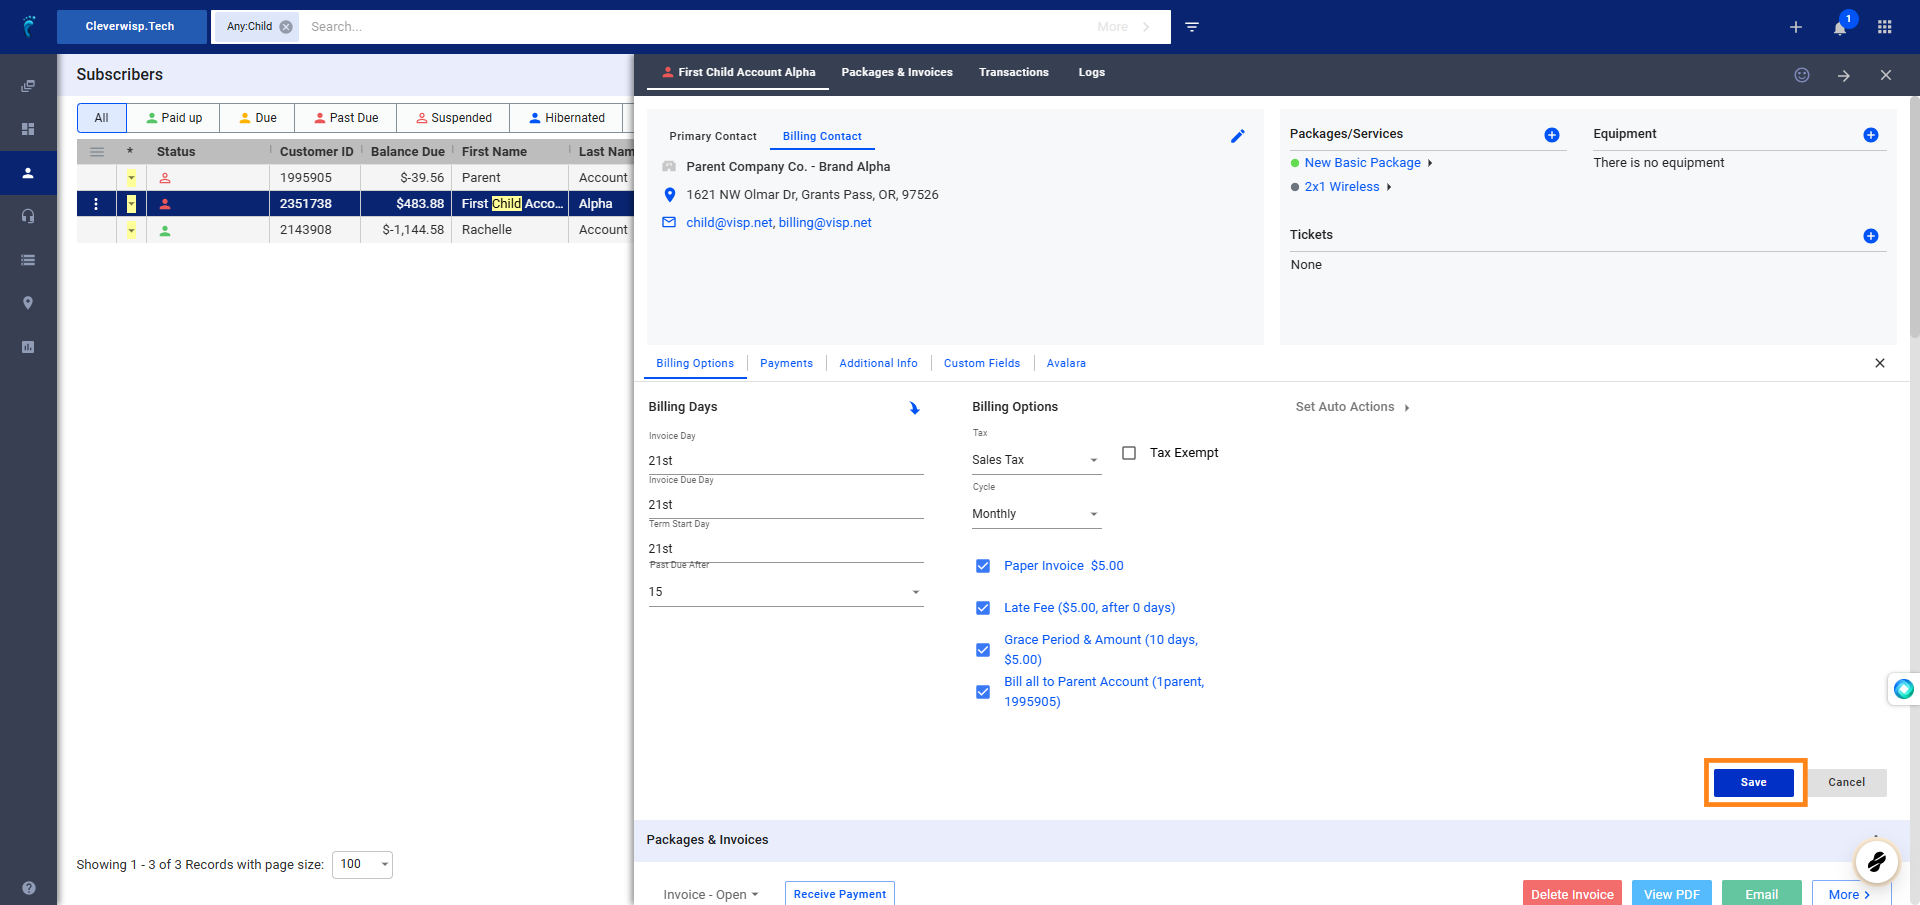
6. From the Subscriber’s Profile, click on Billing Options
Toggle “Bill all to another Subscriber”

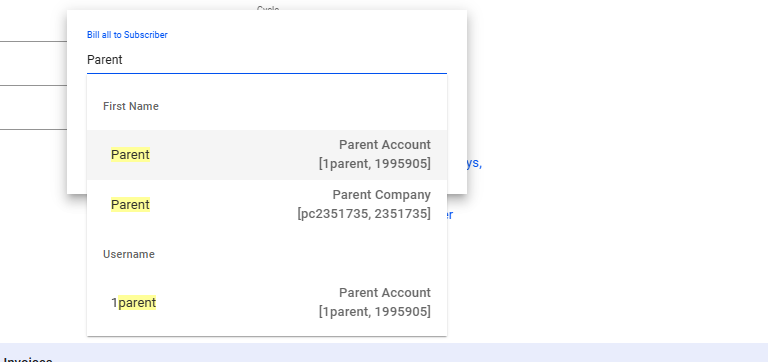
7. Click on the field to enter the name, customer ID, or username of the account you want to set as the parent.
Use the dropdown to select the account.

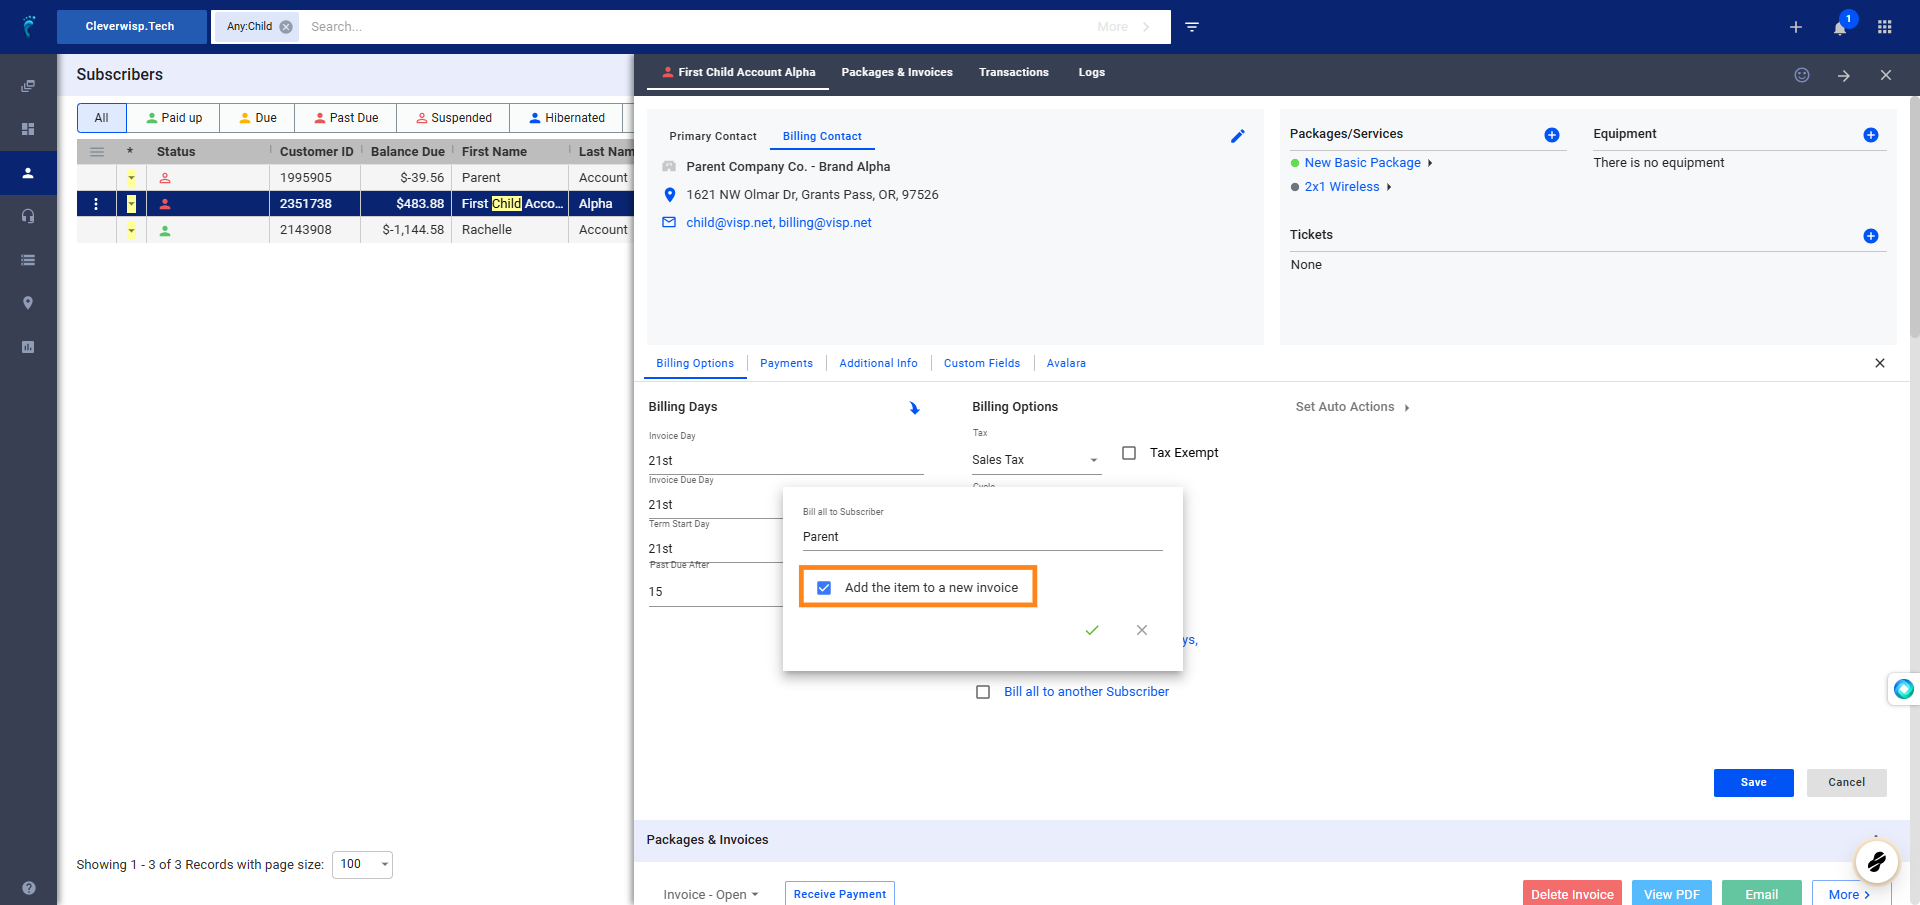
8. Enable or toggle “Add the item to a new invoice”
If the sub or child-account has a different billing cycle (flexible billing) than the parent account or other sub or child-accounts, a new invoice allows for proper billing alignment.

Also for one-time charges or fees, a new invoice can clearly distinguish them from recurring charges. This makes it easier for both the service provider and the customer to track and manage payments.

Click on the green check mark, to save your changes.

9. Click on Save

💡 How does bill all to another work?
When you enable the “bill all to another” feature, all system-generated and recurring invoices will be charged to the parent account, from the child accounts. For instance, if a customer has four child accounts, charges from different days will appear on the parent account’s transaction list.

With flexible billing, these charges can show up on different days throughout the term. If there’s a fixed invoicing schedule, say on the first of the month, multiple invoices can be displayed separately or combined into one on the first of the month.

💡 How is Bill to Another Similar to this feature?
The Bill- to-Another feature allows you to transfer billing responsibility for a specific item or transaction to another subscriber or customer.

  • For example, if a subscriber purchases an extra router, but wants it billed to their parent company, you can use this option.

Using the Bill to Another Feature

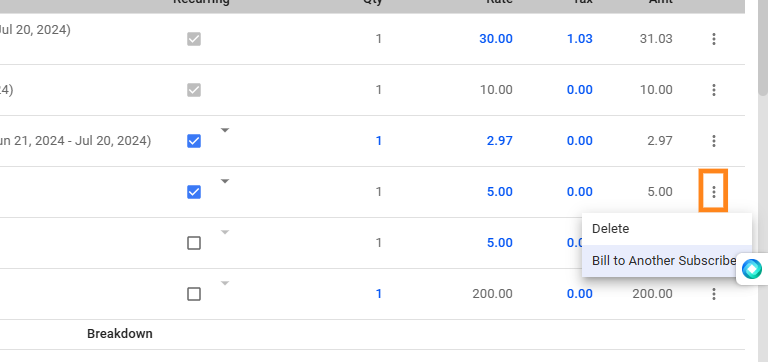
10. Search for the subscriber or select from the list.

11. Click on the three dots or vertical ellipsis.
The available options will allow you to delete the line item or bill it to another subscriber. If you have a child account and need to charge your company for this item, click the three dots and then select the bill-to- another option.

Click on Bill to Another to open additional options for the line item.

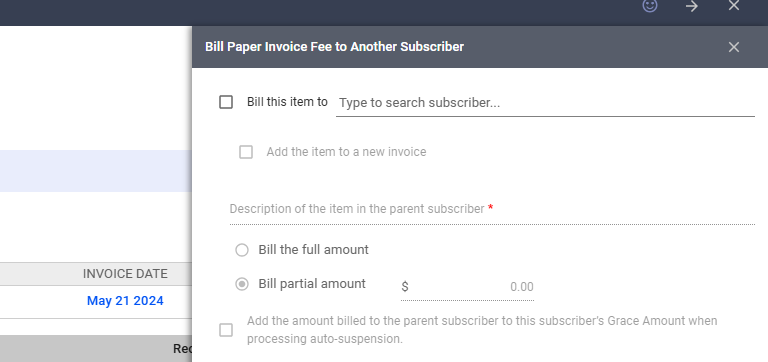
12. Here are the options available:

  1. Bill this item to (set subscriber name): This allows you to specify the name of the subscriber who will be responsible for the bill. This could be an individual or a company.
  2. Add the item to a new invoice: This creates a separate invoice for the transferred item, keeping it distinct from the parent account’s invoices.
  3. Description of the item in the parent subscriber: This option allows you to add a note or description of the item on the original subscriber’s account.
  4. Bill the Full Amount: This charges the entire cost of the item to the parent account.
  5. Bill Partial Amount: This lets you split the cost of the item between the child and the parent account. You can specify the amount to be charged to the parent account.

Add the amount billed to the parent subscriber to this subscriber’s Grace Amount when processing auto-suspension: This is a complex setting. The setting ensures that child customers are never suspended from the system. This feature allows the billed amount to be added to the child accounts grace amount (if auto-suspension is active).

    • When Auto-suspension is enforced even for child accounts, and If the parent account has not made payments yet, the child account may be suspended. To prevent this, a grace amount is implemented. As long as the grace amount is equal to or higher than the charge, the customer will never be suspended, while waiting for the parent account to pay the bill.
    • Grace Amount: This is the amount where a subscriber can delay payment without immediate consequences (like service suspension).
    • Auto-Suspension: This is an automated process that suspends service if a bill remains unpaid after the grace period.

Save your work when done.

Using Alerts for Parent and Child Setup

13. Open a Subscriber’s Profile

  1. Go to the Logs section by clicking on Logs at the header menu of the subscriber profile page.
  2. Or scroll down to the Logs section.
    • To the right most side of the the Logs section, click on the three dots or vertical ellipses

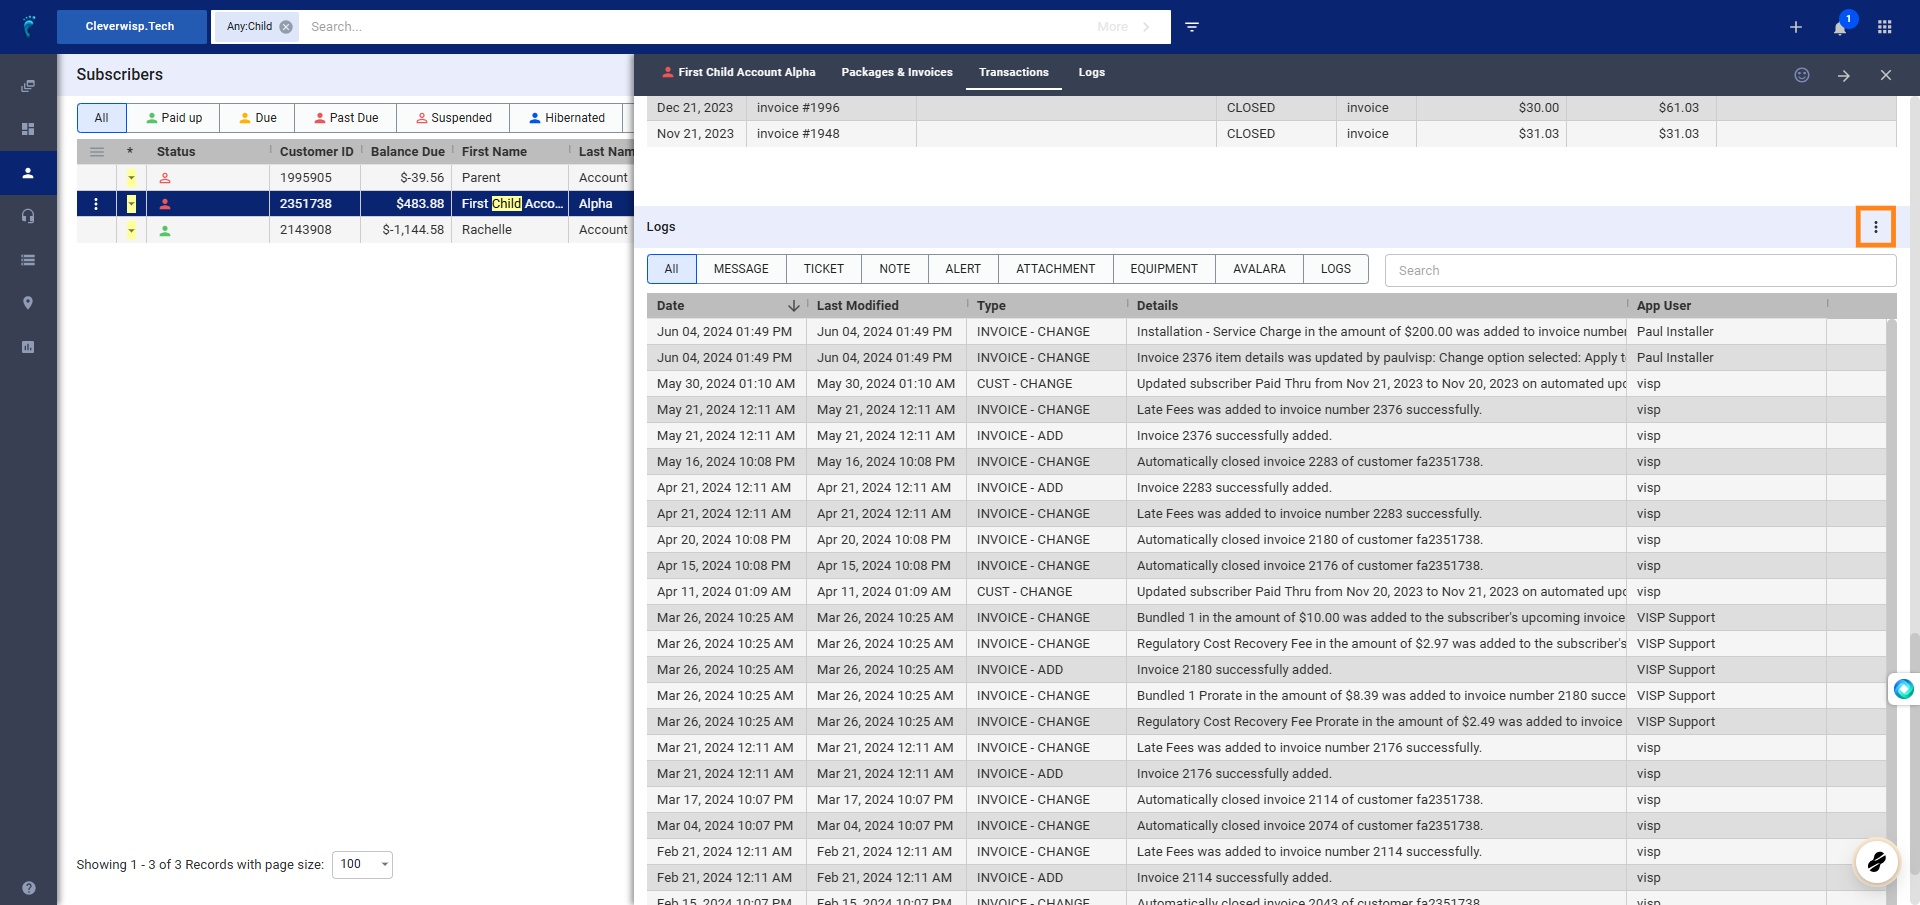
14. View Available Options

  • Send Email: Compose and send an email to the subscriber. This could be notification for invoices, payment reminders, account updates, etc.
  • Add Alert: Creates a banner alert at the top of the subscriber’s profile. This shows an upcoming task or event related to the customer’s account (e.g., following up on an overdue invoice, reviewing a contract).
  • Add Ticket: Open a support ticket for the customer, either for them to report an issue or to request assistance with their account or billing.
  • Add Note: Record a note about the customer or their account for future reference. This could be details about a conversation, specific requests, or any other relevant information.
  • Add Attachment: Attach files to the customer’s profile, such as contracts, invoices, payment confirmations, or other supporting documents.
  • Add Equipment: This is used to record and track devices associated with the customer’s account.
  • Add Scheduled Action: This contains two very specific functions:
    • Reschedule Late Fee – This allows you to delay when the late fee is applied.
    • Reschedule Suspension – This allows you to delay when the account is suspended.
  • View Scheduled Action: This allows you to view the Scheduled Actions for the specific customer.

Select “Add Alert”

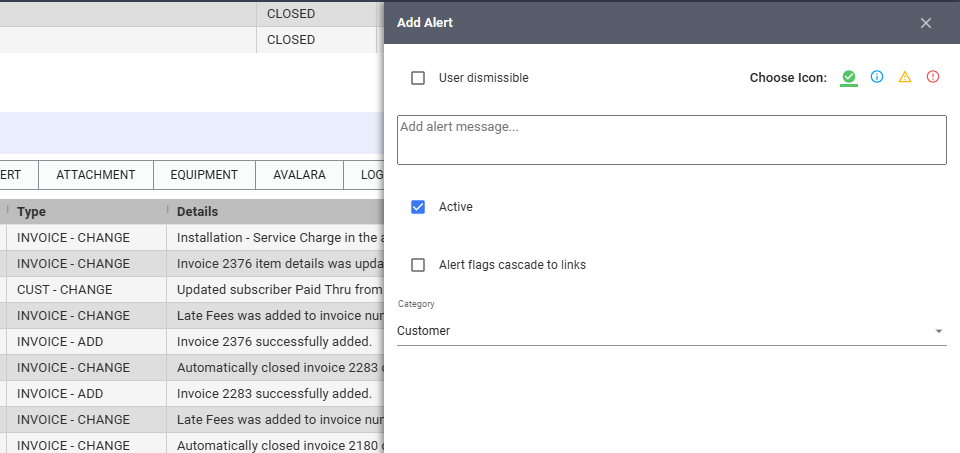
15. Options or Parts of an Alert
User Dismissible : Sets whether the user can manually close or remove the alert after seeing it.

Choose Icon : Select a visual icon (e.g., warning symbol, exclamation mark) to quickly convey the alert’s type or importance.

Add Alert Message : Write the actual text content of the alert, providing clear and concise information or instructions.

Active : Turn the alert on or off to control whether it’s currently visible and displayed to users.

Alert Flags Cascade to Links : If enabled, the alert will not only appear on the customer’s profile but also open any related or linked records within the account (e.g., an alert shows the associated category).

Category: In relation to the option above, choose the category that the alert relates or opens to.

Click on Add to save your settings.

Note: It may take a few minutes before your alert shows up on the customer’s profile.

Use Billing Contacts and Column Headers to Identify Parent-Child Accounts

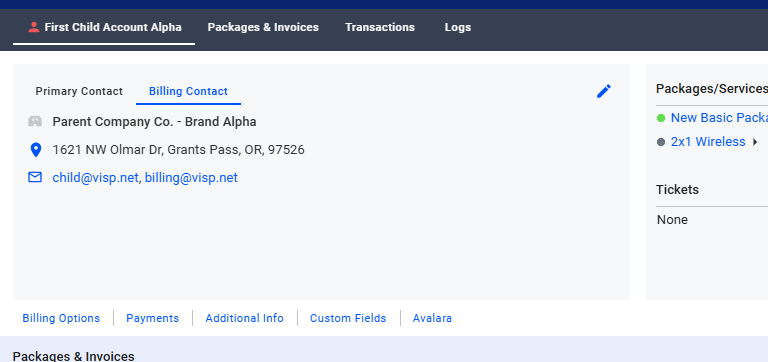
16. Display and Edit the Billing Contact Section
Add Company Name in the Billing Contact section. You can add a “Parent” word as prefix, to identify that this account is part of a parent-child setup.

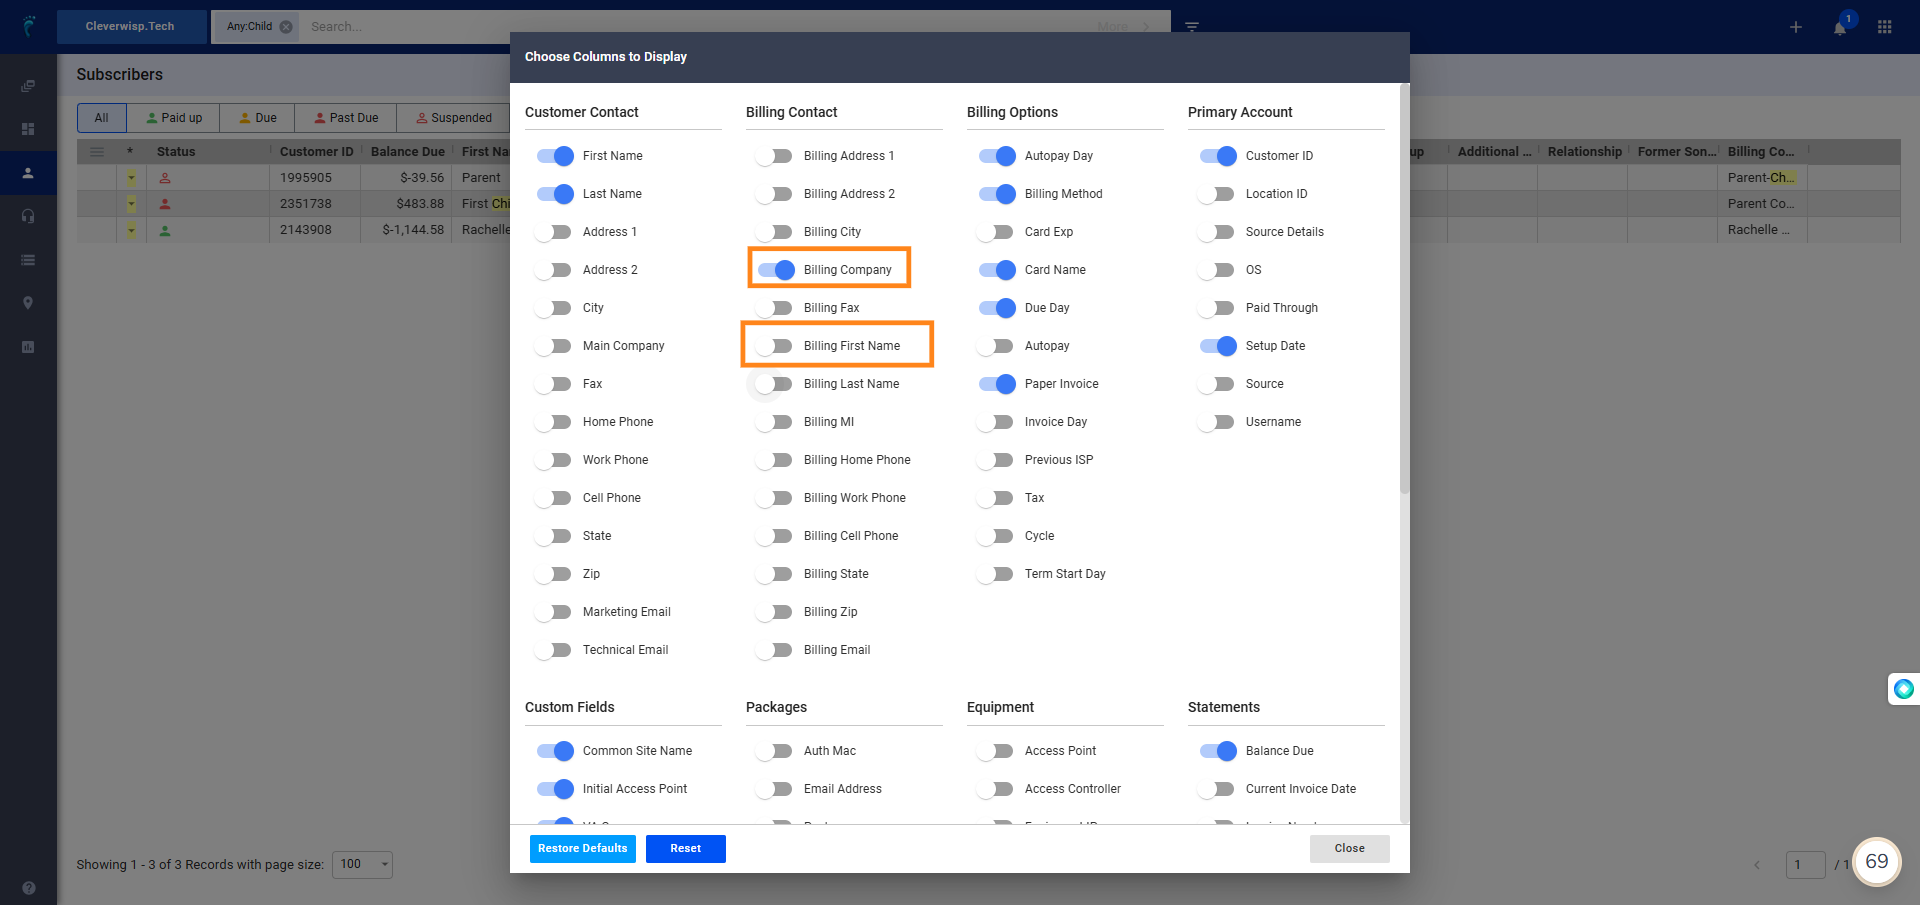
17. Enable Billing Contact Information Columns

  1. Click on the hamburger menu on the Subscriber table.
  2. Select Choose Columns

18. Display Billing Contact Details

  1. Toggle or enable Billing Company
  2. (Optional) Toggle or enable Billing First Name

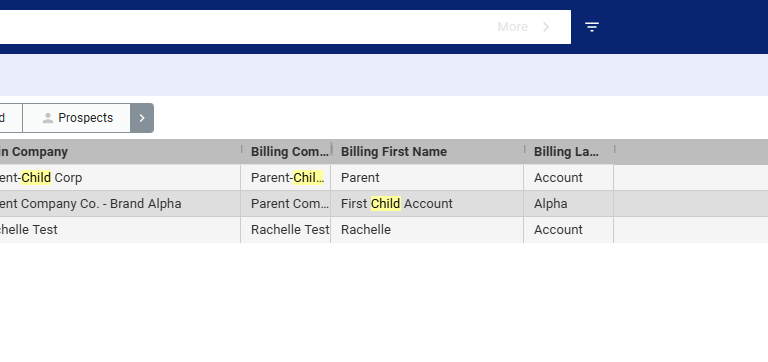
19. View the Parent-Child Account from the Subscribers’ List When Search for the Company Account
If you search for “Parent” or type the subscriber’s company, it will show all related relationships through the column headers.

💡 For more information about this and all other features in Visp, reach out to your Visp Client Success Team today.
Phone: 541-955-6900

Email: success@visp.net

Open a ticket via www.visp.net/ticket

Add Prospects or Subscribers

Add a new subscriber or prospect in Visp by filling out the required fields, completing billing details, and clicking “Add.” Optionally, auto-generate the username and password.

How to Update Customer Service and Billing Contact / Address Information

Update contact details in Visp by editing the customer profile, adjusting necessary fields, and saving changes. Add separate billing information if required

How to Set up a Parent Account with Linked Child or Sub-Accounts?

Set up parent-child accounts in Visp to manage multiple accounts and consolidate billing. Use the “bill all to another” feature to streamline payments.

Allow Customers to Create Their Passwords

When a new user is added to VISP, a password reset link is sent to their email for account setup. If the email is missing, a system-generated or manually created password is used.

Deleting a Subscriber

To delete a subscriber in VISP, select the subscriber, click the three dots, and choose “Archive.” To restore an archived subscriber, search in the Archive column, and select “Unarchive.”

(Workflow) Archive Subscribers

To archive a subscriber in VISP, ensure no outstanding balances, collect any equipment, and deactivate services before selecting “Archive.”

Options When a Customer is Archived

When archiving a customer in VISP, options include removing packages, writing off bad debt, and deleting saved card information after 90 days.

Subscriber Payment Workflow

Process one-time payments, save or add payment methods, and set up autopay and automatic retry options in VISP.

Workflow: Receive Check and Cash Payments in Visp

Process cash or check payments in VISP by selecting the payment method, entering details, and posting the payment for accurate financial records.

Process NACHA Payments

Activate NACHA in VISP for secure eCheck payments by configuring settings, setting NACHA as default, and processing payments while managing reports, refunds, and reversals.

Add a Package to a Prospect or Subscriber

Add a package to a prospect or subscriber in VISP by selecting a package, setting the billing date, activating the service, verifying devices, adding charges to invoices, and sending the invoice via email.

Enable and Configure Subscriber Alerts

Enable and configure subscriber alerts in VISP by adding alerts, customizing settings, choosing icons, entering messages, and setting navigation links to enhance team communication and streamline workflows.

Attach Files to Emails

Attach files to emails in VISP by using the paper clip icon in the email editor for mass emails or by clicking an email address in a subscriber’s profile.

Filters

Manage and customize subscriber lists in VISP by adding or editing filters through the search field to streamline operations and group subscribers based on specific criteria.

Add a New Filter

To add a new filter in VISP, access your Subscriber list, click the search bar, choose “New Filter,” set the data source, operator, and criteria, then save or email the filtered subscribers.

Create and Customize a Filter

Attach files to emails in VISP by using the paper clip icon in the email editor for mass emails or by clicking an email address in a subscriber’s profile.

Automate the Reactivation of Hibernated Packages

To automate reactivation of hibernated packages in VISP, enable auto-reactivation, set a reactivation date using the date picker, and save changes.

Workflow: Cancellation Surveys

Enable cancellation surveys in CRM, archive the subscriber with a reason, and view archived accounts in the Archived table.

Upgrade Subscriber Service or Package

To upgrade a subscriber’s package, add a new package, move active services to it, and confirm changes. The old package will become inactive automatically.

Suspend a Package

To suspend a subscriber’s package, select the subscriber, choose the package, and click “Suspend.” All services in the package will be suspended. To unsuspend, click “Unsuspend.”

Hibernate a Package

To hibernate a subscriber’s package, open their account, select an active package, and click “Hibernate.” This will stop billing until reactivation. Note: Only internet service packages can be hibernated.

Usage-Based Billing

Enable it in Main Menu > Billing Tab > Packages > Provisioning. For individual subscribers, configure settings under Usage-Based Billing in their package. Save changes.

How to Delete a Package

To suspend a subscriber’s package, select the subscriber, choose the package, and click “Suspend.” All services in the package will be suspended. To unsuspend, click “Unsuspend.”

Deactivate a Service

Select a subscriber, go to Packages and Services, expand the package, choose the service to deactivate, and click Deactivate.

Change or Update Subscriber Internet Speed

Select a subscriber > Packages > expand package details > go to Speed Limits to adjust speeds. Save.

Activate Package Hibernation

Learn how to activate package hibernation in Visp, enabling temporary suspension of internet services while allowing customization and reactivation options.

Activate a Package or Service

Learn how to activate packages or services for subscribers in Visp with step-by-step instructions.

Upgrade Packages via the Change Option

Learn how to upgrade packages in Visp using the Change option, including billing adjustments for pro-rated charges, credits, and next invoice scheduling.

Package Upgrade (Move Process)

Learn how to activate package hibernation in Visp, enabling temporary suspension of internet services while allowing customization and reactivation options.

Add and Configure Packages

Learn how to add and configure packages in Visp, including setting up package details, pricing, services, taxes, and speed limits, and managing package options.

Create a Package (Basic Guide)

Learn how to create and configure packages in Visp, including setting package details, pricing, services, and speed limits. Discover how to add services, set recurring rates, and manage provisioning options.

How to Add a Quote?

Discover how to add, customize, and send quotes in Visp, including adding packages and items, viewing PDFs, emailing quotes, and converting them to invoices.

How to Apply Credits to a Customer’s Account

Learn how to add and configure packages in Visp, including setting up package details, pricing, services, taxes, and speed limits, and managing package options.

ISP Logs

Discover how to use the ISP Logs section in Visp to review historical changes, filter data by date range, and access related documents like payments and equipment lists.

Enable Automatic Payment of Invoices to VISP.net

Enable automatic payment for your invoices in Visp.net by setting up billing reminders, adding a balance threshold, and scheduling payments.

Receive Payments

Learn how to add and configure packages in Visp, including setting up package details, pricing, services, taxes, and speed limits, and managing package options.

Managing Equipment in Archived Customer Accounts

Learn how to manage equipment in archived customer accounts in VISP, ensuring proper tracking and retrieval for ISPs dealing with high-turnover locations like apartments or condos.

Dashboard Customization Guide

Enable automatic payment for your invoices in Visp.net by setting up billing reminders, adding a balance threshold, and scheduling payments.

Packages & Invoices

Workflow: Adding New Items

Discover how to add new billing items in Visp using the Items Manager. Learn to create item profiles, assign codes, choose types, and manage activation with ease.

Workflow: Archive Customers

Learn how to archive customers in Visp, handle equipment returns, write off bad debt, remove expired cards, and manage cancellation surveys to maintain a clean customer database.

Workflow: Receiving Money Order Payments

Learn the step-by-step workflow for processing money order payments in Visp, from receiving and recording the payment to applying it to customer accounts and updating balances.

Workflow: Processing Refunds

Learn how to enable and process refunds or void transactions in Visp, including setting up refund permissions and reviewing transactions.

Update Billing Cycle

Learn how to update a subscriber’s billing cycle in Visp, including options to apply changes on the next invoice, reverse charges for unused days, or reverse charges for unused months.

How to Create a New Invoice and Add Invoice Items

Learn how to create new invoices and add or customize invoice items in Visp to streamline your billing process.

Edit an Invoice

Learn how to create new invoices and add or customize invoice items in Visp to streamline your billing process.

Delete an Invoice

Learn how to update a subscriber’s billing cycle in Visp, including options to apply changes on the next invoice, reverse charges for unused days, or reverse charges for unused months.

How to Void an Invoice?

Learn how to void an invoice in Visp by selecting the invoice from a subscriber’s Transactions tab and using the “Void this Invoice” option.

Add Equipment Charge to an Invoice

Learn how to add and configure equipment charges to a subscriber’s invoice in Visp to ensure accurate billing and equipment management.

How to Add a Credit Memo?

Learn how to add, view, and manage credit memos in Visp, including applying them to invoices and sending them via email.

Add a One-Time Discount

Learn how to apply a one-time discount to an invoice in Visp, including setting item details and configuring discount rates.

Adding a Credit or Debit Memo

Learn how to add a credit or debit memo to a subscriber’s account in Visp, including adjusting accounts receivable or payable with detailed steps and descriptions.

Recurring Discount

Discover how to add a recurring discount to future invoices in Visp by creating a custom line item and enabling the recurring option.

Bill-to-Another Feature

Learn how to apply a one-time discount to an invoice in Visp, including setting item details and configuring discount rates.

Add Scheduled Actions (Reschedule Late Fee / Suspension)

Discover how to reschedule suspensions and late fees in Visp by adding scheduled actions to adjust dates and manage payment extensions effectively.

Set Manual Invoice Dates

Learn how to manually set invoice dates in Visp, ensuring they align with package start dates and billing options for accurate invoicing.

Credit Memo

Learn how to apply a one-time discount to an invoice in Visp, including setting item details and configuring discount rates.

Refunds

Learn how to process refunds in Visp, including voiding transactions, enabling refund options in payment gateway settings, and handling refund policies.

Bill All to Another

Simplify billing with the “Bill All to Another” feature in Visp, allowing the transfer of all invoices and charges from a child account to a parent account.

Setup Multiple Payment Gateways for Different Billing Methods

Learn how to apply a one-time discount to an invoice in Visp, including setting item details and configuring discount rates.

Add Scheduled Actions (Reschedule Late Fee / Suspension)

Learn how to easily reschedule late fees or suspensions for subscribers in VISP using the ‘Add Scheduled Actions’ feature with step-by-step instructions.

Logs

Remove or Update Card Information

Learn how to remove or update card information in Visp, including adding a new card, enabling autopay, and setting up automatic retry for secure and efficient billing.
?