Documentation Series

Learn About VISP App Dashboard

Help Documentations / Equipment / IRM: Profiles and Metadata

IRM: Profiles and Metadata

To add a brand new site, tower, or equipment in the Infrastructure Resource Management or the IRM, you must first add a profile or template. These profiles simplify the process of adding new infrastructures and equipment, as well as collecting the metadata that provides critical information about your network.

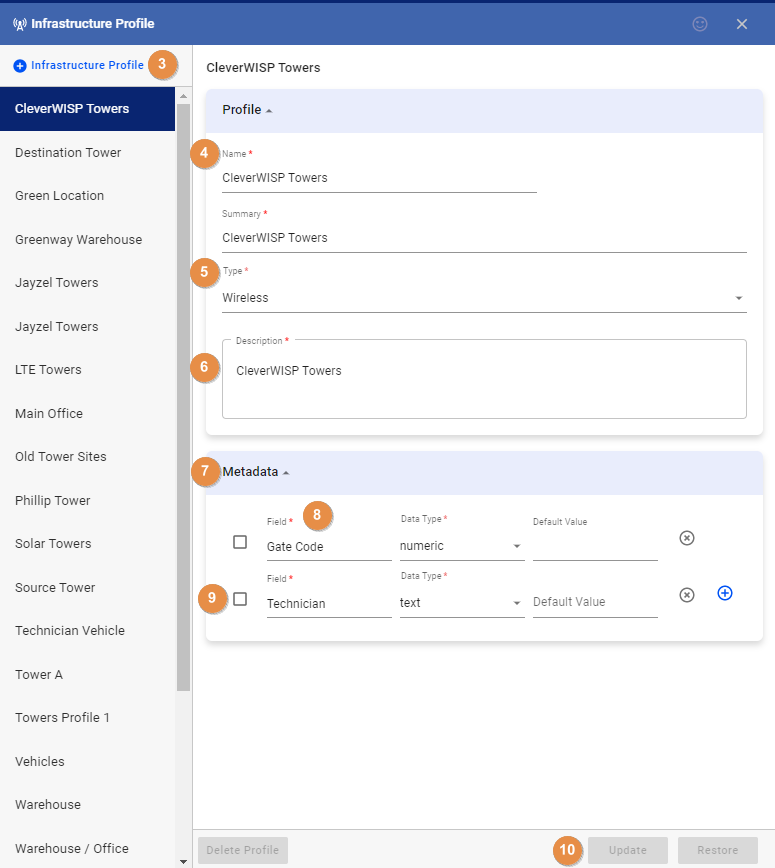
To add an infrastructure profile:

      1. Go to the Menu.
      2. Select the Equipment tab, and click on Infrastructure Profile.
      3. Click on the + plus sign to add a new infrastructure profile.
      4. Enter a name and summary.
      5. Select the type for your infrastructure.
        Suppose the infrastructure is a Wireless tower, select Wireless. If it is an office or a storage unit, then you can select the Warehouse type.
      6. Enter a description.
      7. The metadata section allows you to create custom fields for collecting data about your infrastructure or equipment.
        For example, you want to put the name of the technician in charge of tower maintenance, the gate code, and phone numbers to call in case of an emergency.
      8. To add metadata
        1. Click on the first field, and then add a label.
        2. In the next field, to the right, click on the dropdown.
          1. Select a data type – determine if you’re using the field to collect a text, a number, an integer, or a Boolean (containing a true or false statement.)
        3. In the last field, you can leave it blank or enter a default or sample value to show your users what to collect.
        4. Add or remove metadata fields by clicking on either plus or x-button.
      9. To mark metadata as required, toggle the checkbox before the first field.
      10. Click on the Add / Update button when you’re done.

IRM: Profiles and Metadata - Visp Web App Documentation

Next, to create a profile for a device, go to the menu.

Before we continue, let me explain the two parts of a device record in VISP. A device record is composed of an inventory profile and an equipment profile. The inventory profile stores data like the model, manufacturer, and SKU. The equipment profile contains the device’s metadata and equipment type. [If you want to closely track a particular device record, from the time it is purchased from a vendor until it gets to your inventory, and then deployed to your customers, then the serial number of the device is required. You can enter batch or order numbers, IP addresses, or MAC addresses instead of serial numbers, if you’re not closely tracking the inventory records.]

      1. Click on the Equipment tab
      2. Select Inventory profile.
      3. Click on the + plus sign to add a new inventory profile.
      4. Add the Model, Manufacturer, SKU, or Stock Keeping Unit of the device.
      5. If you want to get notified when your stocks are low, you can create or set up an automation profile. Here are the steps:
        1. Click on the dropdown and select Add New.
        2. Add a description for your profile.
        3. Set a limit on how low your stocks can go before the notification goes out.
        4. In the Low Stock action field, two options are available – to order new stocks or to simply send a notification to specific users. The order option will be explained in a separate video. For now, we’ll select notify.
        5. Select a preferred Vendor for this order.
        6. And choose a User that will get the notification.
        7. The automation profile type gives you an idea of whether this automation is based on your reorder level (stock), a calculated rate based on a specific metric, or both. If you’re only reordering when your stocks go below a certain level, then you can select Stock from the dropdown.
        8. Save your work when done.
      6. Select the automation profile from the dropdown.
      7. Next, add a description for this device.
      8. Toggle metered if the item or device you are creating a profile for can be measured and sold in meters.
      9. Click on Add / Update when you’re done.
      10. After you add the inventory profile, check if the equipment appears on your list of available profiles.
      11. Click on the profile
        1. You will find two new tabs – one for the Equipment Profiles and another tab for the Vendors.

IRM: Profiles and Metadata - Visp Web App Documentation

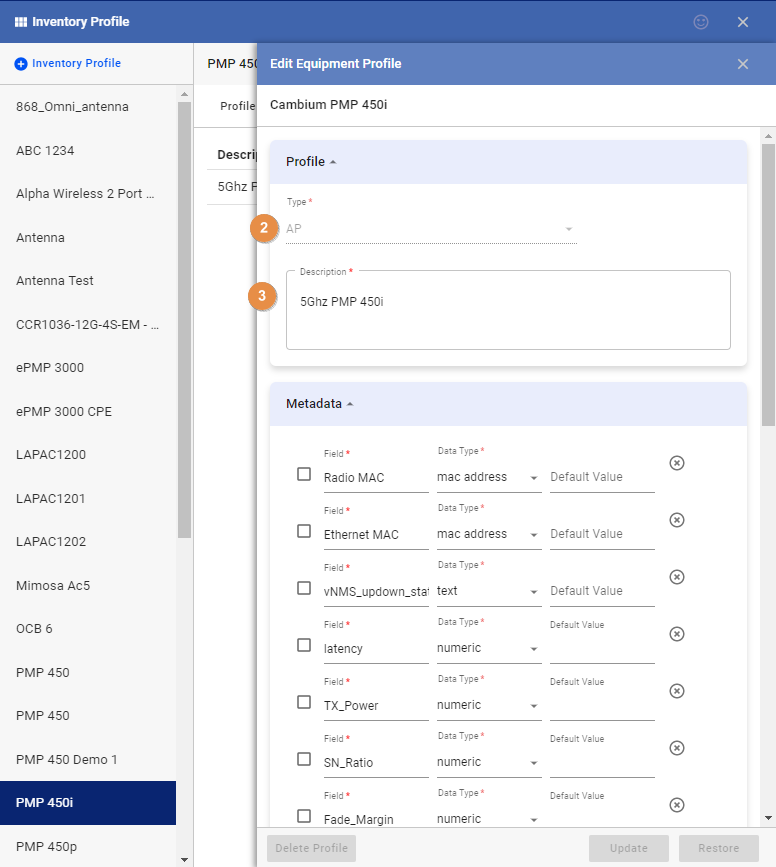
Now, select the Equipment Profiles tab.

      1. Click on Create Equipment Profile.
      2. Select the equipment type – determine whether the device is going to be used as an AP, a CPE, PtP, PMP, or a router.
      3. Add a description for the device.

The metadata section allows you to create custom fields for collecting data about your equipment.

      1. Click on the plus sign to add more fields, or click on the X to remove fields.
      2. To mark metadata as required, toggle this checkbox.
      3. Click on Add / Update when you’re done.

IRM: Profiles and Metadata - Visp Web App Documentation

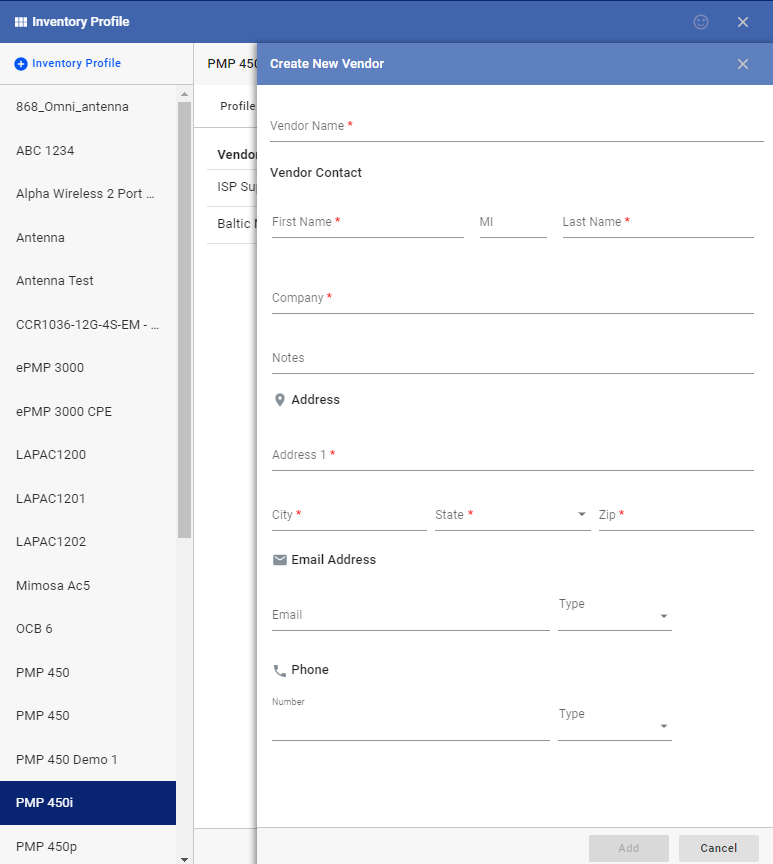
To select or create a vendor profile for the equipment you are adding, click on the Vendors tab.

      1. To add an existing Vendor, click the Add Vendor link and select one from the list.
      2. Click on Create Vendor to create a new profile.
      3. Add the contact information for your vendor.
      4. Fields with a red asterisk are required.
      5. Click on Add when you’re done.

IRM: Profiles and Metadata - Visp Web App Documentation

You have successfully added the necessary profiles for your sites, towers, equipment, and vendors.

Watch our next video for the process of adding new infrastructures and devices.

For more information about this and all other features in VISP, reach out to your VISP Client Success Team today.

1. Assigning and Unassigning Equipment

Assigning Equipment 1. Using the Equipment Manager Open the Equipment Manager and go to the Inventory tab. Select the equipment profile you’d like to assign. On the equipment profile, search and select the equipment, then click on the “Assign to Subscriber” button….

2. Receive Inventory

Receiving inventory or a new device in VISPrequires an equipment profile. If Equipment profile is already configured, follow the steps below to receive or add new equipment into VISP: Navigate to the Equipment > Hamburger menu > Click Add Inventory In the Add…

3. Add ISP Tower or Site Location

The ISP Tower or Site Location gives you an overview of the Towers/Site that you installed with their corresponding address. Additional features include automatic calculation of revenue per site and accounting for expenses that were set. To add a Site Location or ISP…

4. IRM: Profiles and Metadata

To add a brand new site, tower, or equipment in the Infrastructure Resource Management or the IRM, you must first add a profile or template. These profiles simplify the process of adding new infrastructures and equipment, as well as collecting the metadata that…

5. Equipment Accounting Controls

Manage and control how your equipment is being handled by the software with accounting controls. To enable this feature, go to the Main Menu > Equipment > Equipment Accounting Controls and check the “Enable Equipment Management Features” checkbox. This will…

6. Inventory Locations

The Inventory Location determines where devices are stored or the type of storage that houses your equipment. This can include the warehouse or the storage unit of your suppliers. To add an inventory location, for your equipment inventory, click on the menu. Go to…

7. IRM: Add Infrastructure and Equipment

To add an infrastructure, like a site or tower, a warehouse, or even your technician’s vehicle, go to the infrastructure locations panel and click on the plus sign. Add a name to this infrastructure. Select an Infrastructure profile from the dropdown. Input the…

8. Add a Purchase Order

Before you begin, ensure that the Vendor’s information is added to the profile of the equipment you’re planning to purchase. You can verify by going to the Inventory profile of that equipment. To get there, go to the menu, click on Equipment, and select Inventory…

9. Add a Purchase Order

Before you begin, ensure that the Vendor’s information is added to the profile of the equipment you’re planning to purchase. You can verify by going to the Inventory profile of that equipment. To get there, go to the menu, click on Equipment, and select Inventory…

10. IP Management (IPAM)

To setup IPAM: First, click on the menu Go to your Equipment tab Click on the IP Management panel. In the Subnets tab: Click on Add New Subnet Fill out the Network field, which contains your IP and slash notation. The Gateway field automatically populates after you…

11. IP Management (Subscriber Settings)

After adding your IP addresses via the IP Address Management (IPAM) tool, it’s time to populate them to your customers’ devices. Open your customer’s account and go to Packages Click on the service and open Devices Click on the vertical ellipsis for a specific device…

12. Avalara

Before you begin, ensure that the Vendor’s information is added to the profile of the equipment you’re planning to purchase. You can verify by going to the Inventory profile of that equipment. To get there, go to the menu, click on Equipment, and select Inventory…

13. Wireless Infrastructures

How to Create a Wireless Infrastructure Profile? 1. Open the Visp Web App 2. Click the nine-dot menu in the upper right corner to open the VISP Admin Page. 3. Click on Equipment 4. Select Infrastructure Profile 5. Click on Infrastructure Profile An Infrastructure…

14.How to Access the Infrastructure Resource Management (IRM)

The IRM or the Infrastructure Resource Management feature in Visp allows you to efficiently manage and optimize the infrastructures (sites, warehouses, etc.) and…

15. Add Access Point and Antenna

1. Required Equipment for Displaying Coverage Maps Wireless Infrastructure Location (Sub-Location / Sector) Create Profile and Add Equipment for AP + Antenna Assembly Configure Metadata for Azimuth, Beamwidth, and Range in your Antenna Profile How to Add the AP…

16. Assign Equipment to User Accounts and Connect to Access Points

Add Equipment to a Subscriber Account 1. Click on Subscribers 2. Search for the subscriber or select from the list. 3. Go to the Equipment Panel. 4. Click on the blue plus icon. 5. Choose a Subscriber or CPE-type device using the “Add Equipment” window. 6. Use the…

17. Infrastructure Resource Management (IRM)

The IRM or the Infrastructure Resource Management feature in Visp allows you to efficiently manage and optimize the infrastructures (sites, warehouses, etc.) and infrastructure resources (network devices, servers, etc) in a centralized platform. 1. Outline of Setup…
?