

Step 1: Configure RADIUS Servers
Follow the instructions on this page to configure the RADIUS servers.
Step 2: Configure IP Addresses
- Add the IP addresses on the customer-facing interface that will be used as the gateway IP for active subscribers (probably the bridge named ‘Customers`).
- Address: Ex: 100.64.1.1/24.
- Optional: Add Subscriber Management IP addresses on the appropriate VLAN interface.
- Address: Ex: 10.2.1.1/24
Note: It is also best practice to document the subnet with meaningful comments.
Step 3: DHCP server setup
- Open winbox, navigate to IP > DHCP Server on the router
- Click on the DHCP Setup button
- Select the interface where you want to configure the DHCP server from the drop-down menu and proceed.
- Configure the following parameters:
- Put your LAN network block in the DHCP address space input box, then click the Next button.
-
-
LAN Network Block: Input the network block for the DHCP server.
-
Gateway Address: Specify the gateway IP for the network.
-
IP Address Pool: Define the IP range to allocate to clients.
-
Preferred DNS Server: Provide the DNS server’s IP address.
-
IP Lease Time: Suggested value is 10 minutes.
-
-
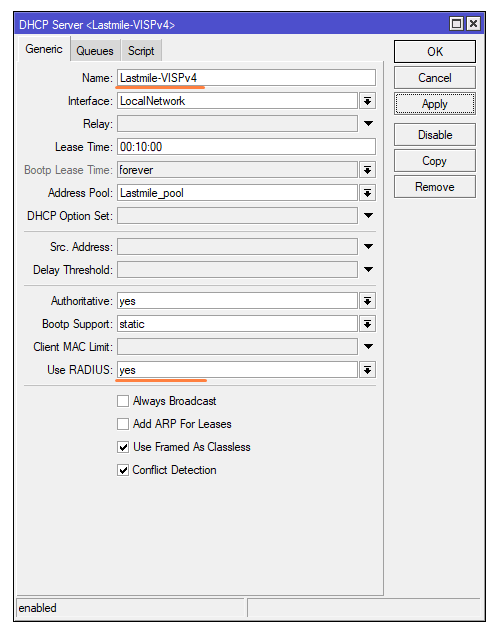
- Set the RADIUS option to “Yes”.
- Lastly, rename the DHCP server, and add a “-VISPv4” (case sensitive) suffix to it. IE: “Lastmile-VISPv4”
Critical Note: When using UBNT devices, the radio acts as a DHCP relay when option-82 is enabled. Because of this, we have to set a DHCP relay (255.255.255.255) on the server to process all incoming requests from any radio.
Step 4: Optional – Enable ARP Payment Enforcement Protection
This step ensures that only clients with IP addresses assigned by the DHCP server can access the network, preventing unauthorized static IP configurations.
- Set ARP to Reply-Only on the customer-facing interface (bridge or physical).
- Enable the Add ARP for Leases option on the customer access DHCP server.
Step 5: Configure NAT for Active Subscribers
If using private IP addresses, configure NAT either at the tower or core.
- General / Chain: srcnat
- General / Src Address: 100.64.1.0/24 (adjust based on your customer IP pool)
- Action / Action: masquerade or src-nat (recommended for resource efficiency) with a specified
to-address.
Step 6: Configure Firewall and Redirection Page for Suspended Subscribers.
- Generate Firewall rules by clicking the button below.
- After downloading the file, upload it to the Mikrotik router by dragging it to the file directory.
- Open the terminal window and run the following command:
/import verbose=yes file-name=firewall.cfg.rsc
Step 7: Configure Queues
- Navigate to the Queue Types tab.
- Double-click
default-smalland change the Kind value tosfq.
Important Reminder: When using Option-82 authentication, ensure the multi-mac option is enabled in the VISP package.