Documentation Series

Learn About VISP App Dashboard

Help Documentations / Extensions / Google Calendar Integration

Google Calendar Integration

You have the ability in VISP to schedule a fixed or a flexible date and time on tickets. Scheduled tickets are displayed on the calendar with additional information about the task and the assigned technician. However, if you wish to use Google calendar for it, here’s how to integrate Google Calendar to schedule your tickets in the Ticket and Schedule Manager to maximize your technicians’ time addressing tickets.

To start the integration, here are the steps to follow:
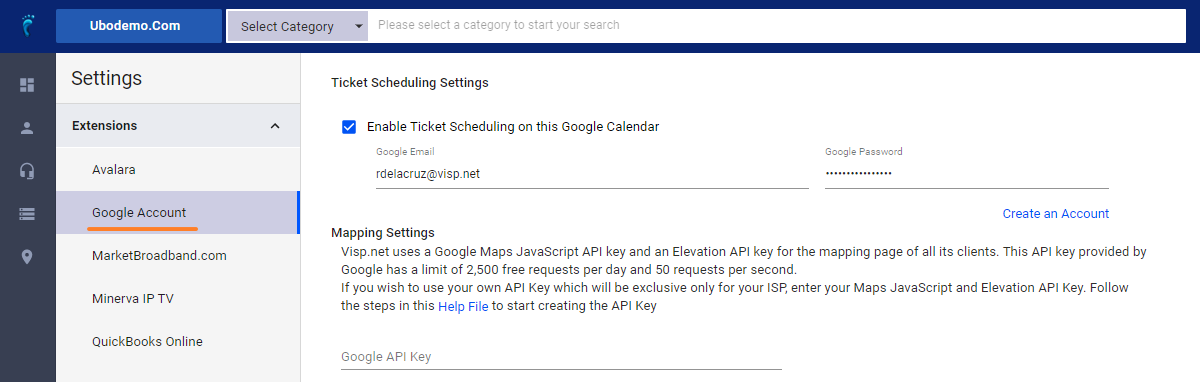
  1. Go to Main Menu > General tab > Extensions > Google Account.
  2. Check the Enable Ticket Scheduling Feature checkbox.
  3. Add in your Google account by entering your Google email and password.
  4. Click the Save button.

Google Calendar Integration - Visp App

Things to Remember:

  1. This is a master calendar used for scheduling tickets such as onsite installs and repairs.
  2. All tickets scheduled will appear on this master calendar, so it’s a good idea to use a dedicated account and not a personal account.
  3. Any app user can be set as a technician which means that tickets that are assigned to them and scheduled on this calendar will appear on their own calendar as long as it’s been set up for their VISP account.

Authorize VISP to Access Google Calendar

In order to continue connecting your Google Calendar with VISP, you would need to allow access for VISP to access the calendar. This is just a one-time authorization,  won’t be required to do it again.

Here are the steps to follow:

  1. When scheduling a ticket or syncing tickets, a popup would appear:
    Google Calendar Integration - Visp App
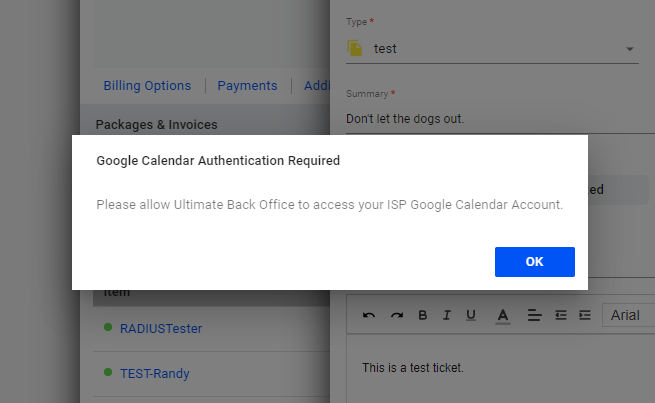
  2. After clicking OK, your default browser will open the Google authorization page. If there is no existing Google account logged-in, and after login, the browser will warn that Google hasn’t verified the application. Click on Advance and Go to userservices.net.
    Google Calendar Integration
  3. On the Google Authorization page, click the Allow button to allow VISP to access the Google Calendar of the account.
  4. You will be notified that you have successfully authorized VISP to access your calendar. You can now go back to the software and continue your tasks.

1. Preseem Integration

How do I connect my VISP system with Preseem? How It Works Preseem polls VISP for information about site equipment and customers. Site equipment is read into Preseem’s model of (Tower, Sector). APs are SNMP polled using the IP address in UBO. Packages and their speed…

2. VISP API

VISP chose GraphQL for our API because of the capability that it has. It only requires one endpoint, making maintenance easier and always up to date. Retrieving data for the user becomes easier as they customize their requests to only get the data that they need….

3. MarketBroadband.com Integration

MarketBroadband.com has been helping ISP’s and other home service providers execute highly effective marketing programs for over 20 years. Here’s how to integrate it with VISP. On the Main Menu, go to Settings > Extensions > MarketBroadband.com. Check the Enable…

4. Google Calendar Integration

You have the ability in VISP to schedule a fixed or a flexible date and time on tickets. Scheduled tickets are displayed on the calendar with additional information about the task and the assigned technician. However, if you wish to use Google calendar for it, here’s…

5. Quickbooks Online Integration

Requires: Quickbooks Online Account Reminders to ISPs: Data is passed from VISP to Quickbooks Online in a one-way sync. No data is transferred or synced from Quickbooks to VISP. To integrate QuickBooks Online with VISP, follow these steps: Login to QuickBooks Online…

6. Setting up an SSL Certificate – Hosting Service

Introduction to SSL Manager 1. Log in to your website control panel under Quick Access; click on Web Apps 2. From the Web Apps Overview Menu, open the Security toggle tab and select SSL Manager. 3. To get to the SSL Manager, click Install. It is recommended that you…

7. API and Integrations

Email: success@visp.net, or call 541-955-6900. You can also send a message via RingCentral or create a ticket here www.visp.net/ticket, for this request. API Credentials like the one below will be shared with you via secure note/email, once your request…

8. Configure Global Package IP and MAC Settings [Preseem]

1. Click the nine-dot menu in the upper right corner to open the VISP Admin Page. 2. Click on Billing 3. Select Packages 4. Click on the gear icon on the upper right of the panel. 5. Enable “Auto-update MAC address for single-device internet services during…

Avalara

a. Setup and Use Avalara for Taxes

1. Click the nine-dot menu in the upper right corner to open the VISP Admin Page. 2. Click on Extensions. 3. Select Avalara 4. Toggle, “Enable Avalara Integration. 5. Choose Sandbox 6. Enter your Avalara Username, Password, and Client ID. Client Profile ID defaults to…

b. Enable Avalara in the Subscriber’s Account

1. Click and open the Subscribers list. 2. Search for the subscriber or Select from the list. 3. Click on Avalara 4. Use the dropdown to select an “Avalara Sale Type” 5. Select the “Avalara Customer Type.” 6. Toggle “Lifeline Participant,” if the customer is a Federal…

c. Setup Avalara for Packages

1. Click the nine-dot menu in the upper right corner to open the VISP Admin Page. 2. Click on Billing 3. Select Packages 4. Select the package for edit and click on the three dots. 5. Click on Edit 6. Click on Tax 7. Toggle, “Avalara Tax 8. Choose a Transaction Type…

d. Avalara Tax Configuration for Set-up Fee

To set up Avalara for your Items, do the following: 1. Click the nine-dot menu in the upper right corner to open the VISP Admin Page. 2. Choose Billing. 3. Select Items. 4. Click on Fee. 5. Type the package name on the search bar. 6. Click on the Item you want to edit…
?